How to Build a HIPAA Compliant Telehealth App for Android (Zocdoc Clone)
By Wajahat Karim • 10.Feb.2021
A major result of the Covid-19 pandemic has been the rapid widespread adoption of telehealth technologies. Usage of apps like Zocdoc have grown dramatically, and have allowed patients to connect with their doctors virtually through text chat and audio/video calls. The demand for these and similar services has skyrocketed, with no indication it will slow down, even after the pandemic is over.
As an indie Android developer, advanced chat features like read receipts or push notifications in your healthcare app can be tricky and therefore time-consuming to implement which is why I look to CometChat.
CometChat is a flexible developer tool that bridges the gap between what users expect (a complete chat experience) and the technical requirements we get as Android developers. In this tutorial, we will build a simple clone UI of Zocdoc app with some functionality through which patients and doctors can communicate directly using the open-source CometChat Java Chat UI Kit.

As you can see in the above GIF demo, on the left side, patient logs in and on the right side, doctor logs in. Patient searches the doctors, and initiate a chat with one. On the right side, doctor receives the message from patient and answers her back.
I encourage you to follow along but if you’re keen to read the source code, you can find it on GitHub.
{{% linkpreview title="wajahatkarim3/ZocDoc-Clone" subtitle="ZocDoc UI clone is an Android Demo app (using CometChat Pro and Java Chat UI Kit) for a fully functional messaging app between doctors and patients." link="https://github.com/wajahatkarim3/ZocDoc-Clone" thumbnail="https://avatars.githubusercontent.com/u/8867121?s=400&v=4" %}}
To help you know what to expect, in this tutorial we will discuss about:
- A basic UI clone of Zocdoc app with themes and colors
- User authentication with Firebase and connecting it to CometChat
- Patients can view a list of doctors and their profiles.
- Patients can make a chat with any doctor through their profile
- Doctors can see all the existing patients conversations
- Doctors cannot initiate a chat with any patient directly.
- Integration of chat and conversations screen with features like read receipts, unread messages etc.
Building Zocdoc UI
The first step is to develop the basic user interface flow of the app in a way that it looks like Zocdoc app. Since this article is focused on CometChat UI Kit, so I have already created the Zocdoc clone UI. This basic app provides some screens such as Home, Doctors Search, Doctor Profile, Chat, Conversations, Login, Signup etc. It should be noted that I have not implemented any appointment bookings, calendar, or more advanced features found in the original Zocdoc app. Rather, this is a starting point for you to follow along and see how CometChat is integrated in any existing app to add chat functionality. The code is uploaded to a branch called start-here.
{{% linkpreview title="wajahatkarim3/ZocDoc-Clone start-here" subtitle="The start-here branch of ZocDoc-Clone repository" link="https://github.com/wajahatkarim3/ZocDoc-Clone/tree/start-here" thumbnail="https://avatars.githubusercontent.com/u/8867121?s=400&v=4" %}}
Assuming you are comfortable with Git you can run this command to download the repository:
git clone -b start-here https://github.com/wajahatkarim3/ZocDoc-Clone
Once downloaded, open this project in Android Studio and run this in any emulator or Android device. I am using Android Studio 4.1.2 stable version, but the app should run on any version from 3.2 or later.
Once your app is ready, you can see that the app has dummy data on all screens. This code includes different Activity, Fragment, RecyclerView, adapter classes, XML layout files, and resources etc.
Let’s get into some basic overview of the code. The app utilizes Material Components to create the white-yellow color theme of the app. You can see the different styles like Theme, Toolbar, Text etc. in the themes.xml file. The app comes with two flows:
Patients
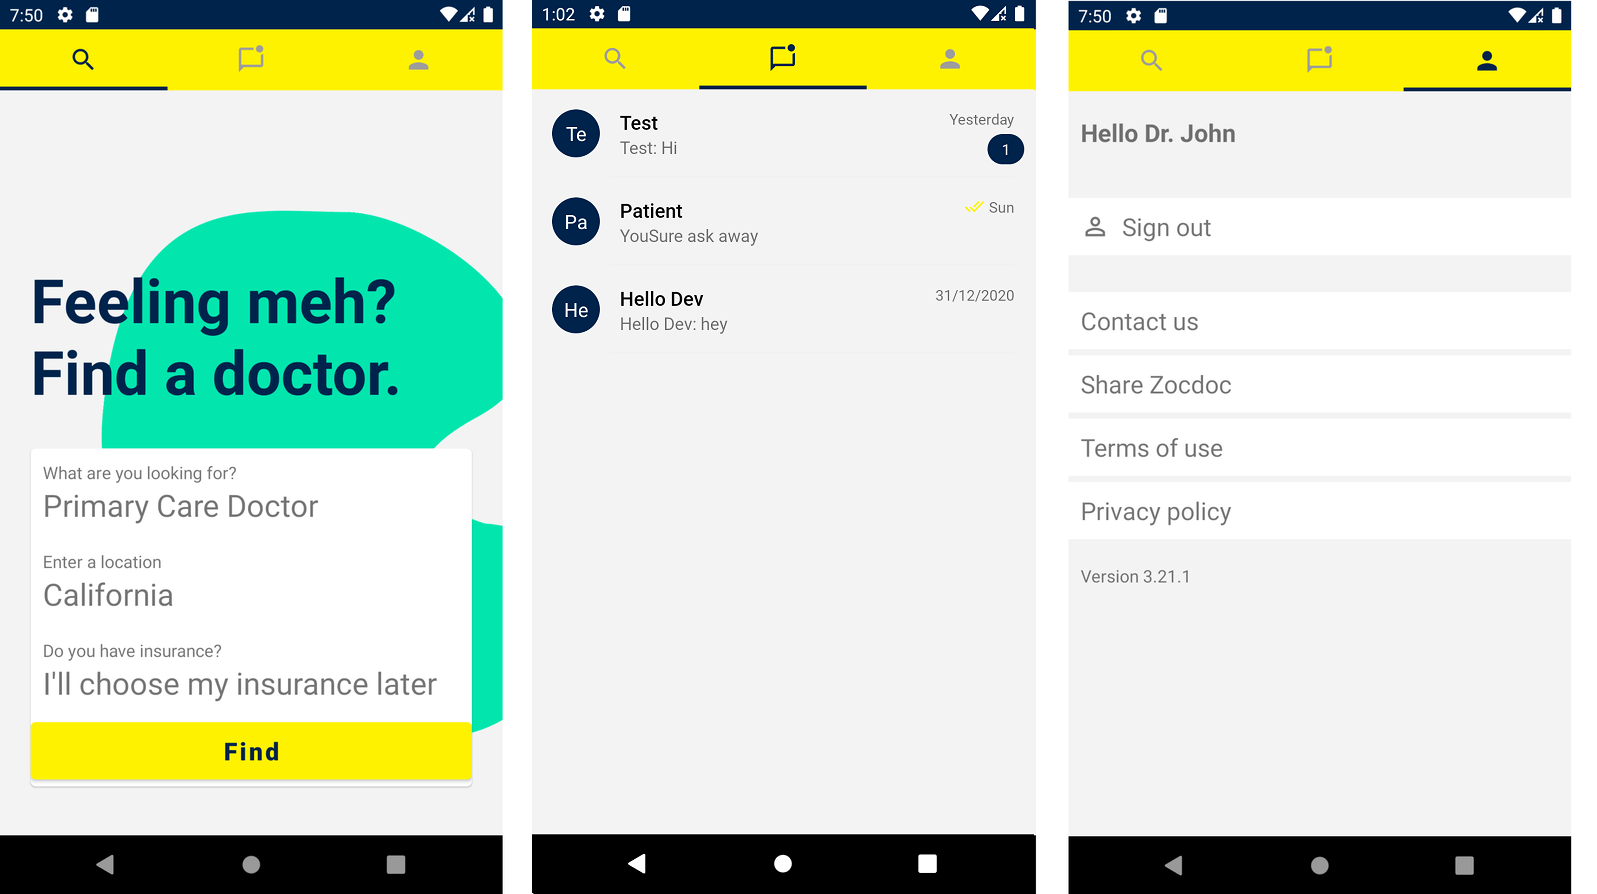
On the app launch, the splash screen checks if the current logged in user is doctor or patient. If its patient, it shows the patient flow defined in the MainActivity.kt file. This shows the tab screens such as Search, Appointments, Recommendations, Medical Team, and Profile. Each of these are in separate Fragment files with basic UI and dummy data. Almost all the click listeners and events are preset in method setupViews() in every Fragment or Activity class.
The patient can search doctors with Care type, insurance, and location (SearchFragment.kt). Since this app is only focuses on the chat part, so all the data shown in the app is random regardless of which type you choose. Once you press the Find button, then it shows the list of doctors (DoctorsSearchActivity.kt) with available time slots. On selecting any, it shows the doctor details such as biography, available slots, address, and reviews. This screen (DoctorDetailsActivity.kt) also includes a button Chat with Doctor through which a patient can chat with doctor. This button will only be visible when user is logged in. At this time, this button opens an empty screen. In this tutorial, we will implement the functionality and see how CometChat works.

Doctors
The doctors app flow is almost similar. Except, it shows three tabs - Search, Conversations, and Profile. The profile and search has same UI and functionality as in the patients. The only difference is the Conversations screen, where a doctor can see list of all the patients who have talked to this doctor. Since the doctor cannot initiate chat with any patient directly, so this screen will only show the conversations which has been started by patients themselves.
Here are some other things to know about the app code:
- Kotlin: The code is written in Kotlin language and it doesn’t utilize any kind of architecture like MVVM in order to make things easier to understand.
- ViewBinding: To bridge the gap between XML and Kotlin, app utilizes View Binding feature. But since, CometChat SDK uses the Data Binding, that’s why you will find both ViewBinding and DataBinding enabled in the app.
- Adapters: I have not created any Adapter classes for RecyclerView. I have used a third-party library Lite Utilities which gives the adapters for RecyclerView in a short and simple way.
- Image Loading: For the image loading such as doctor’s profile picture, I have used Coil library.
- UI Components: For the star rating of doctors, I have used ExactRatingBar library. The bio section of doctors is in the Markdown, so I have used Markwon library.
Setting up CometChat
Once we have our app’s UI ready, its time to integrate the actual chat functionality. We will do this through CometChat SDK. First, you need to create your CometChat application with a unique identifier. We will later specify this identifier in our Kotlin code when connecting to CometChat.
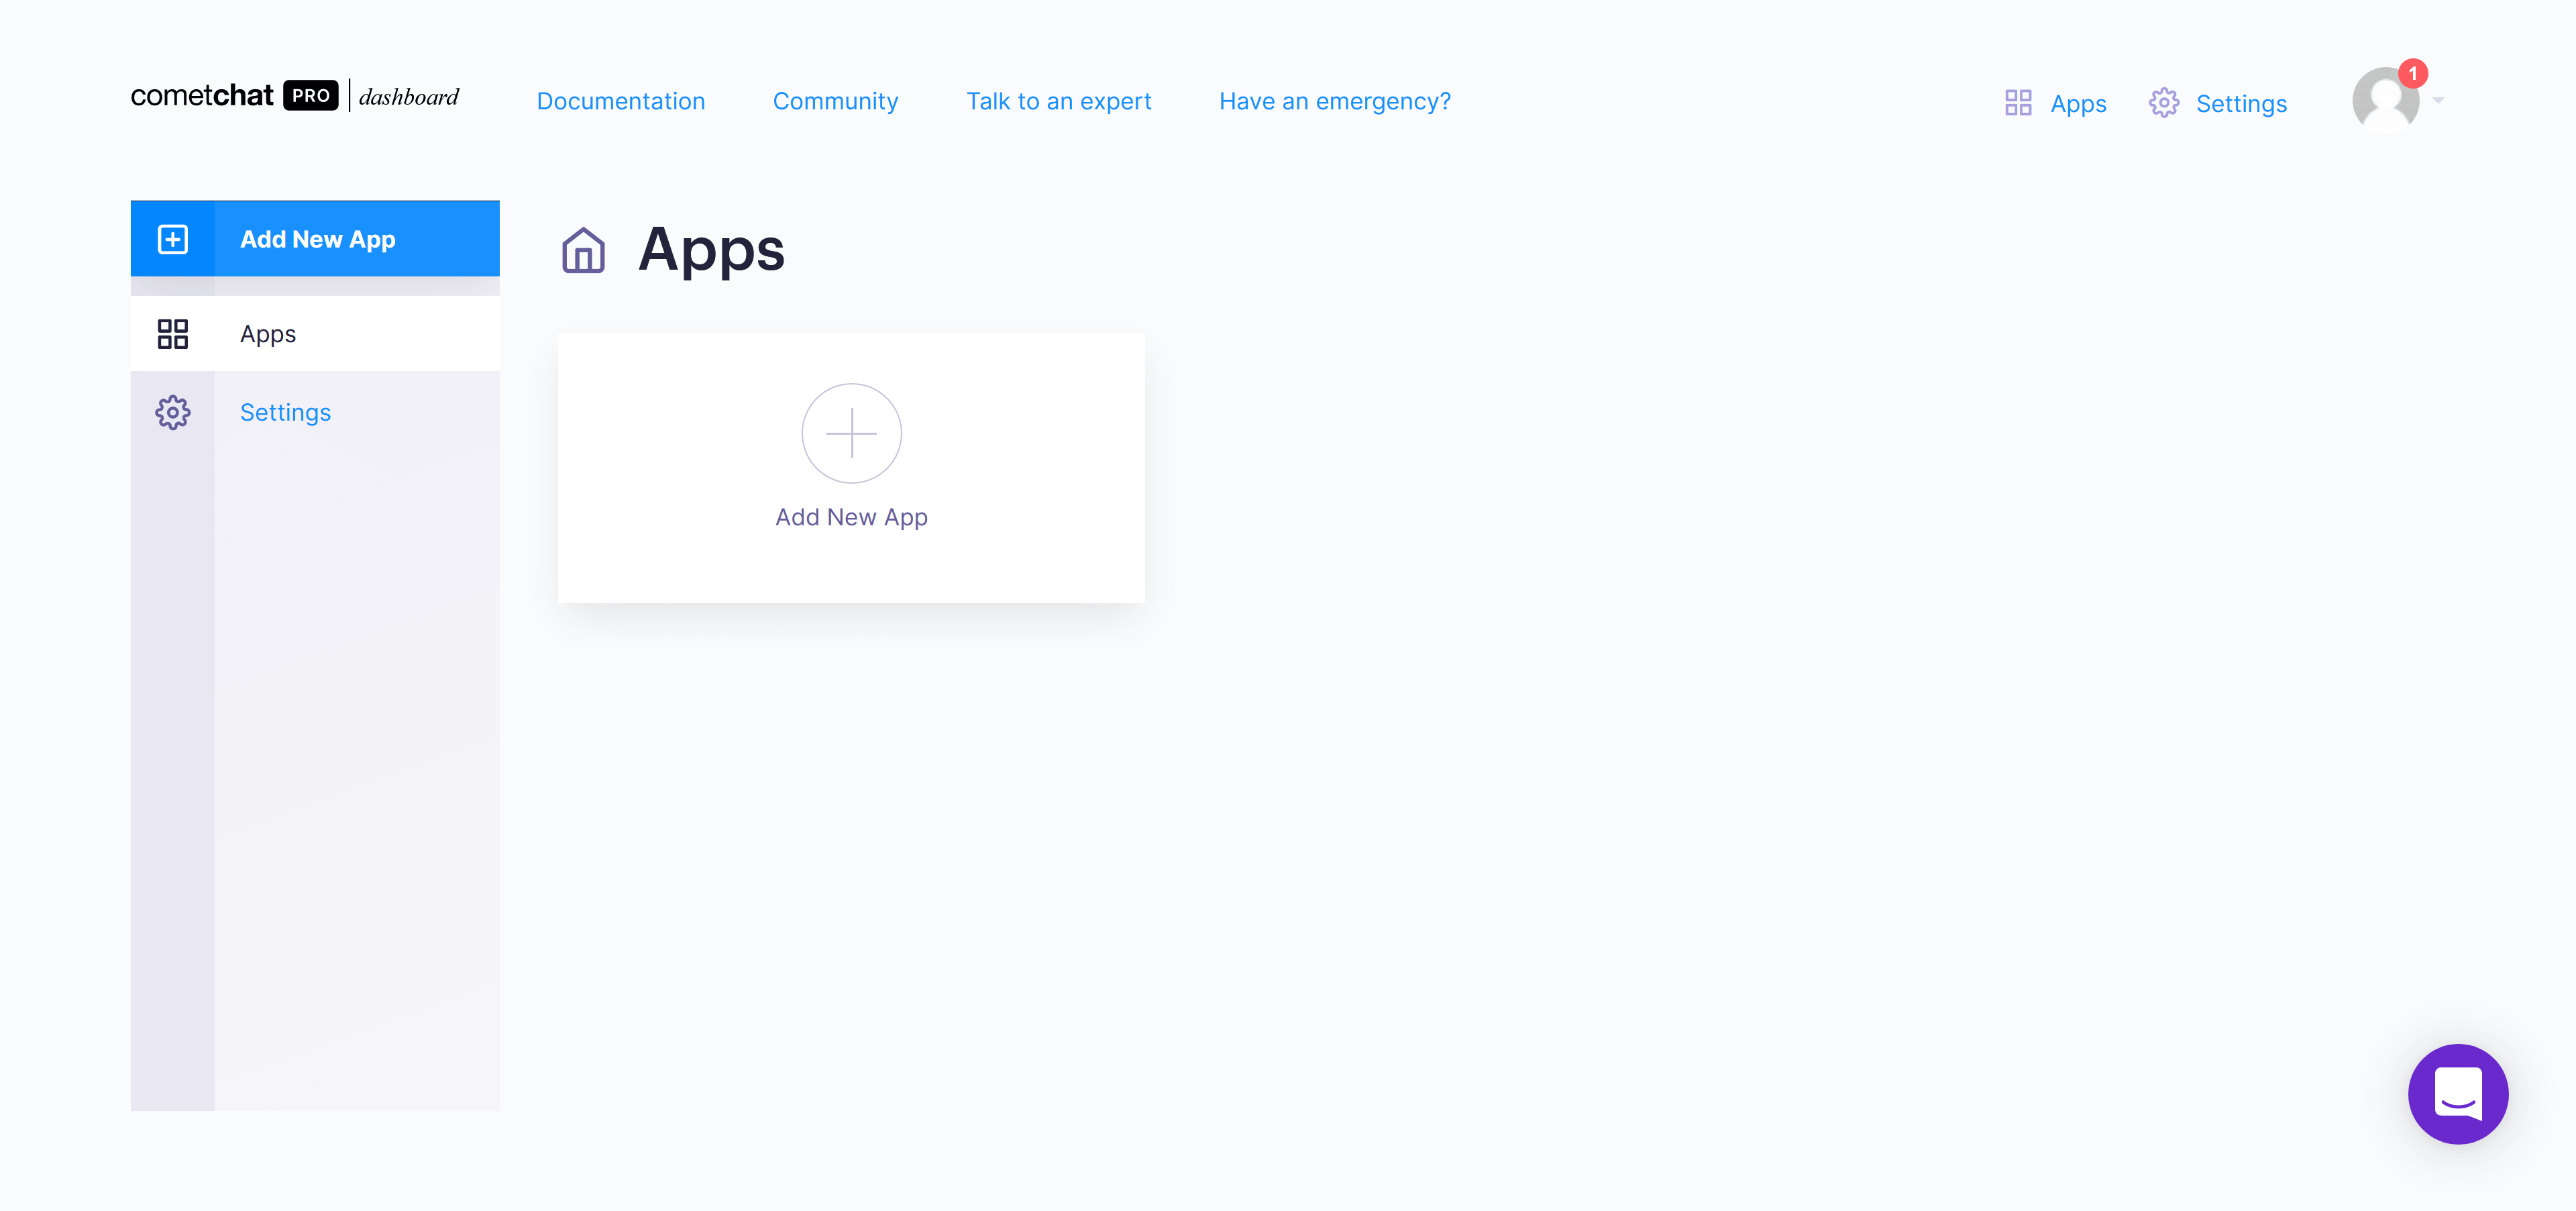
Create an account on CometChat Pro if you don’t have one already. and head to the Dashboard where you will see all your apps.
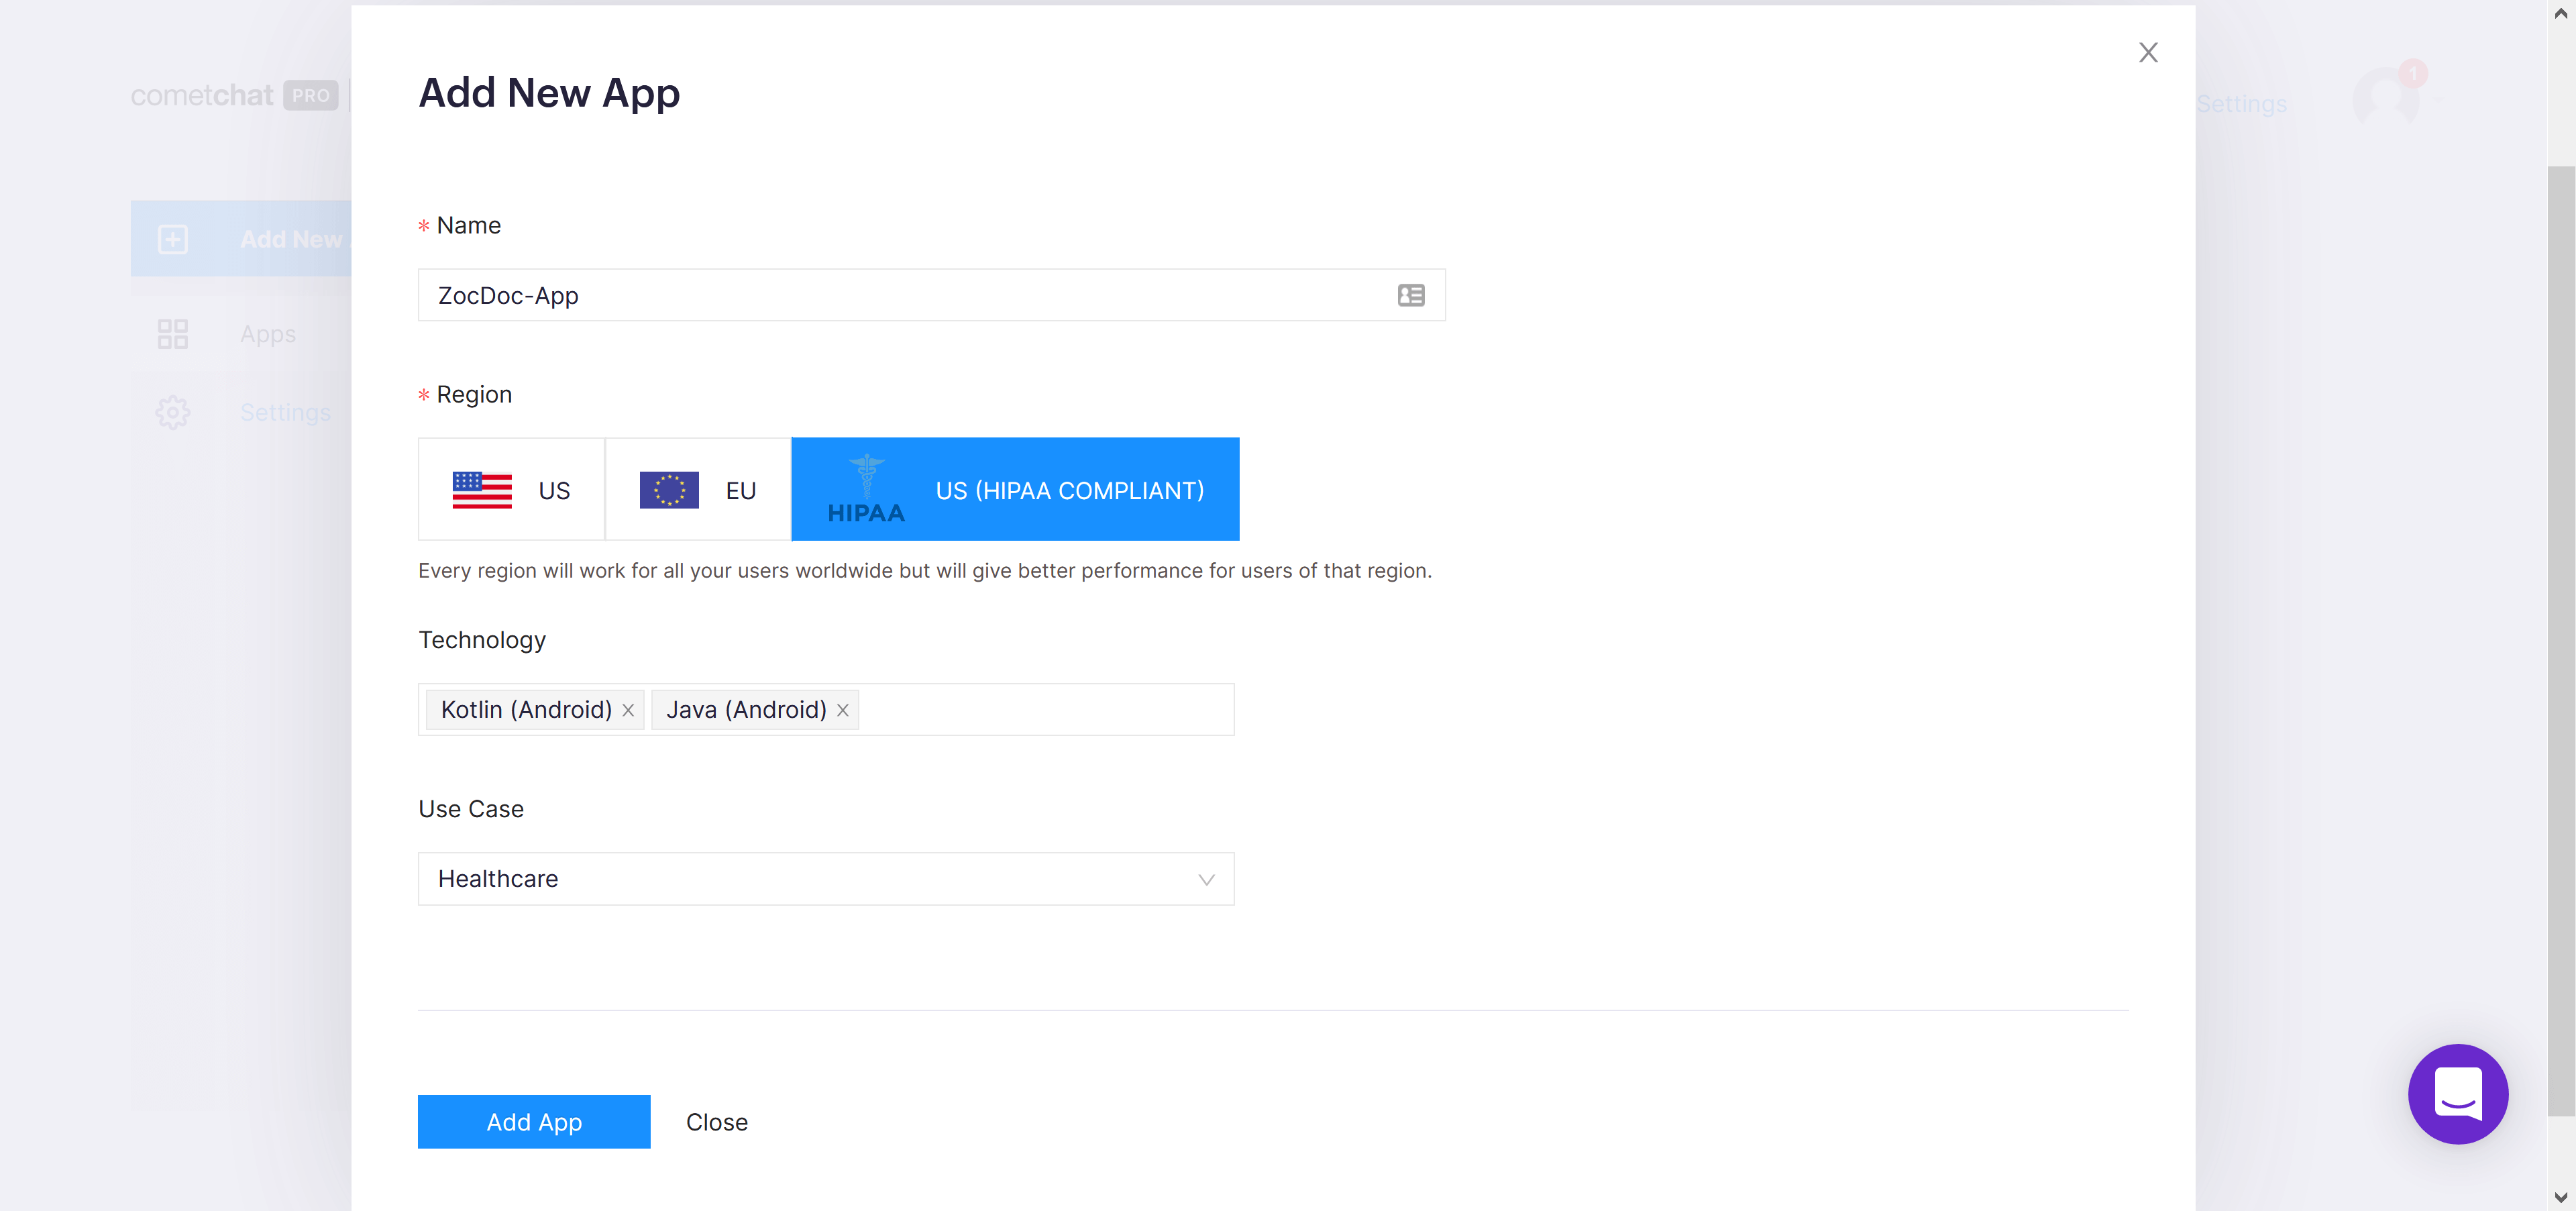
Click on Add New App and fill the information in the modal shown. Since this app is healthcare, so you should select US (HIPPA COMPLIANT) for region. But, it needs an approval and may take several days for verification, so for the sake of this tutorial I am selecting US for region, Kotlin (Android) in Technology and Healthcare in the Use Case fields.
You will be redirect to the app page to Quick Start section with some documentation about integrating CometChat SDK. Select API & Auth Keys from the left panel and you will see secrets like App ID, Auth Key, etc.
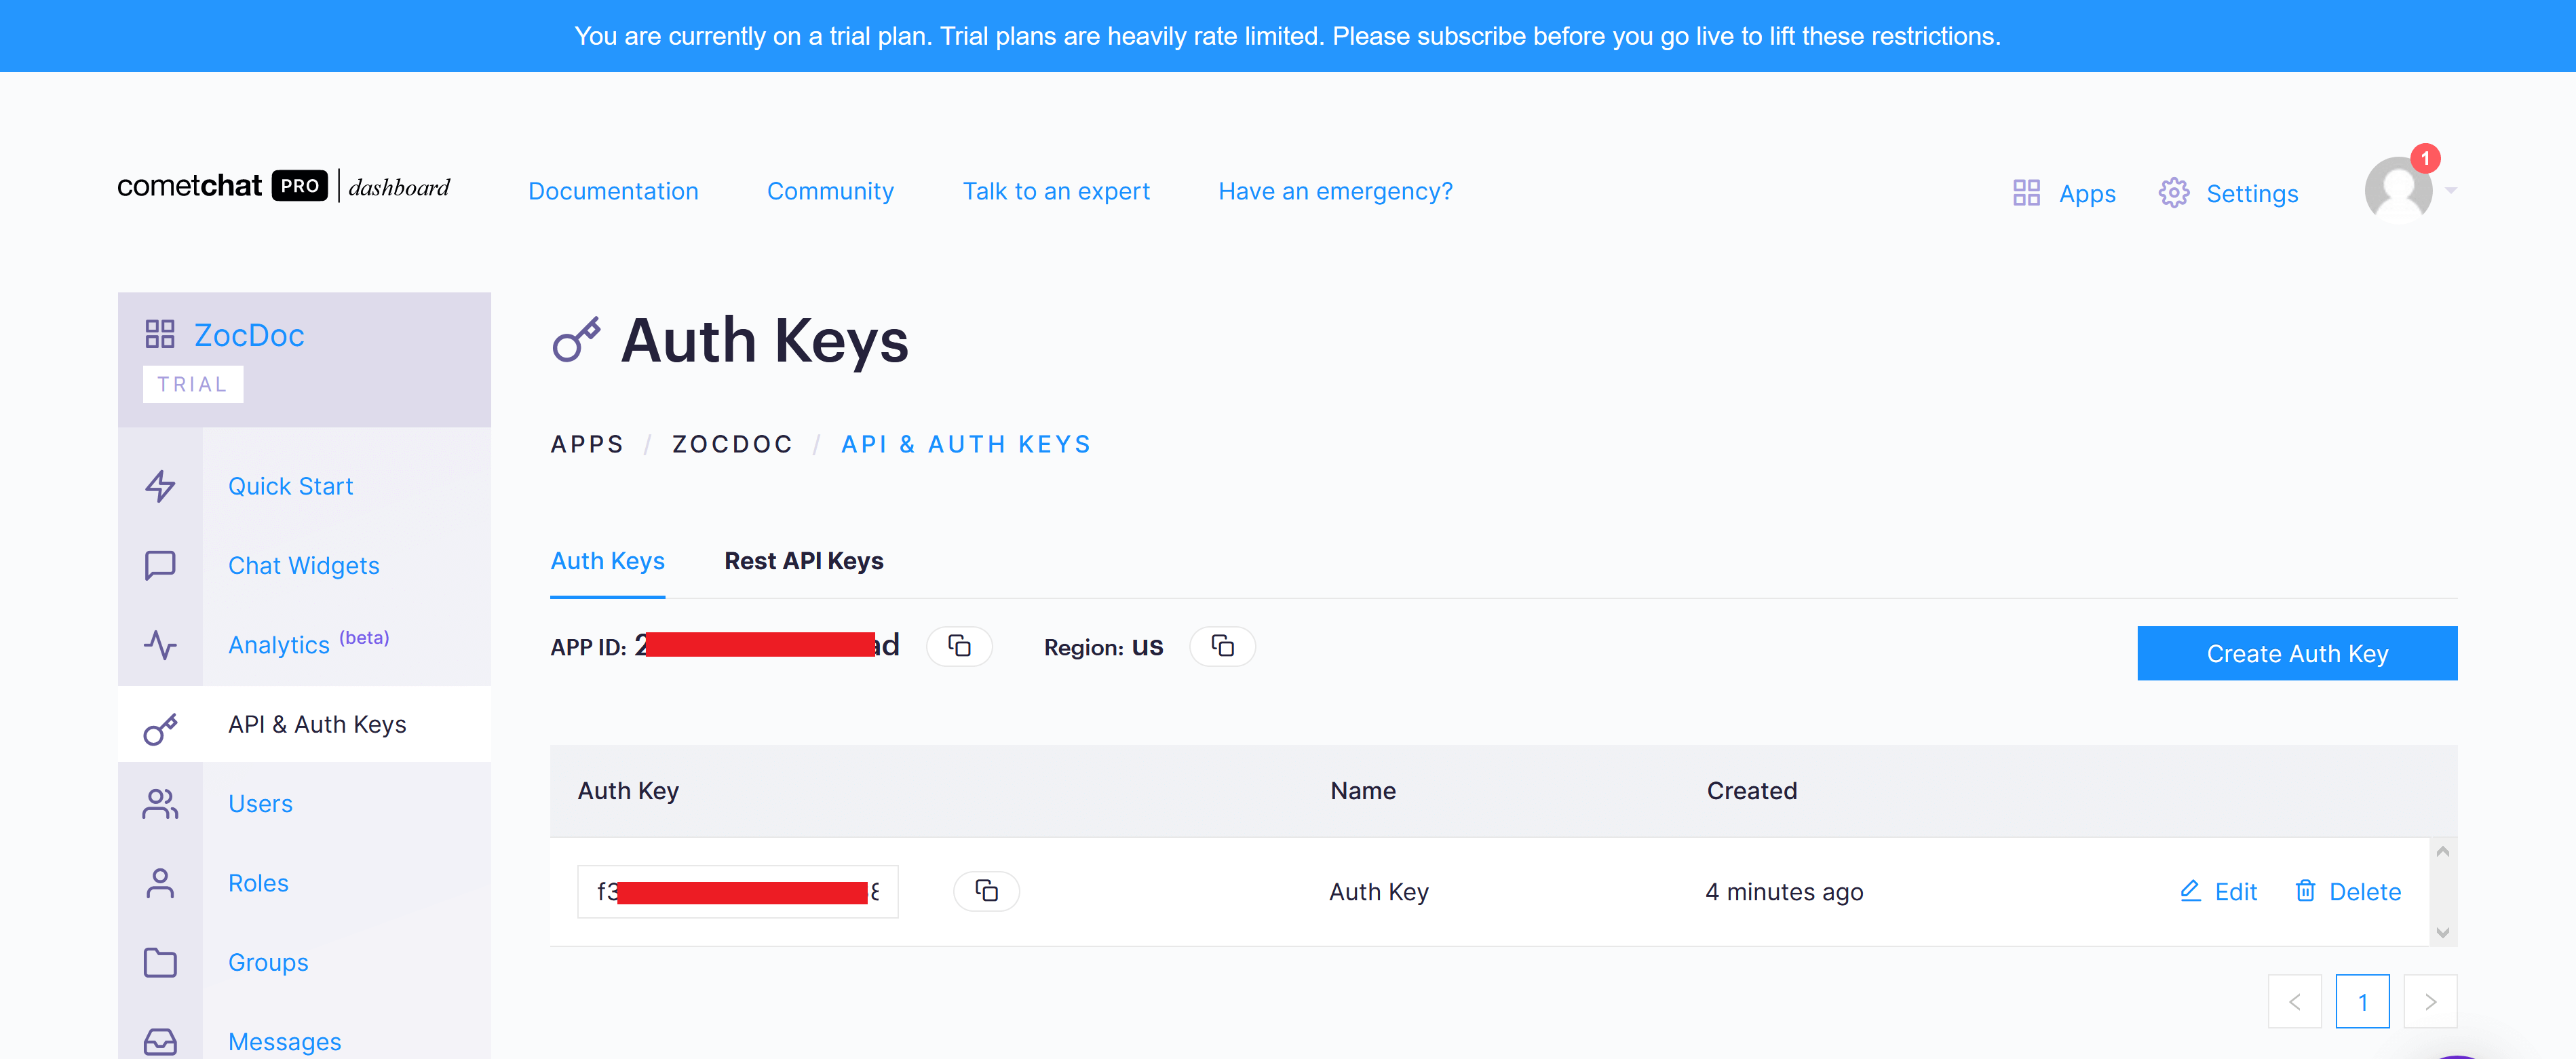
Create a new XML file keys.xml in the res/values directory of the app code and paste your App ID, Auth Key, and Region like the code below.
{{< gist wajahatkarim3 9e77b1ca98f691a5f1eb15a779383c1b >}}
Now, we have secrets keys in our code. Its time to add CometChat dependencies in the app. Start by adding the maven lines (line # 25-28) from the below snippet in the project’s root level build.gradle file:
{{< gist wajahatkarim3 02a29163a0155e569b64926f27170389 >}}
Now open the app’s build.gradle file and add the following dependencies in the dependencies section.
{{< gist wajahatkarim3 3218a3e1337610bf7590b360785a9e7b >}}
It should be noted that we will use Firebase for authentication purpose in this app. Now, finally you will need to add the uikit module (line # 7 in above gist) in your code.
First, head to this link and click on the purple Java Chat UI Kit button as shown in the image below.
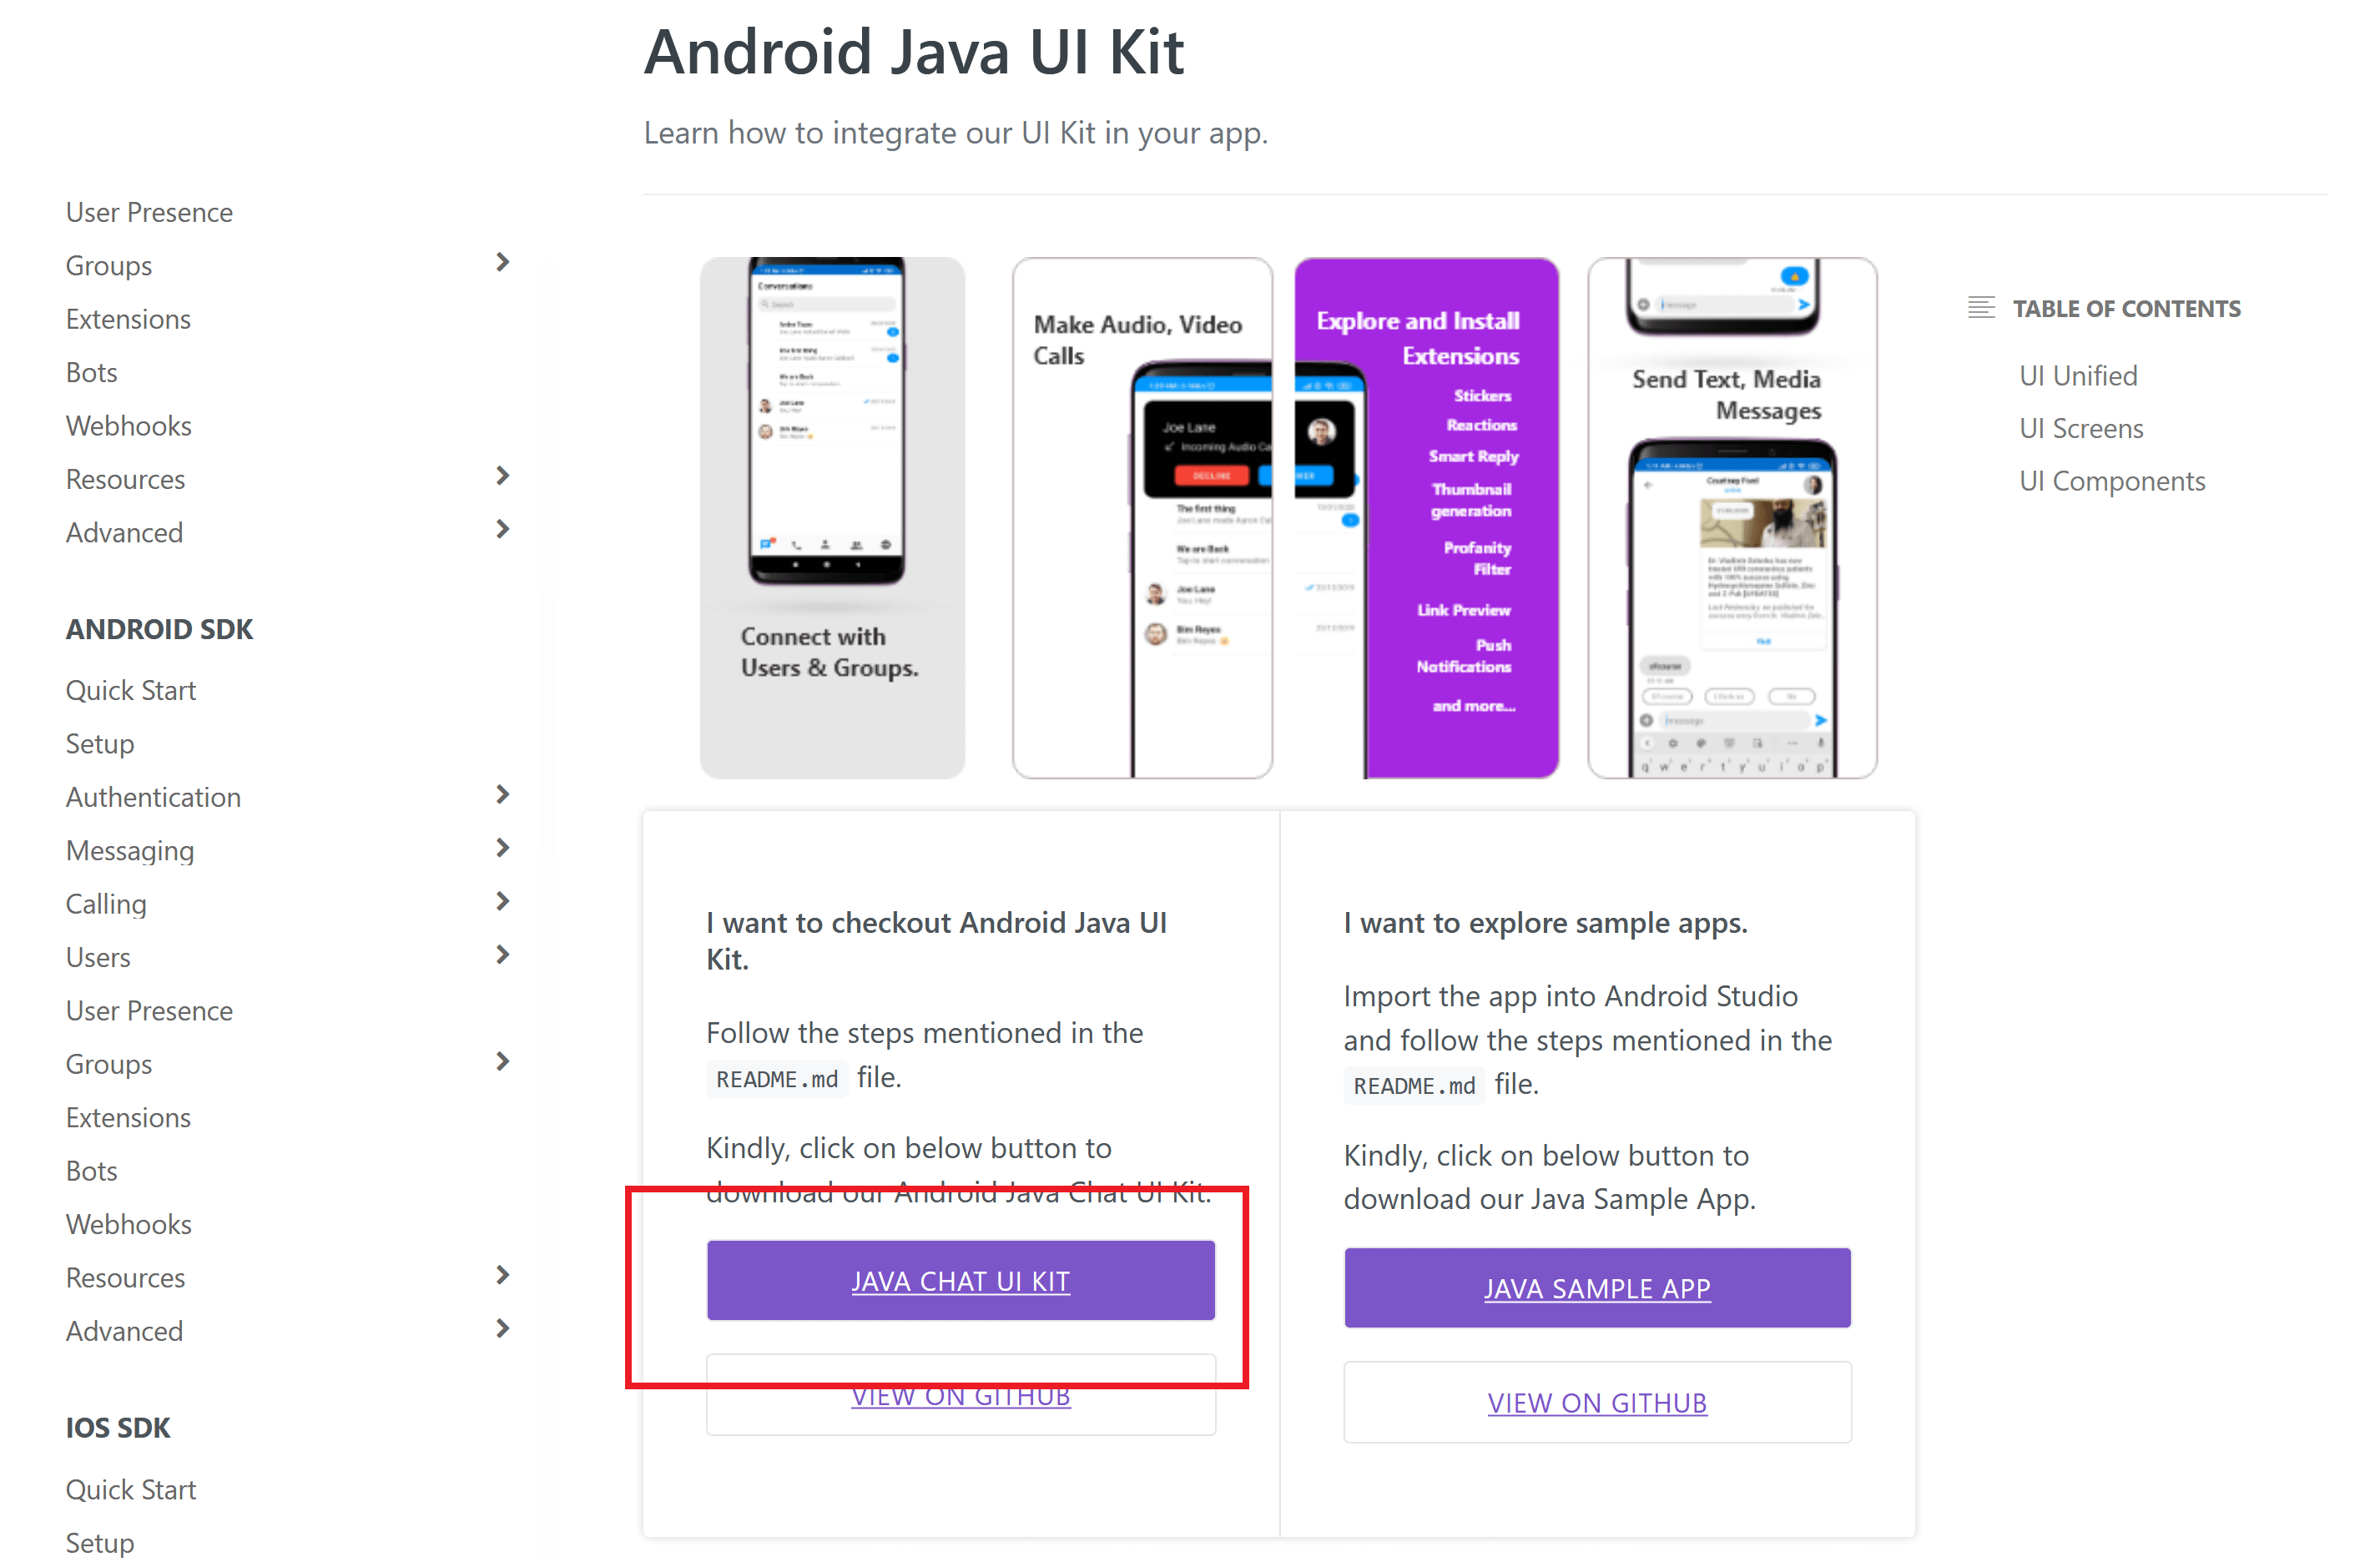
This will download a zip file. Extract that to any directory. Now, go to Android Studio project, and right click on app → New → Module and select Import Gradle Project option from the list.
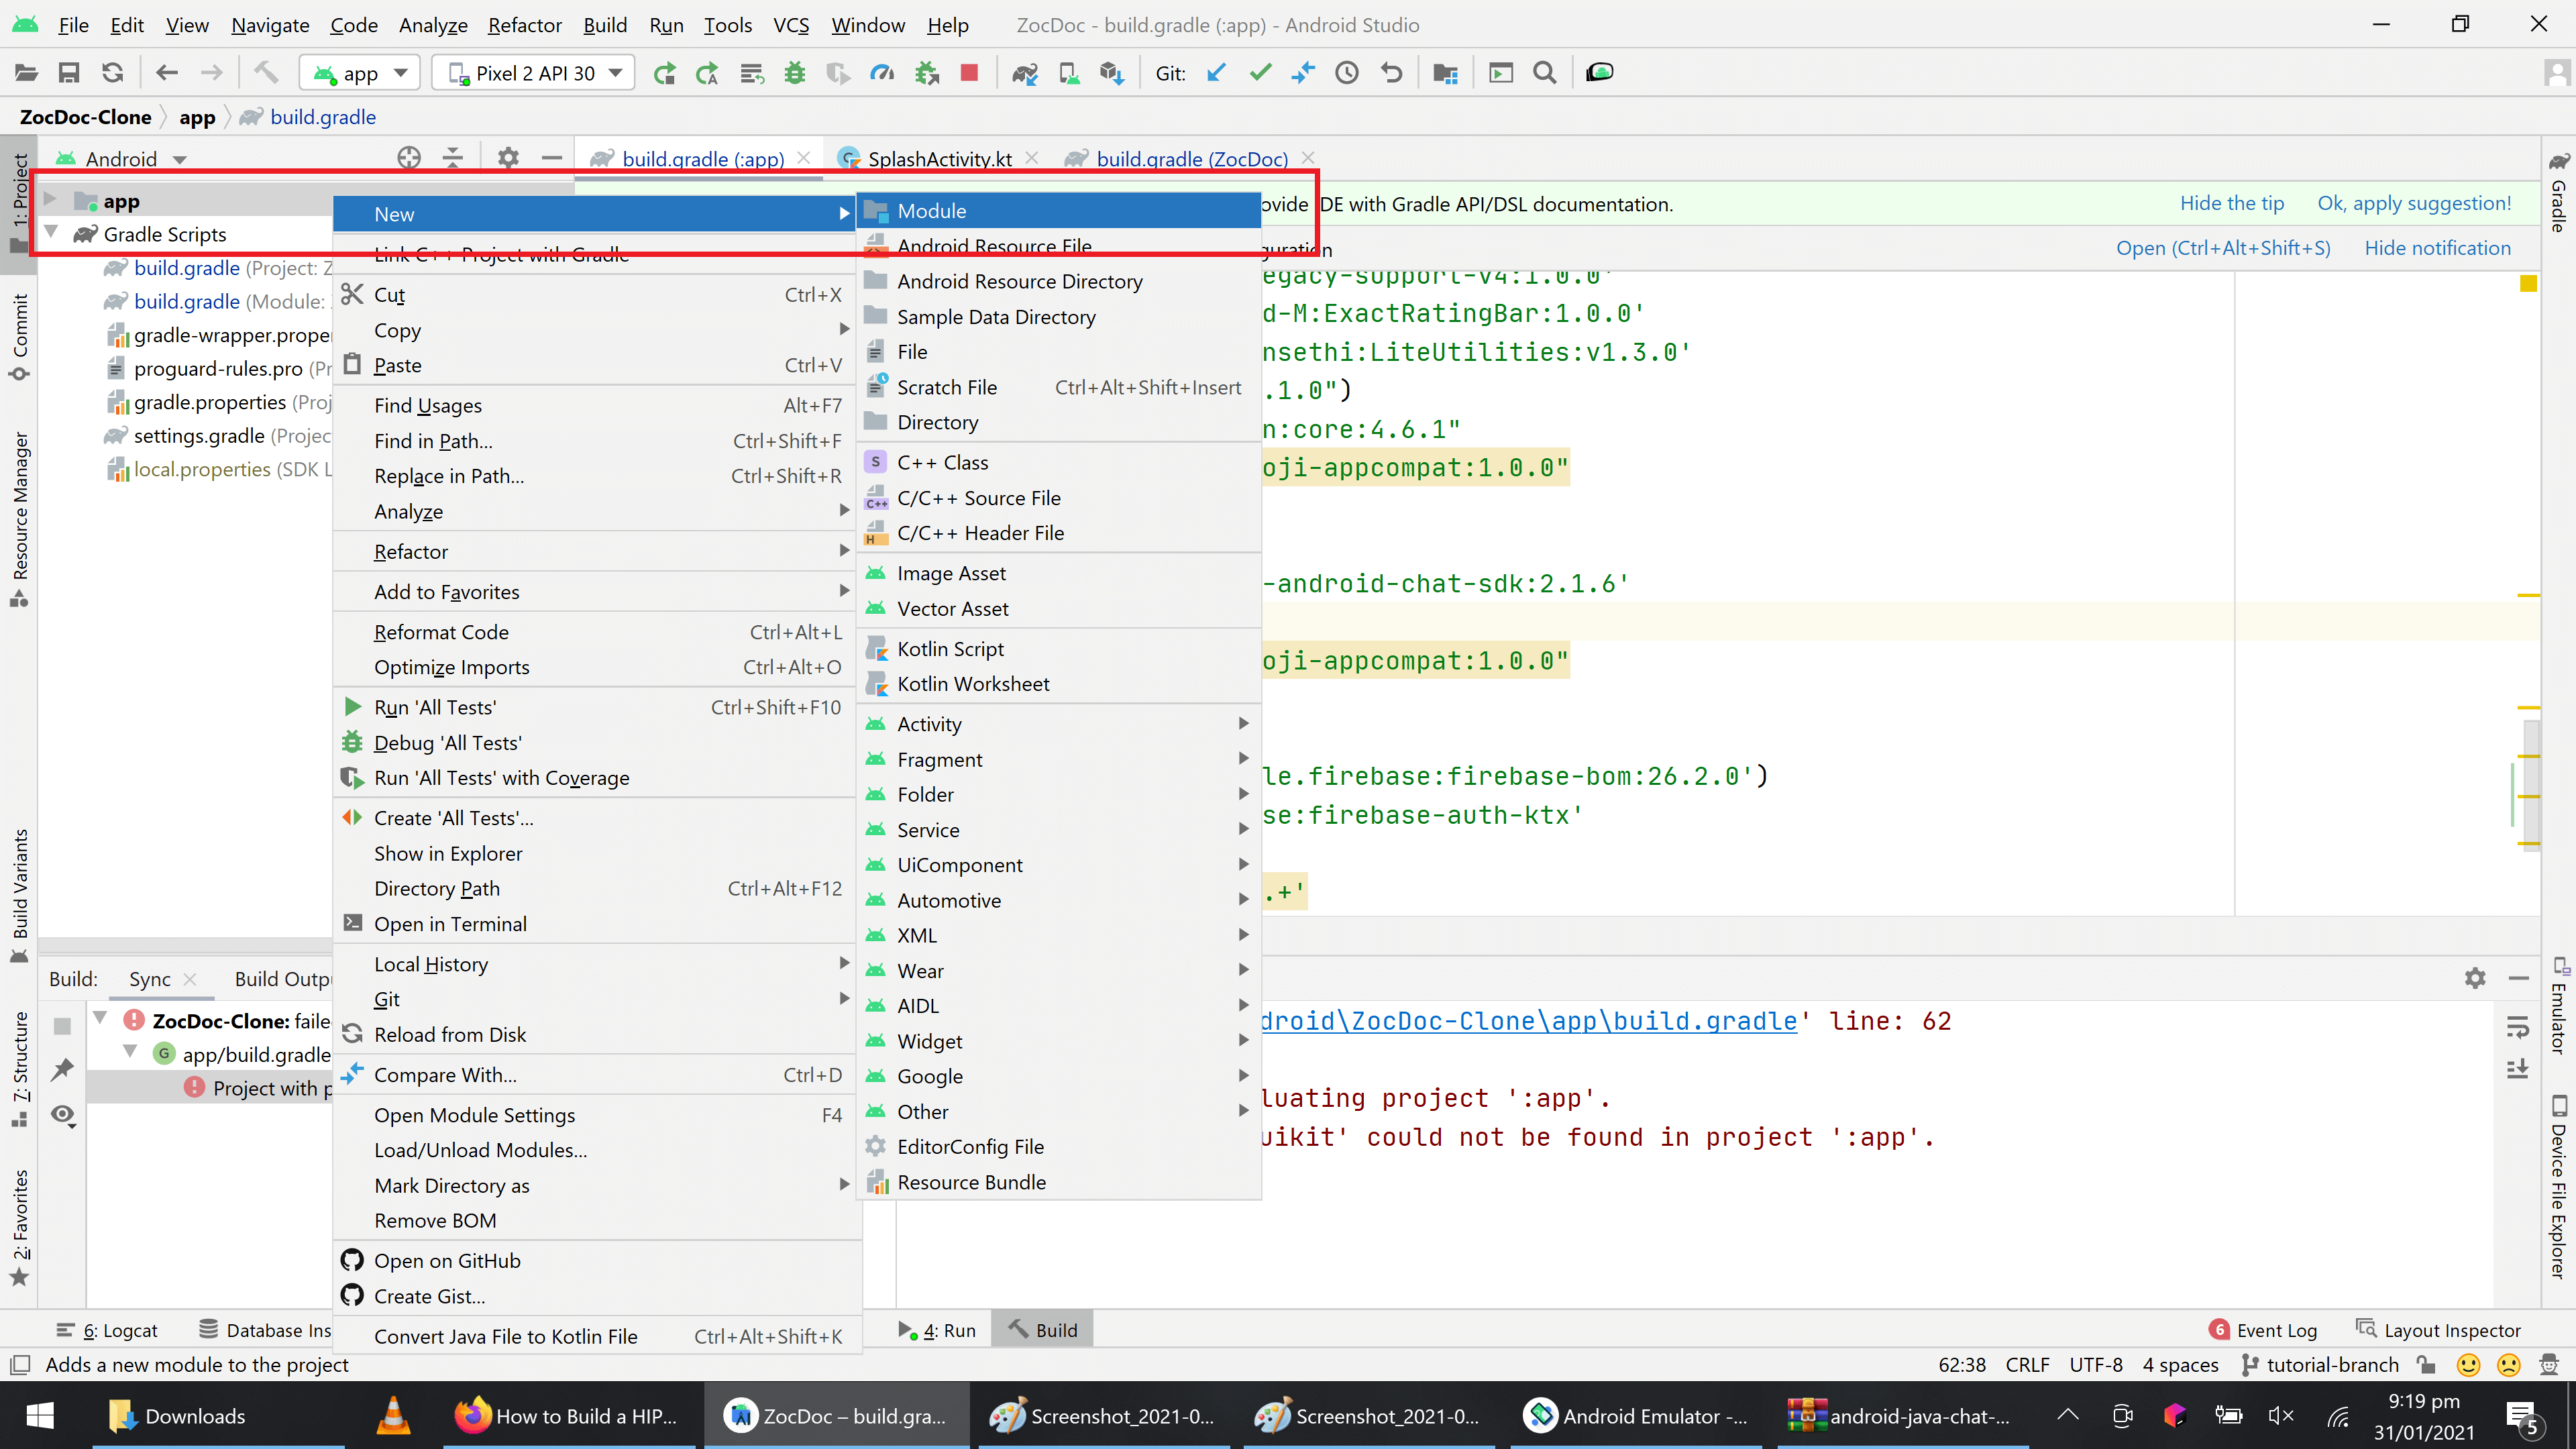
Now, choose your extracted folder directory. Set the name of module exactly uikit and click Finish button.
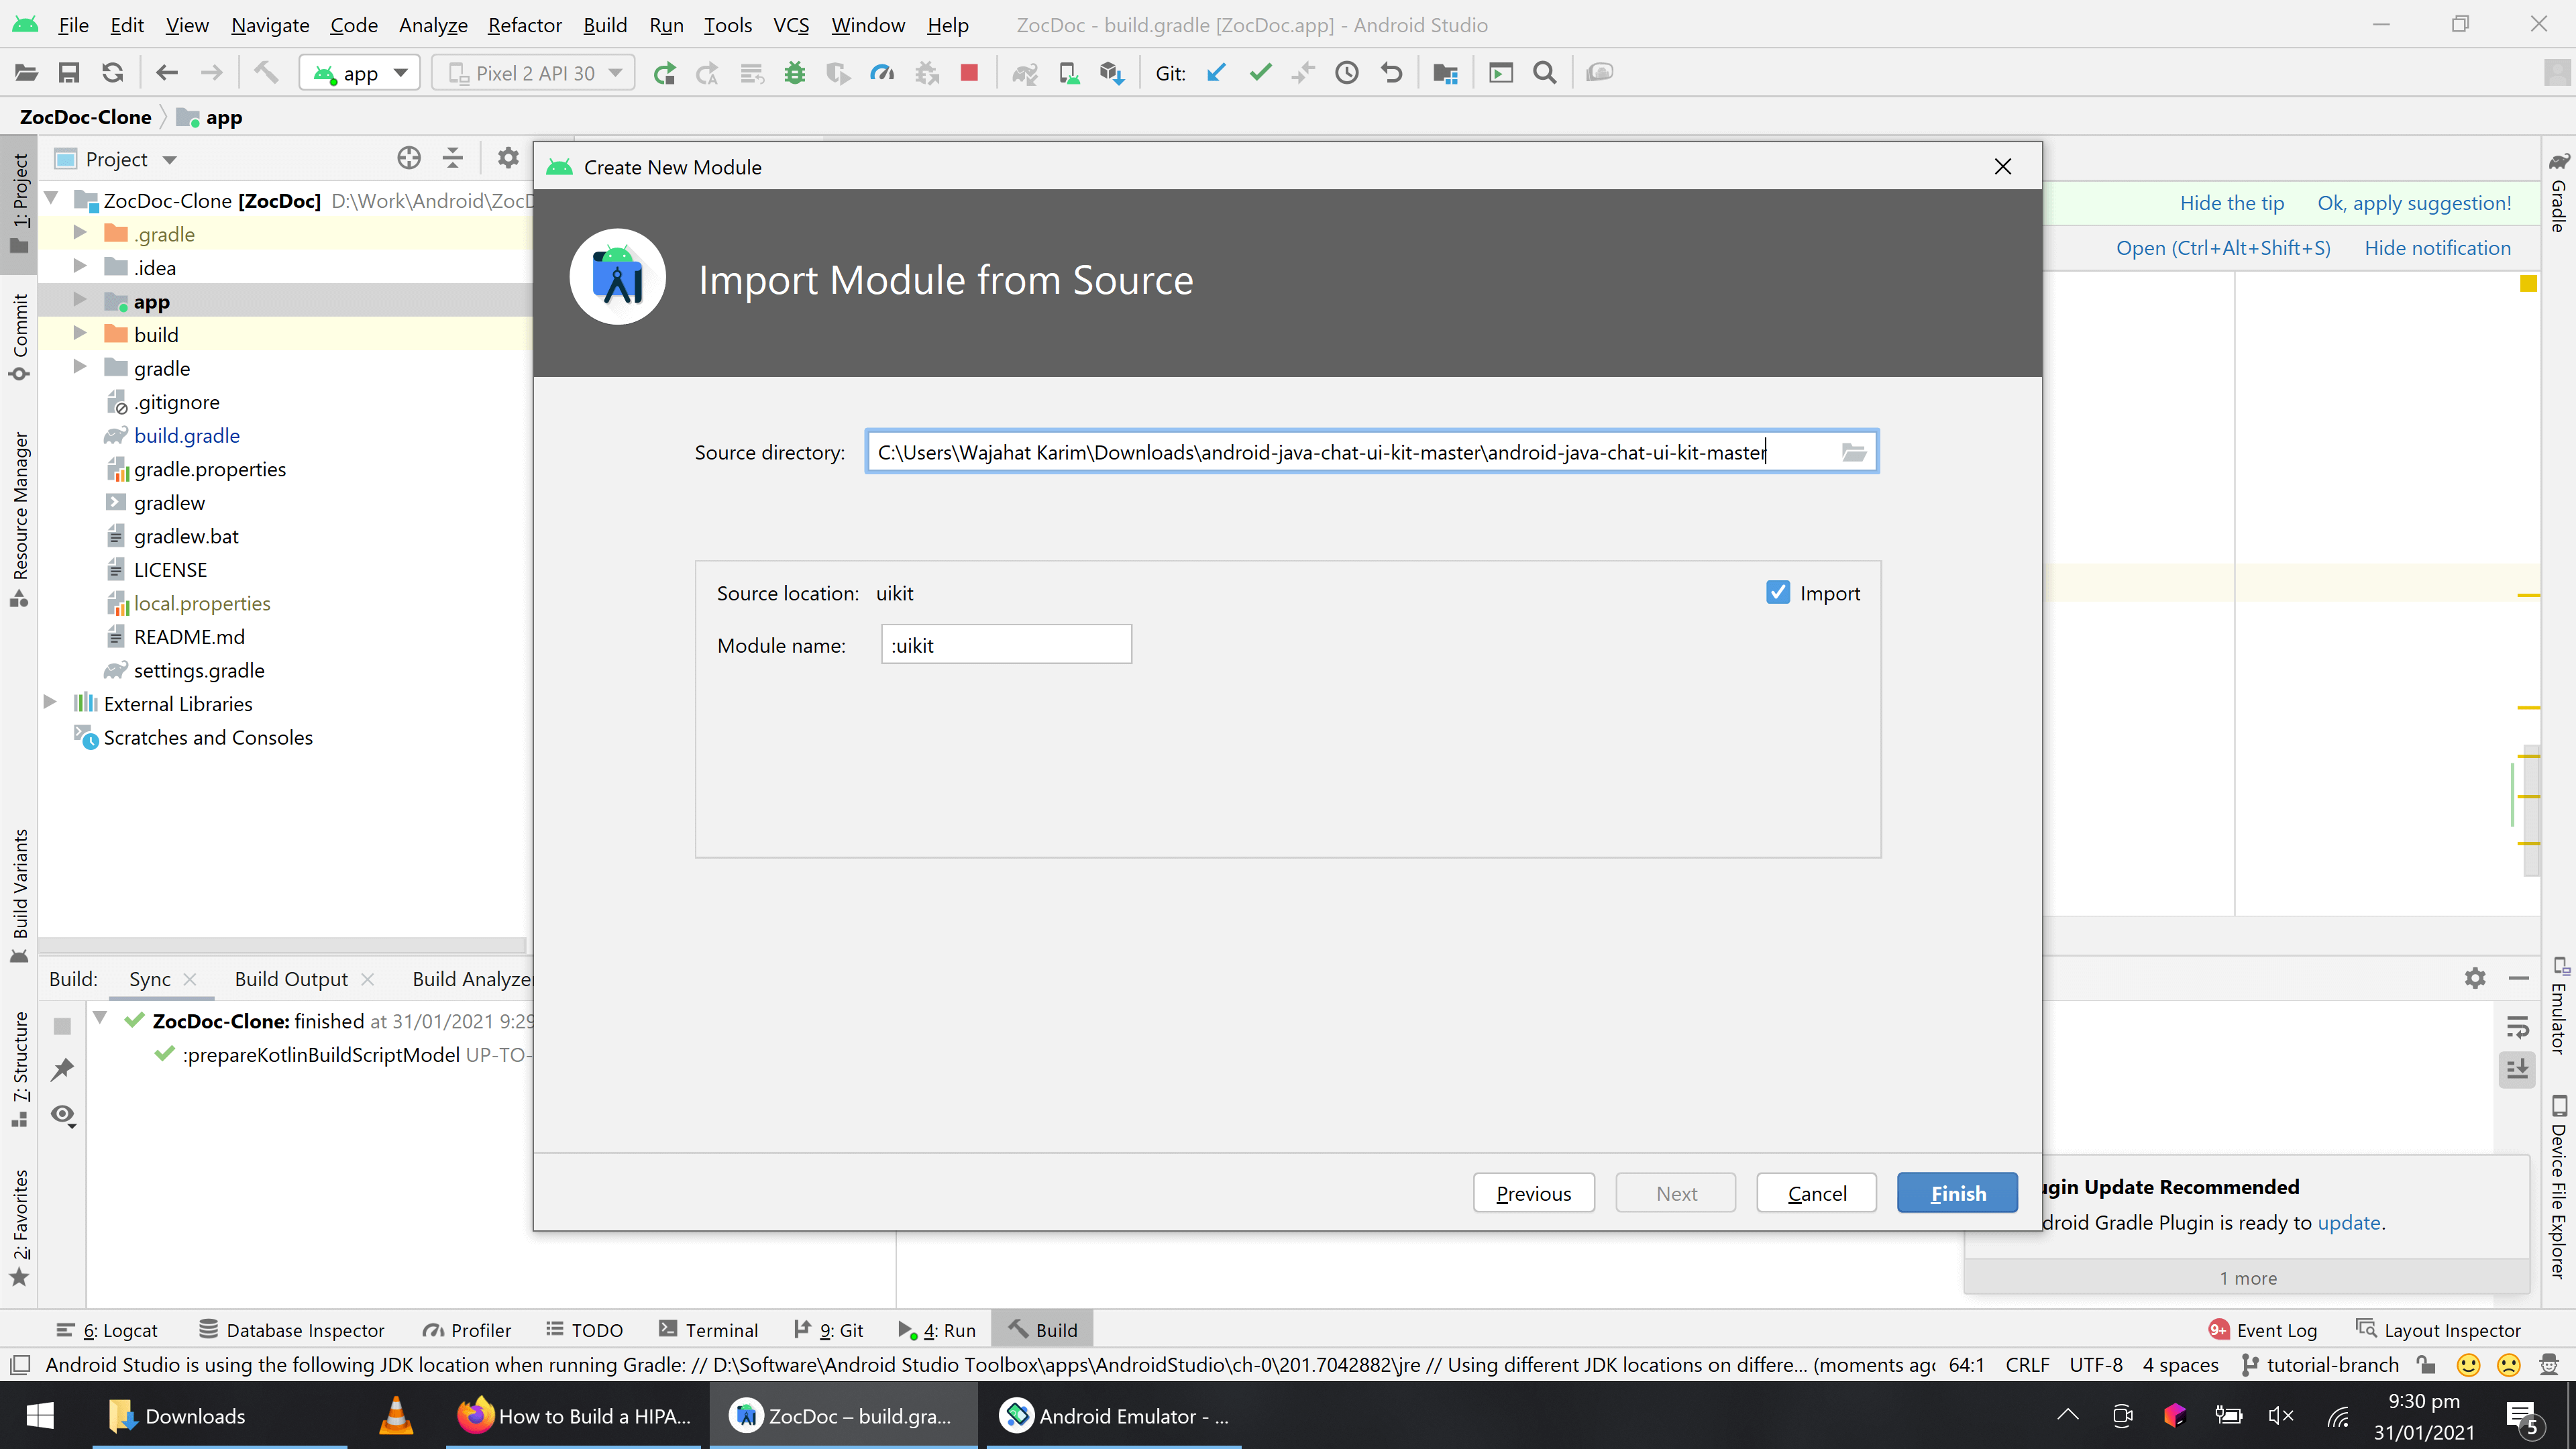
Now sync the project and you’re ready to play with CometChat SDK into the app.
Initializing CometChat in the app
Once all the CometChat dependencies are resolved in the app, first thing we have to do is initialize it. Open the ZocdocApp.kt file and add the initCometChat() method after the initEmoji() line in onCreate(). This method’s definition will be like the code below:
{{< gist wajahatkarim3 d42366e762cf582b010d02bde311e5e1 >}}
Note that how the App ID and region are being fetched from the keys.xml file in resources. Also, I have only logged the messages in onSuccess() and onError() callback methods of CometChat.init(). But in the production, you will have to add the proper alert mechanism if the CometChat fails to initialize.
Adding User Authentication in App
With the app UI ready and CometChat SDK setup, let’s add user authentication in the app. CometChat does not handle authentication or authorization itself, but it makes it seamless for you to tie CometChat to your existing users’ database or authentications services such as Auth0 or Firebase.
Since adding the Firebase authentication is beyond the scope of this article, so I will not discuss it here. But, you need to integrate Firebase in your app with the usual google-services.json file and dependency. We will use the password-based authentication from Firebase, so you can get the details about it on their documentation on this link.
Signup Functionality
Once Firebase Auth is integrated and password-based method is enabled, we will add our Sign up flow in the SignupActivity.kt class. Open the file, and you will see that there’s a OnClickListener set for the btnSignup in the setupViews() method. It already has the form input validation and it opens the Patient’s home or Doctor’s home screen randomly like the code below.
{{< gist wajahatkarim3 1b4323f67498c7b9faa4c39944d8c2ca >}}
Now, we will change this code to add Firebase Authentication first. Add this code after the form validation below:
{{< gist wajahatkarim3 785774184ed8d8242766653cc169f0f2 >}}
You can see that once user is created successfully on Firebase, we have the object of that. Now, we will add this Firebase user into CometChat’s Users database. Copy the following createAndLoginCometUser method and paste in your code.
{{< gist wajahatkarim3 e68158b39c73776a9ac798adc2d9aa15 >}}
On line 3, I have assigned the uid from method parameter to the CometChat’s user ID. This uid is actually the ID from the Firebase created user. This is to make sure that both users on Firebase and CometChat are in sync and same. The purpose of Firebase here is the security and allow users to actually login/logout etc from the app. Also, CometChat is not used for purpose of putting users’ database in it. Its only a separate platform to integrate chat features in your app. And this user ID plays the role of connecting Firebase users’ database to the CometChat database.
On line 7, you can see that I have added the isDoctor value in a Meta object. CometChat’s User table is minimal and includes basic fields like avatar, name, UID etc. If you want to add extra information, like if user is doctor or patient in this case, then you need to put in a Meta object. The Meta is a JSON Object and can have unlimited key-value pairs.
On line 10, I am calling the CometChat.createUser() method with the CometChat User object and Auth Key from resources. Once the user creation is successful, I am manually logging in the through the CometChat.login() method. You can show Login screen here and ask the user to login herself, but I chose it by directly logging in and showing home screen. Once the login is successful, I am using the old code of showing either patient or doctor home screen as it was originally here.
On line 17, note that I have removed the old Random.nextBoolean() value and replaced it with extracting meta data from logged in user to see if it is a doctor or patient.
Now, call this in your setupViews() method where Firebase user creation is successful like this:
{{< gist wajahatkarim3 ae5d11e7ceb340f1b0504cf132f1a445 >}}
On line 7, I have called this method createAndLoginCometUser and passed the data of Firebase user like uid, name etc to the CometChat user.
Login Functionality
That’s how a signup functionality is created. We can use the similar approach for the login. The app will first perform the login on Firebase, and then once its successful then it will get the the Firebase User ID and perform the CometChat login with that ID.
Open the LoginActivity.kt file, remove the lines 61 to 77 and put this code in loginUser() method after the form validation.
{{< gist wajahatkarim3 548661d3d71e9a8461666739cf868076 >}}
On Line 2, you can see I am calling Firebase’s signInWithEmailAndPassword() method. Once its successful, then on line 6 I am performing CometChat.login() method to fetch the CometChat user info. And then there’s a simple doctor check and home screen is launched accordingly. This is similar to how it was done in SignupActivity.kt class.
Now, open the SplashActivity.kt file, and replace isDoctor's value with this line:
val isDoctor = CometChat.getLoggedInUser() != null && CometChat.getLoggedInUser().metadata.getBoolean("isDoctor")
Sign out Functionality
After the splash, its time to put the sign out functionality. Open the ProfileFragment.kt file and delete the code from the btnSignout’s OnClickListener and replace it with the following code.
{{< gist wajahatkarim3 d47de488cadcf0bdf03b1eacf602d4c5 >}}
You can see that there’s nothing fancy here. Its a simple CometChat.logout() method call. Now, run the application. Go the profile tab, click on signup and create a user. You will see that you will automatically logged in. And now, in your profile tab, you will see Logout button. You can now login and register perfectly.
Starting a Chat with Doctor
With the patient/doctor authentication in place, its time to actually make chat functionality between patient and doctor. As per the app requirements, doctors cannot initiate chat with patient directly. So, its the patient who will make the chat connection. The way this will work is patient will search the doctors for any care type she is looking for. The app will show the list of doctors available for that care type and in the provided location. Patient chooses any doctor by tapping on it, this will show the doctor details screen. In this screen, patient will click on Chat with Doctor button and this will initialize the chat between patient and doctor.
Open the DoctorDetailsActivity.kt file. In the setupViews() method, you can see the listener of btnChat button. This button is opening the ChatActivity.kt screen and passes the selected doctor’s data model through Intent.
Now, open the ChatActivity.kt file. You will see a method initChat() which checks if the received doctor is not null and then there’s nothing. This is where we are going to add out chat functionality.
From the documentation of Java Chat UI Kit module, we can see that this kit provides us three ways to integrate chat into our apps namely:
- Unified - This is quickest solution to start a whole chat flow and it is also customizable as per your colors etc.
- UI Screens - This provides some screens in form of Android
Fragmentclasses to integrate into your apps UI. Some screens areCometChatUserListScreen,CometChatConversationListScreen,MessageListScreenetc. - UI Components - This is even more portable and customizable to integrate into your app. These are standalone UI components to be used in your XML layouts and view classes such as
Avatar,CometChatUserList, etc.
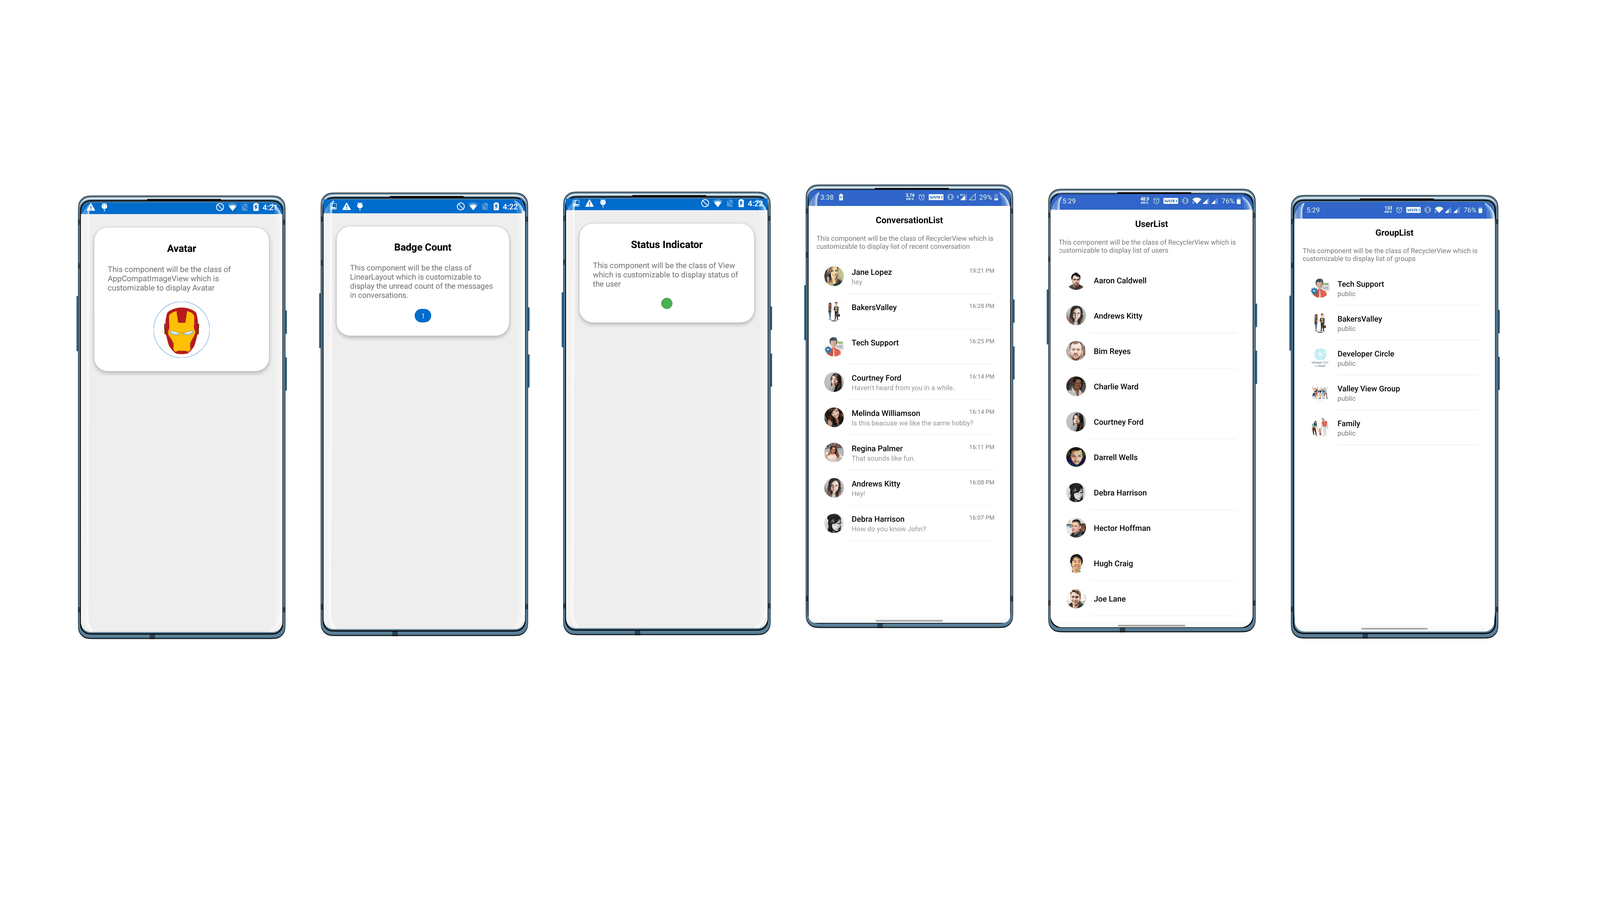
The portability of CometChat’s Java Chat UI Kit makes chat feature a very easy and enjoyable experience for developers. And you can easily customize the colors, and other features through UIKitSettings class.
To add the chat in out ChatActivity.kt, I am going to use the CometChatMessageScreen fragment and replace the chatFrame from layout with this fragment. All I have to do is create an instance of this fragment and provide some configuration values. You can see this in the below code which I have added in the initChat() method of ChatActivity.kt class.
{{< gist wajahatkarim3 1becd2b0bc5c205d433d62dac6fe30f9 >}}
On line 4, I am checking if the patient is logged in or not. On line 6, I am fetching the full data of the selected doctor through Doctor ID from CometChat users database. Once that’s done, then I am creating object of CometChatMessageScreen fragment on line 9. After that, I am providing data such as avatar, ID, name etc to the fragment object in lines 12 to 22. Finally, in lines 23-25, I am actually replacing chatFrame with the chatFragment object itself. This will load the chat UI with all the necessary connection between patient and doctor. And you can send messages, emojis etc.
Within few minutes, you saw how easy it was to actually integrate chat functionality through CometChat SDK.
Adding list of Conversations
Since doctor can’t directly initiate a chat with patient, so she can only see a list of existing conversations. These conversations are created by patients themselves first and then shows up in the doctor’s profile. For this, we will use the UI Component CometChatConversationList .
First, open the fragment_conversations.xml file, and replace androidx.recyclerview.widget.RecyclerView with com.cometchat.pro.uikit.CometChatConversationList . Note that CometChatConversationList is also a RecyclerView element. So, all we are doing is changing the class name and rest is same in the layout.
Now, open the ConversationsFragment.kt file and in the setLoggedInUI() method, there’s a comment saying “Load Conversations”. This is where we will load the conversations in our CometChatConversationList RecyclerView component. We have to put a fetch request through CometChat API and it will load the data into this RecyclerView like this:
{{< gist wajahatkarim3 db51a8588a6e9f089c2794e5009ec1ae >}}
One line 3, you can see I am creating a builder for ConversationsRequest. I am setting limit to 50. This will fetch first 50 conversations. Then on line 8, I am fetching these conversations through fetchNext() method. And in the onSuccess(), I am setting the conversations list to my CometChatConversationList RecyclerView component. And that’s all. This will load all the patients’ conversations which this logged in doctor has made.
This same thing is also integrated in the MedicalTeamFragment.kt class, so that patient can see all the conversations of doctors she has interacted with.
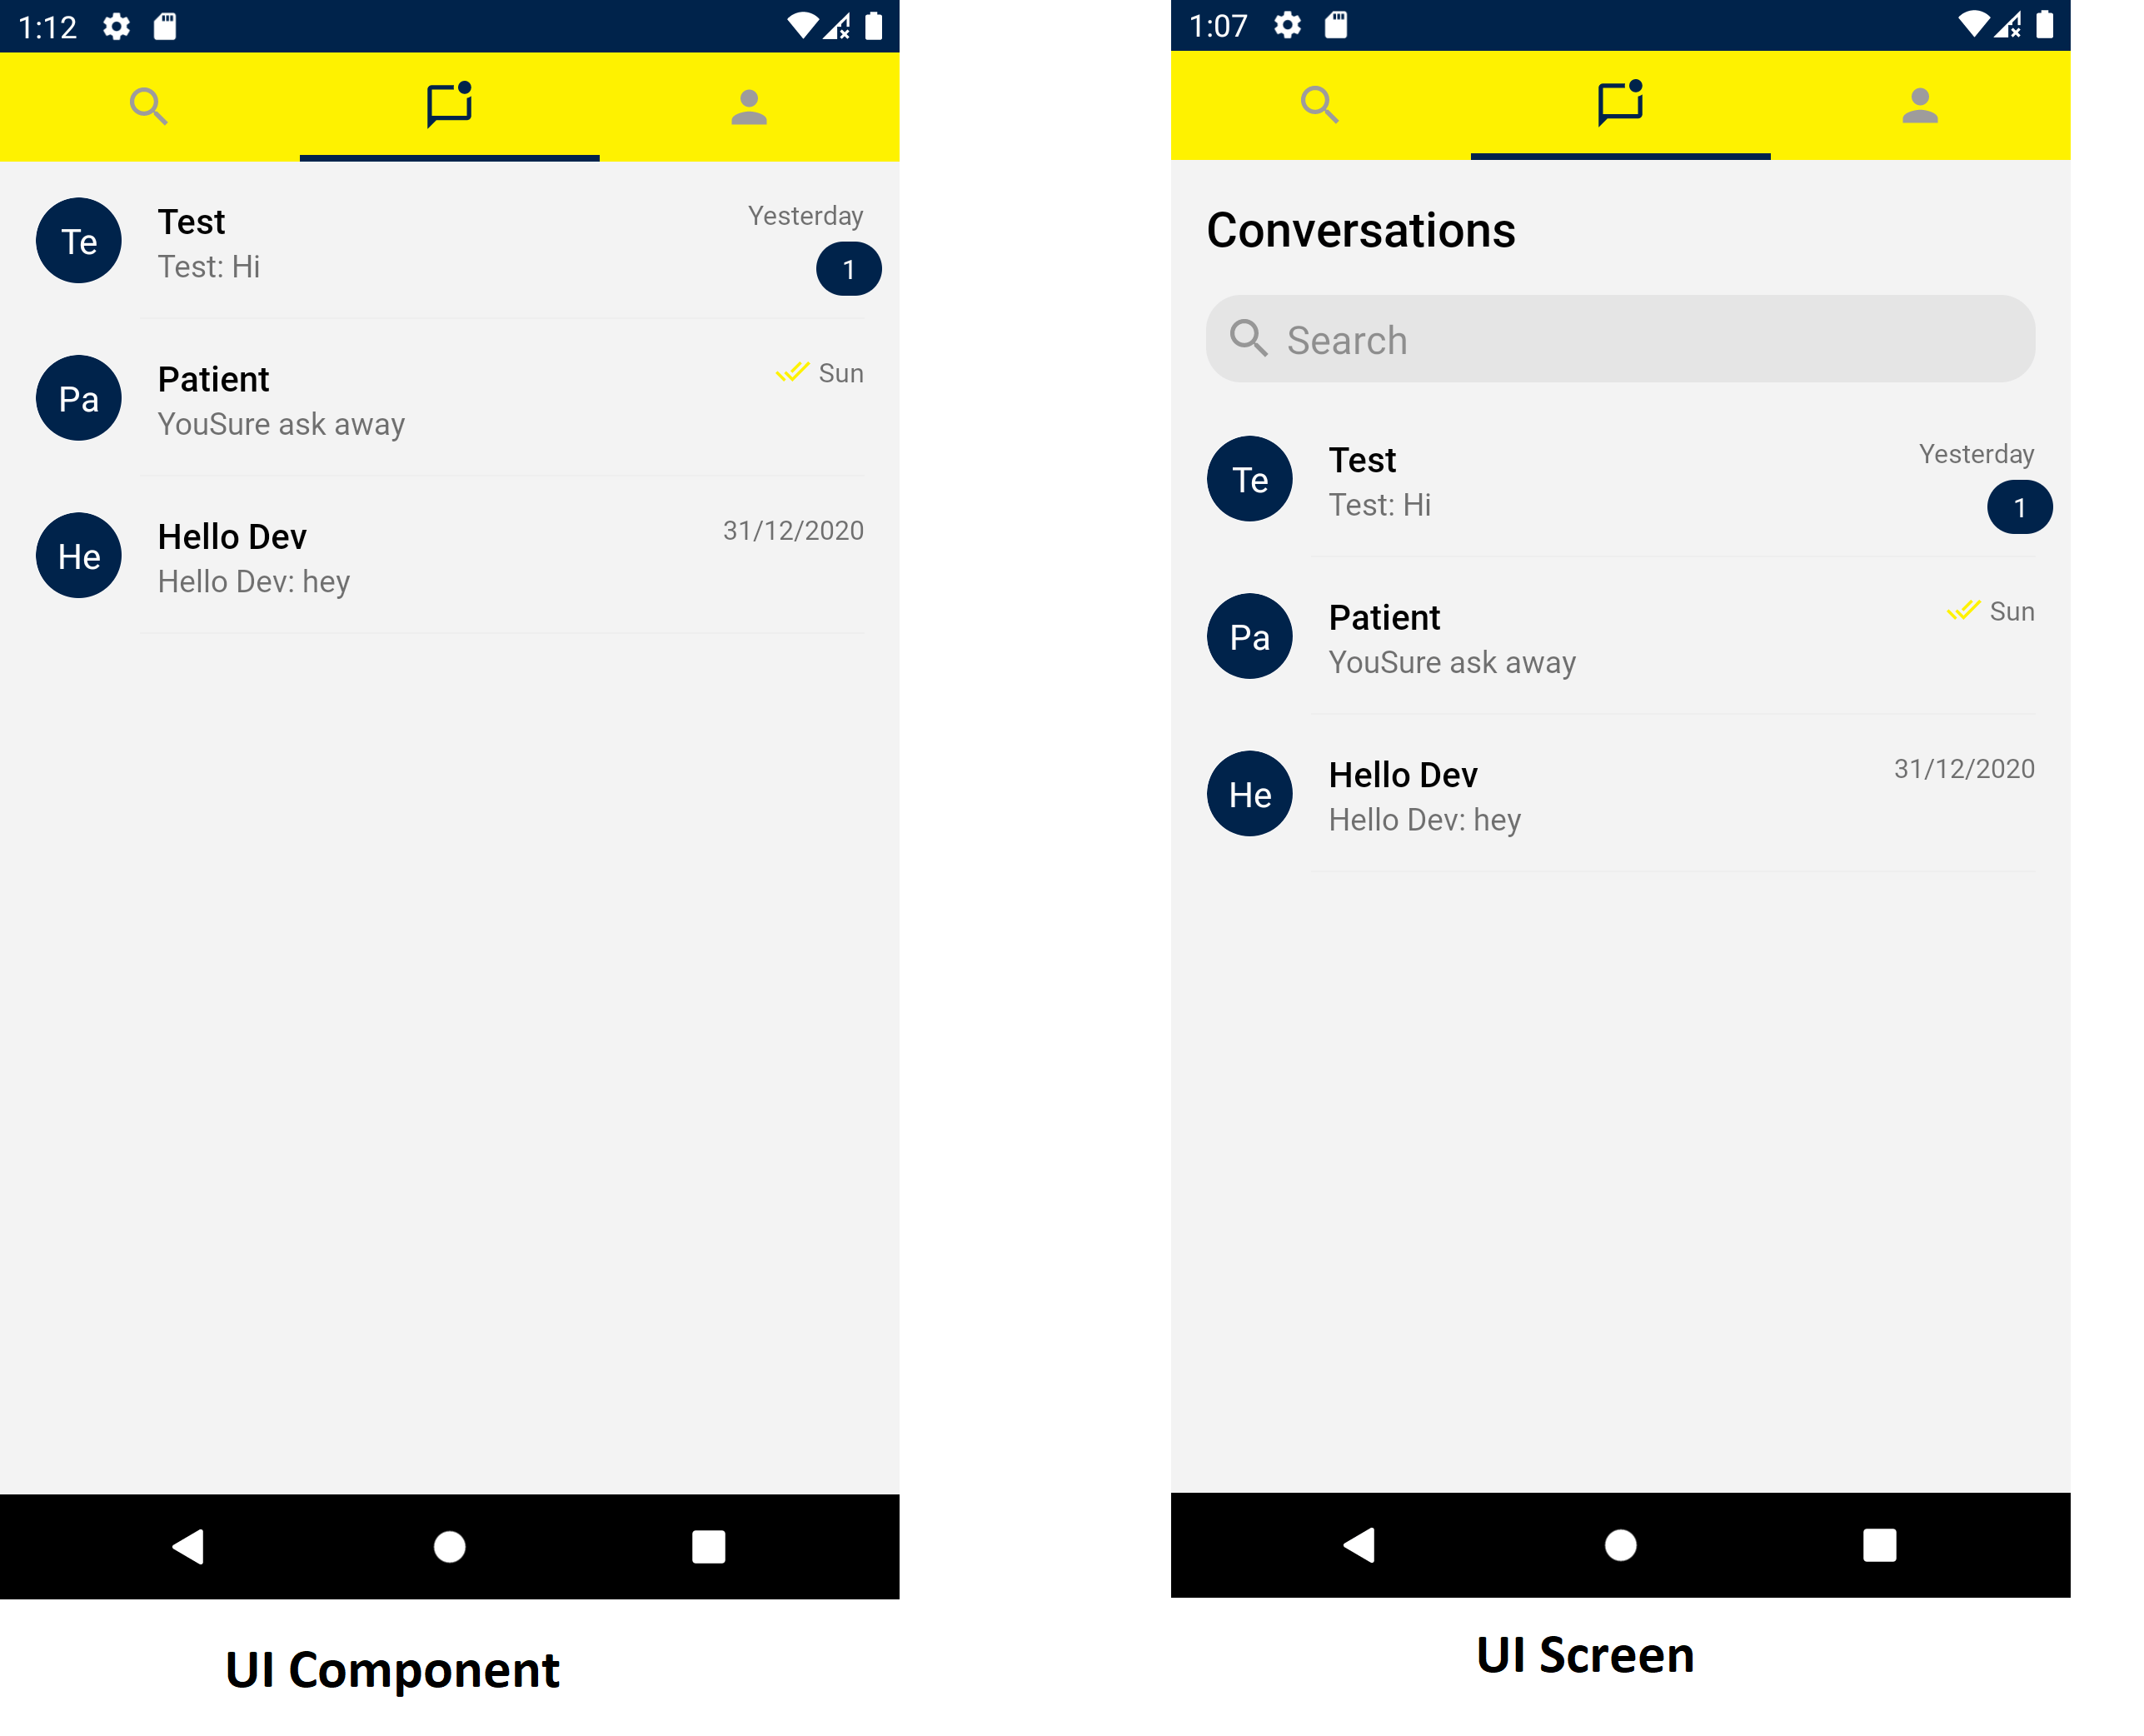
Also, note that I have used CometChatConversationList just to show you how UI Components can be integrated into your apps. Ideally, you should use CometChatConversationListScreen fragment instead of the component in our case. That comes with the support of shimmer loading, pagination, search and more polished interface. Here’s an image of difference between both.
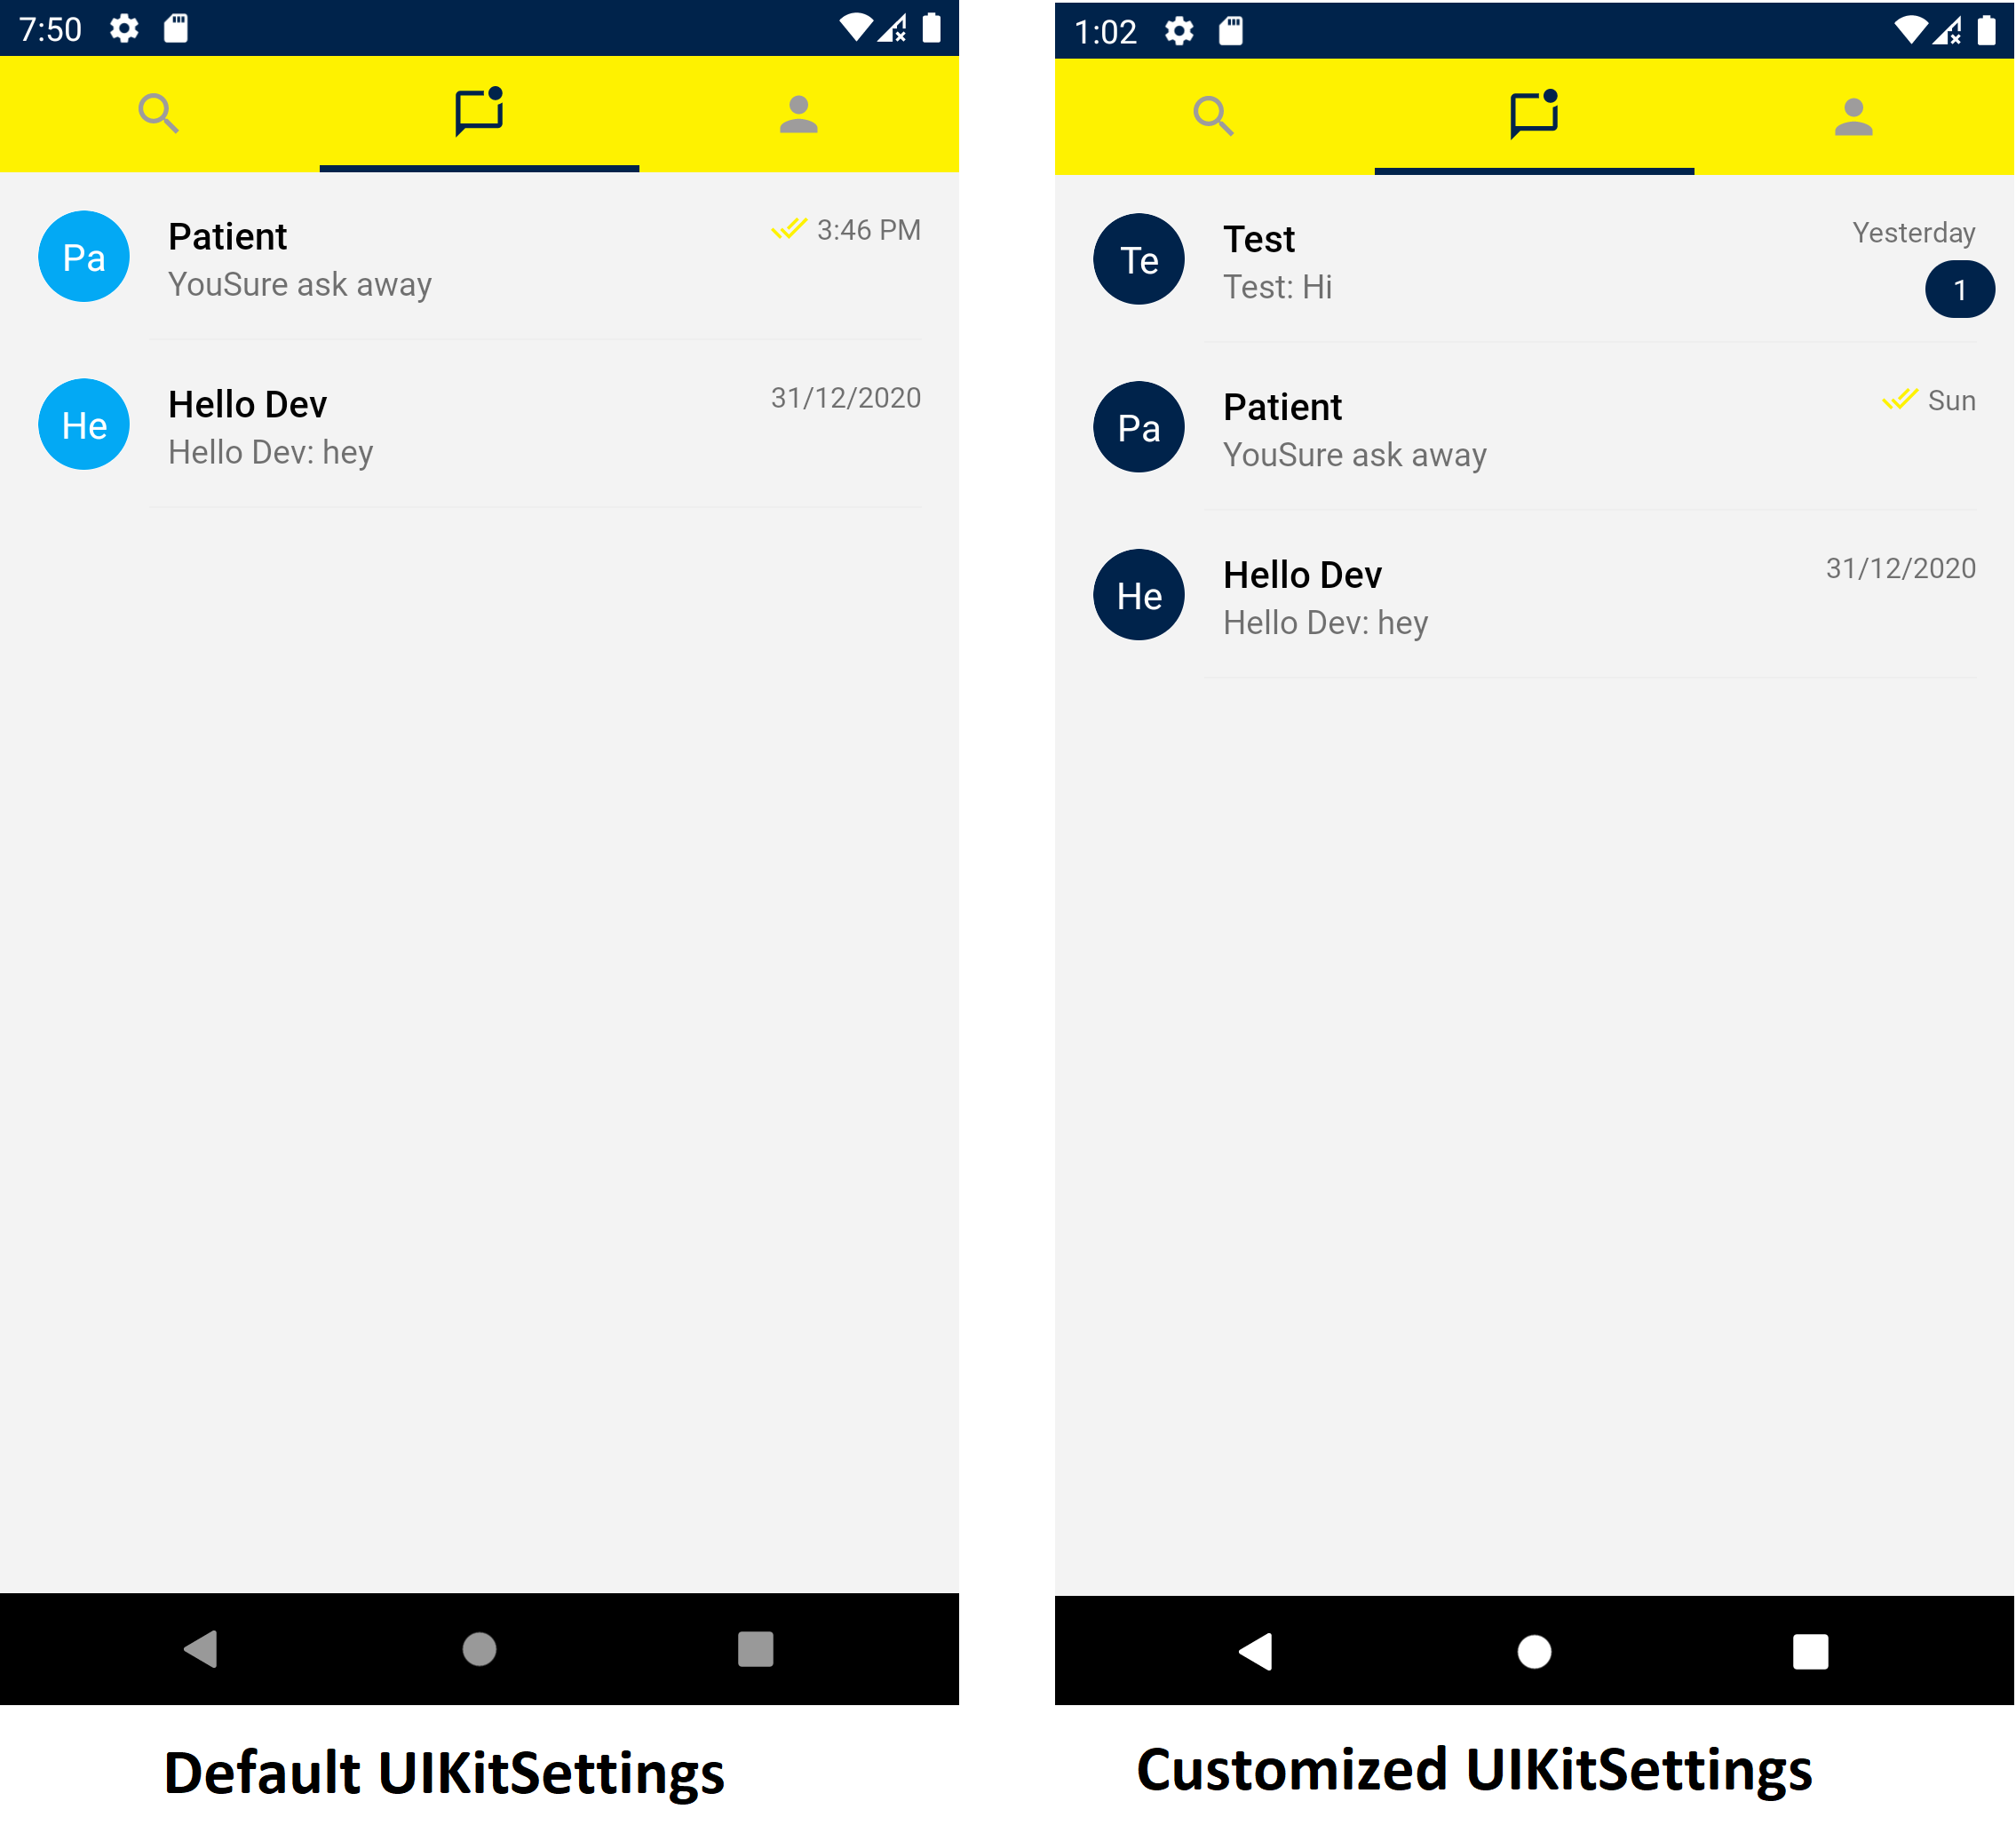
One more thing to note here is the customization of the theming and features of CometChat settings. By default, CometChat gives you blue color for avatars, unread messages etc. But, if you want to customize it based on your own theme, then you can do so by calling UIKitSettings.setColor() method. This method should be called before adding these components or screens in the UI. So, a good place for this would be call this method in your Application class.
For example, I have added this line in my initComet() method in the ZocdocApp.kt class.
{{< gist wajahatkarim3 ed4d2d1988e8d40d0f6db4987796d659 >}}
See line 20, and how I fetch the color through getString() instead of getColor() because CometChat UIKitSettings class needs color in String format. Here’s the difference between how it was before and after the customization setting.
Also, UIKit Settings library is updated by developers weekly where each update includes support of a new feature set. So, it’s a good idea to keep updating the library regularly.
Conclusion and Wrap up
This brings us the whole chat functionality between doctor and patient as seen in the ZocDoc app through the CometChat Pro and Java Chat UI Kit module. In this tutorial, you built a simple UI clone of ZocDoc app with basic chat functionality between patient and doctor. You learned how easy it to use CometChat Pro and Java Chat UI Kit are and how powerful features like user authentication, chat messaging, conversations list etc. can be implemented with not so much effort in a very clean and optimized way. This allows you, as a developer, to focus on the business logic and things that matter most rather than spending time on technical difficulties and minor issues.
I hope you found this tutorial helpful. Don’t forget to check the official documentation of CometChat Pro to explore further. Find the complete source code of ZocDoc clone app and this tutorial here on GitHub.
{{% linkpreview title="wajahatkarim3/ZocDoc-Clone" subtitle="A simple UI clone of ZocDoc app. Contribute to wajahatkarim3/ZocDoc-Clone development by creating an account on GitHub." link="https://github.com/wajahatkarim3/ZocDoc-Clone" thumbnail="https://avatars.githubusercontent.com/u/8867121?s=400&v=4" %}}
I have also written some more articles about CometChat, you can check these here:
{{% linkpreview title="Cometchat" subtitle="All articles about CometChat on wajahatkarim.com site" link="https://wajahatkarim.com/tags/cometchat/" thumbnail="https://www.gravatar.com/avatar/cb3e26de5b49f50cc74a98a7729b3f93?s=640" %}}