Minimal DI Setup for Your App Using Hilt
By Wajahat Karim • 06.Jun.2022

In this article, we are going to make an app that will show you the list of all the universities in a country we want to know about. We will use the Dagger-Hilt approach to implement the Dependency Injection Design pattern and our app will follow the MVVM pattern, so let's get started.
Note: Since this article is focusing on an intermediate/advanced topic of Dependency Injection, so we are assuming that you the readers are well familiar with the concepts like MVVM, Repository pattern, and Retrofit. If you are not familiar and haven’t worked with these concepts, please do check them first before proceeding.
API Setup
For any API to integrate into the app, we are usually provided with a base URL. We will define that URL in an object called Constants. This will also contain other constants used in the app like country name etc.
object Constant {
  const val BASE_URL=”http://universities.hipolabs.com”
  const val COUNTRY_NAME=”Turkey”
}
Once you have added the base URL, next is the model of our app. The models are basically the domain data classes that are based on the API’s JSON responses. We would highly recommend you to not use the same data class for JSON response and model class. Here’s the example University data class based on the response from our API.
data class University(
   val alpha_two_code: String,
   val country: String,
   val domains: List<String>,
   val name: String,
   val state: String,
   val web_pages: List<String>
)
Finally, it’s time to integrate API into your app. You can use any solution like Volley, Retrofit, Ktor, etc. We are going with the Retrofit for this article, and here’s how an API is declared.
interface UniApi {
    @GET("/search")
    suspend fun getUniList(
       @Query("country") country: String
    ) : Response<List<UniItem>>
}
With the API setup ready to go, it’s time to add the Dependency Injection. There are many solutions like Dagger, Hilt, Koin, etc. In this article, we are using Hilt.
Hilt Setup
At first, we have an App class which is inherited from the Application() class. Annotate that with @HiltAndroidApp.
@HiltAndroidApp
class UniApp : Application() {
    // ...
}
This annotation tells Hilt that this is the main Application class for which DI is being set up.
Next, we need modules for our app. You can create as many modules as you need. For the simplicity and minimal setup, we are creating a single module called as AppModule. This will basically be responsible for providing all the dependencies like Retrofit API, Room Database, SharedPreferences, Repositories, and many more. It is often a good practice to create separate modules for separate purposes.
@Module
@InstallIn(SingletonComponent::class)
object AppModule {

    @Provides
    @Singleton
    fun getRepo(api: UniApi):Repository=Repository(api)

    @Provides
    @Singleton
    fun getApi(retrofit:Retrofit):UniApi = retrofit
        .create(UniApi::class.java)

    @Provides
    @Singleton
    fun getRetrofit():Retrofit=Retrofit.Builder()
       .baseUrl(BASE_URL)
       .addConverterFactory(GsonConverterFactory.create())
       .build()
}
Obviously, for the above code to work, you would need a Repository class. So, here’s how it’s implemented:
class Repository(private val api: UniApi) {

   suspend fun getUniItem(name:String):Response<List<UniItem>> =
    withContext(Dispatchers.IO){
        api.getUniList(name)
   }
}
The repository class has an argument of type API, so by using DI with the Dagger Hilt approach, we have no need to worry about the instance of the API class. Fortunately, Hilt will do this for us.
Using Dependencies
Finally, we are at a point where we can use the actual dependencies like Repository in our UI layers such as ViewModel or Fragment/Activity.
For injecting dependencies in the ViewModel, you need to use @HiltViewModel. This will tell ViewModel to get required class instances from the Hilt passed in the constructor. Also, note that there’s an @Inject annotation used along with the constructor.
@HiltViewModel
class MainViewModel @Inject constructor(
   private val repo: Repository
) : ViewModel() {

   val responseList: MutableLiveData<Response<List<UniItem>>> = MutableLiveData()

   init {
     getResponses(CountyName)
   }

   fun getResponses(name:String) {
       viewModelScope.launch {
           responseList.value = repo.getUniItem(name)
       }
   }
}
And to use this ViewModel in the Activity or Fragment, you need to make sure that those are annotated with @AndroidEntryPoint annotation.
@AndroidEntryPoint
class MainActivity : AppCompatActivity() {

   private lateinit var binding: ActivityMainBinding
   private val vm by viewModels<MainViewModel>()

   override fun onCreate(savedInstanceState: Bundle?) {
       super.onCreate(savedInstanceState)
       binding = ActivityMainBinding.inflate(layoutInflater)
       setContentView(binding.root)

       vm.responseList.observe(this, { response ->
            if(response.isSuccessful) {
                // here you can call you Adapter`s instance and do whatever you wanted to do
                // with the list response that contains the list of universities
            }
            else Toast.makeText(baseContext,"Unsuccessful",Toast.LENGTH_SHORT).show()

        }
       )
   }
}
This is how you can set up a simple Repository dependency used in the ViewModel which in turn is using Retrofit dependency. Here’s what the graph looks like.
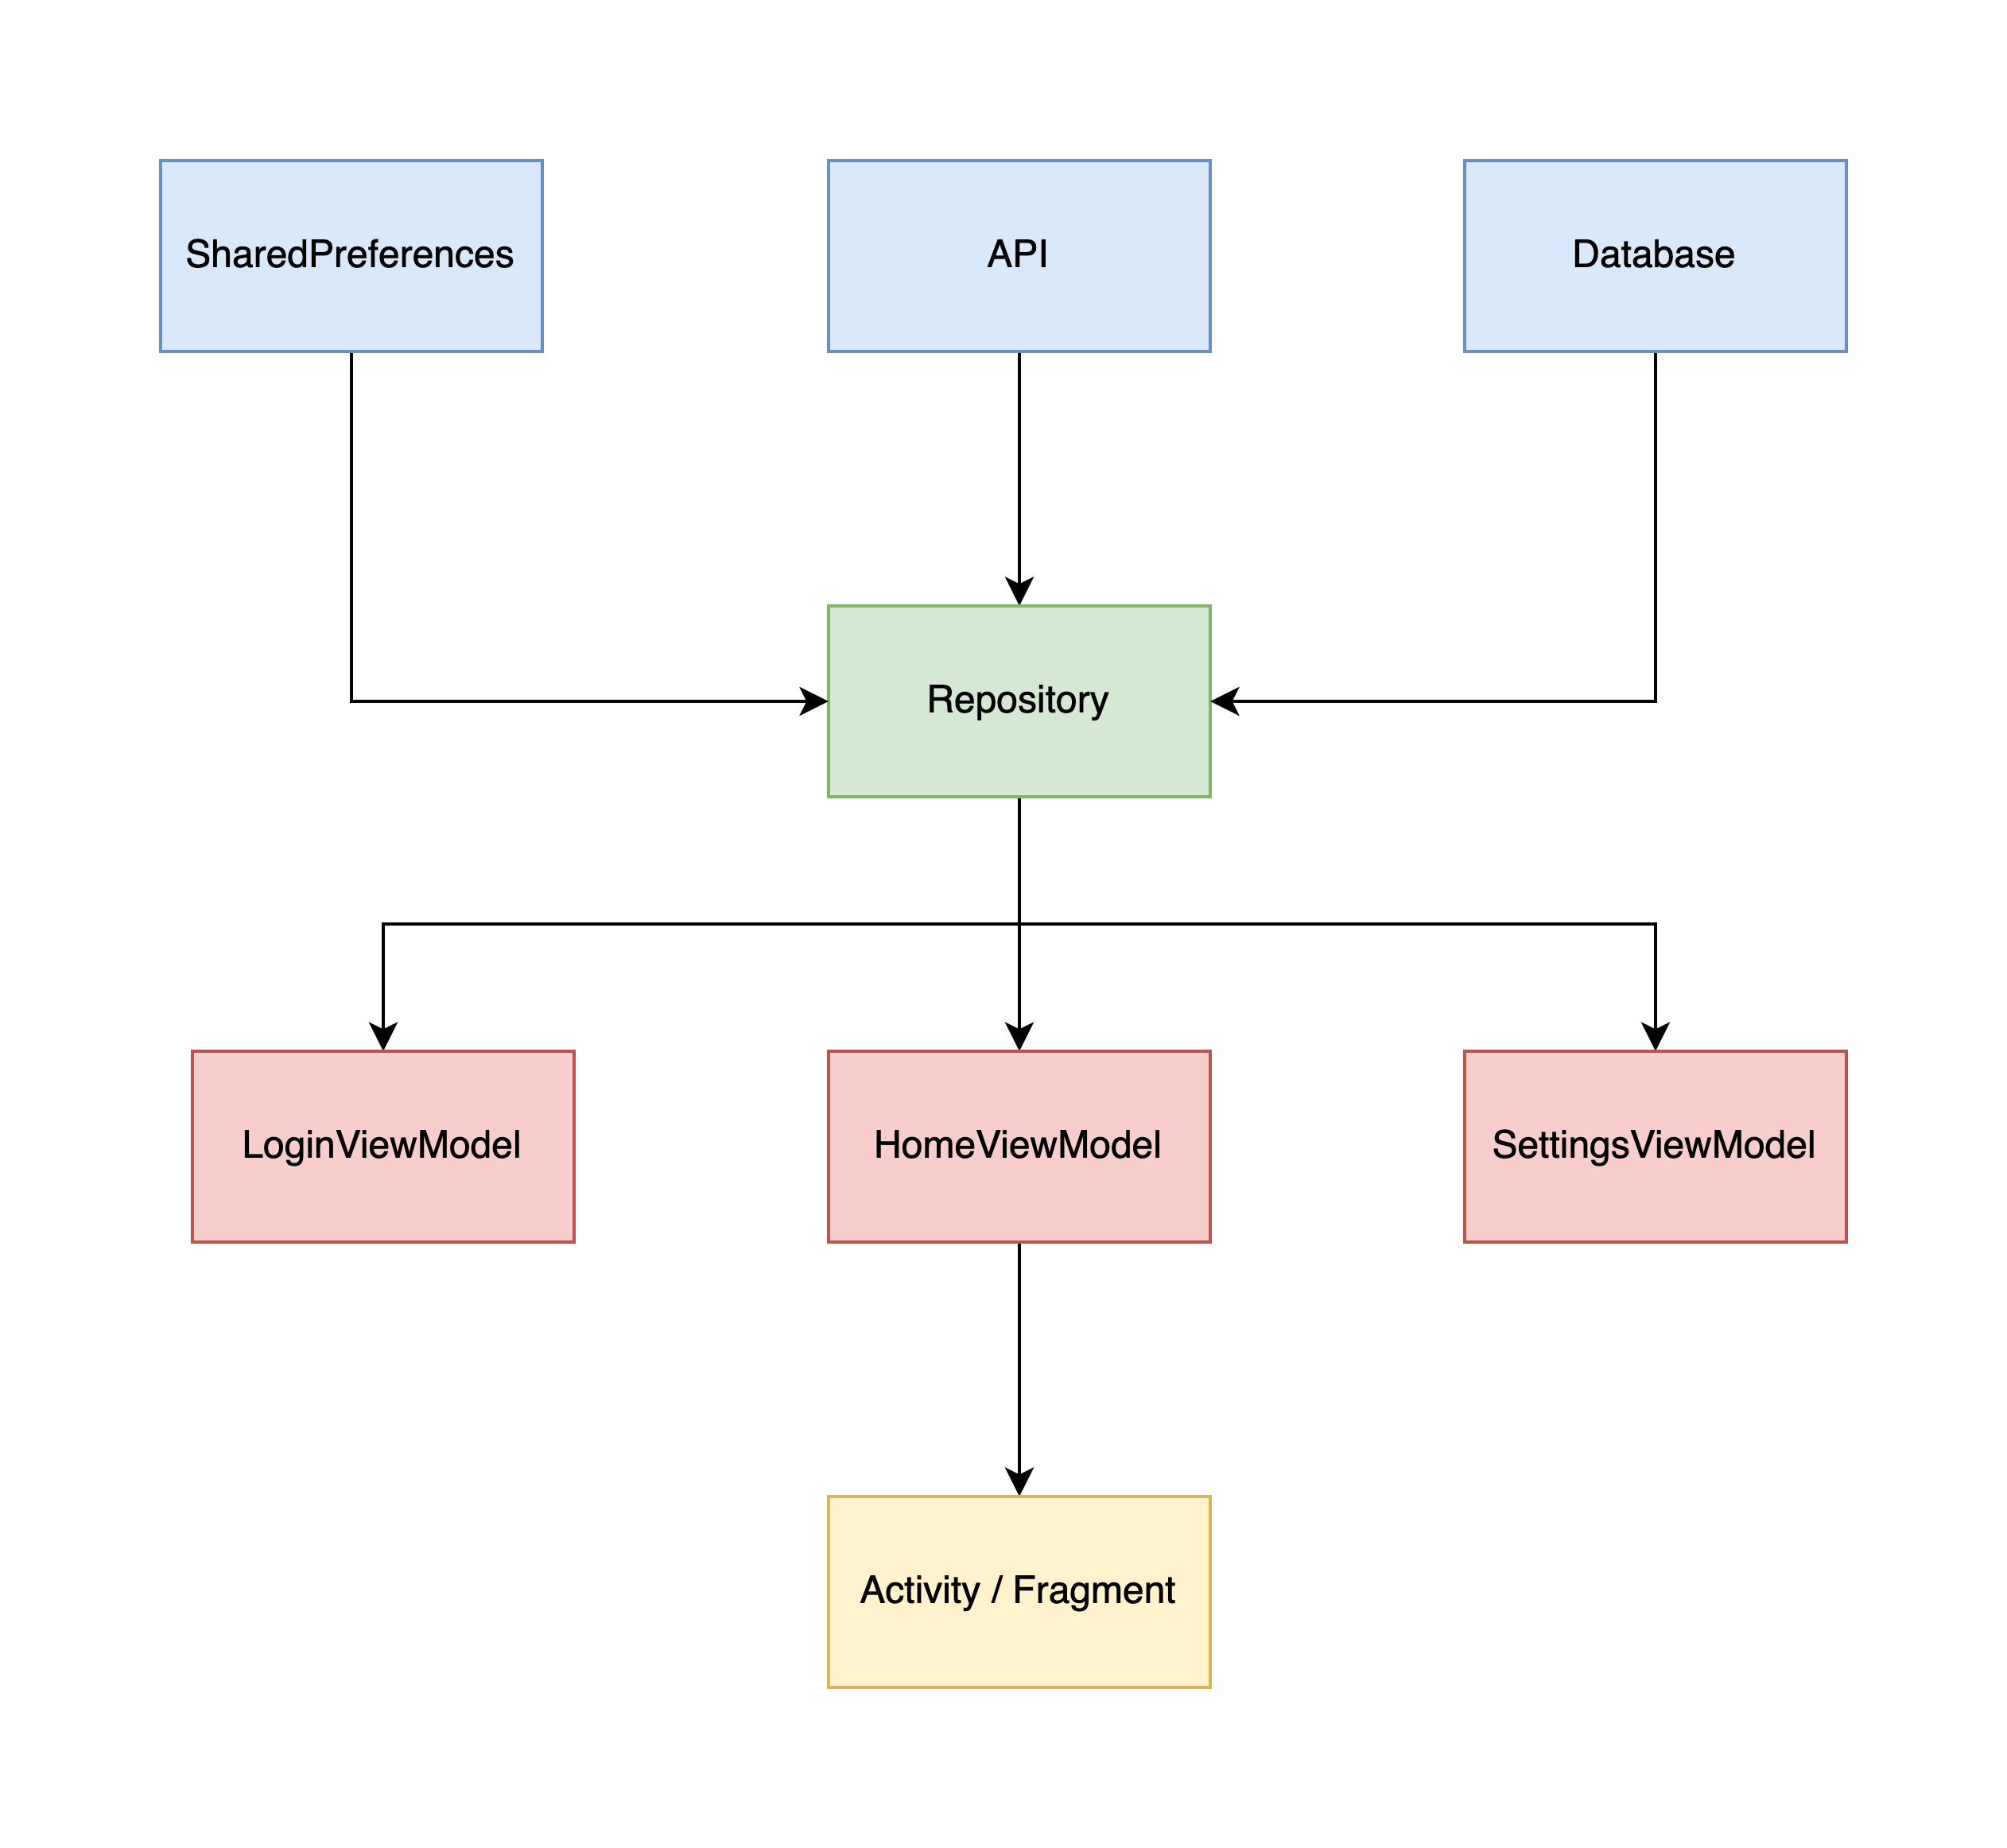
Note how you can inject other dependencies like Database in the repository and how that repository can be used in other ViewModel classes and Activity and Fragments. You can read more advanced usage of Hilt in their documentation. Also, you can check a more complex example of Hilt in the Imagine app code available on Github here.
{{% linkpreview title="GitHub - wajahatkarim3/Imagine: An simple image gallery app to showcase modern Android development architecture" link="https://github.com/wajahatkarim3/Imagine" thumbnail="https://opengraph.githubassets.com/646b62b2756fe7a7309693d7abb0aefb9ef4e77f250ce5b41149cd5a293393bc/wajahatkarim3/Imagine" %}}
At the end, please [Subscribe to my newsletter DroidUp](https://wajahatkarim.substack.com) to learn learn about the latest things, tips, and skills in Android development manually handcrafted and curated by [Wajahat Karim](https://wajahatkarim.com).