Basics of Constraint Layout
By Wajahat Karim • 31.May.2022
With over 2 billion Android devices running in the world with different sizes and targets like mobiles, tablets, TVs, cars, embedded hardware and so on, Android UIs have become a very impactful part of both Android users and developers. With the emerging need of building complex UIs, Android gives you some features to help. One of them is the Constraint Layout.
Why Constraint Layout?
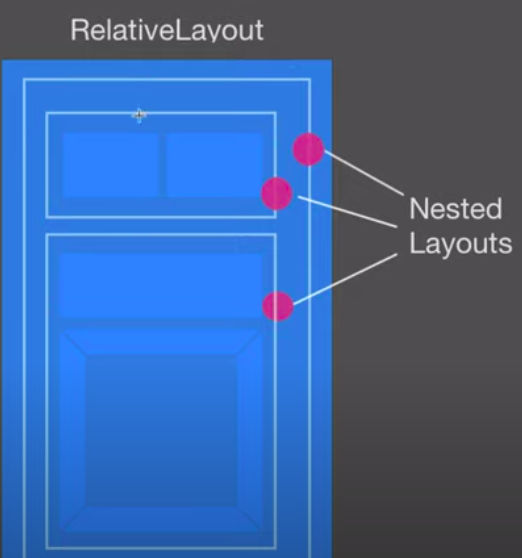
Before Constraint Layout, Android UIs are created with several View Groups such as Linear Layout, Frame Layout, and RelativeLayout etc. In the history of Android development, these layouts have been quite useful in creating UIs. And nesting is one of the major issues which Android developers deal with on a regular basis - especially with usage of above-mentioned layouts. This not only makes layout files large to understand, but also affects performance of UI rendering as well.
What is Constraint Layout?
The ConstraintLayout is a newly announced View Group by Android team which solves problems like nesting and performance. This not only helps developers to build more complex and large UIs, but also it comes with a flat hierarchy.
This article series is going to explain all the features in ConstraintLayout step by step with the help of real UI examples. Now, you are going to learn the basics of Constraint Layout first in this article below.
What is a Constraint?
ConstraintLayout works based on the relationships between views and those are called as Constraints. The essential block of ConstraintLayout is developing constraints. A Constraint defines the relationship among views in the layout and controls how one view is aligned and positioned relatively to other views.
ConstraintLayout is a lot similar to RelativeLayout and uses the same concepts of creating relationships between views to align and position. The only difference is that ConstraintLayout enforces developers to add relationships to all sides of every view, while RelativeLayout doesn’t expect any relationships at all. It depends on the developer whether to put it or not.
Adding ConstraintLayout in Your Project
To use ConstraintLayout in your project, add the library as a dependency in the app level build.gradle file. This is not necessary if your project already have the dependency.
implementation "androidx.constraintlayout:constraintlayout:$constraintVersion"
Adding Constraints
Once your dependency is set, you can add ConstraintLayout by adding code like below:
<androidx.constraintlayout.widget.ConstraintLayout
  android:layout_width="match_parent"
  android:layout_height="match_parent" >

</androidx.constraintlayout.widget.ConstraintLayout>
Views and widgets such as Buttons, Texts etc. are added inside the ConstraintLayout tag, which then becomes the parent to all the nested elements. In the above code, the device’s screen serves as the ConstraintLayout’s parent.
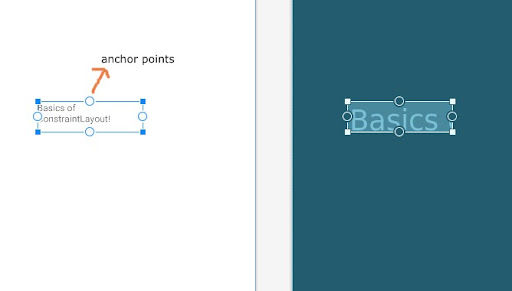
In Constraint Layout, each view has four sides, which are called anchor points (Look at the circles in the below image), These anchor points operate as a source or a target for constraints
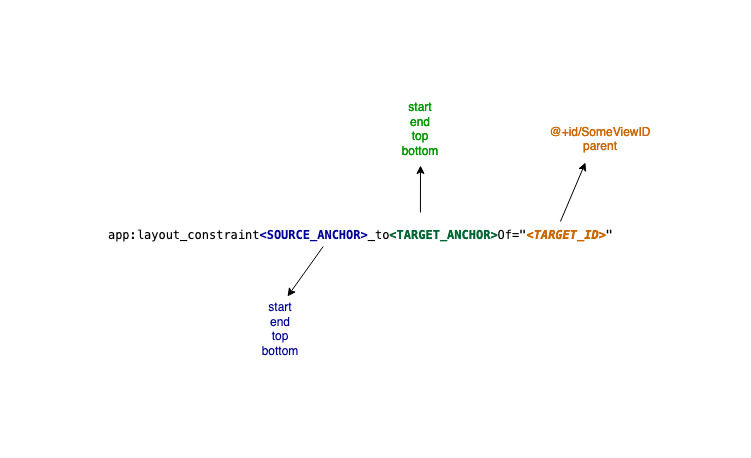
To define the view's position, we have to add **at least one horizontal and one vertical constraint** for it. To set the **horizontal** or **vertical** position of the view, you will need to use some constraints provided in ConstraintLayout.
These constraints are written as shown in the image below. Note that Source and Target are some views like Buttons, Checkbox etc. And you can refer to these constraints with either any other view’s ID or the parent. Parent for the root layout will be the device itself, and in the case of nested layouts, parent will be the layout containing that particular view.
Now, let’s discuss each one by one.
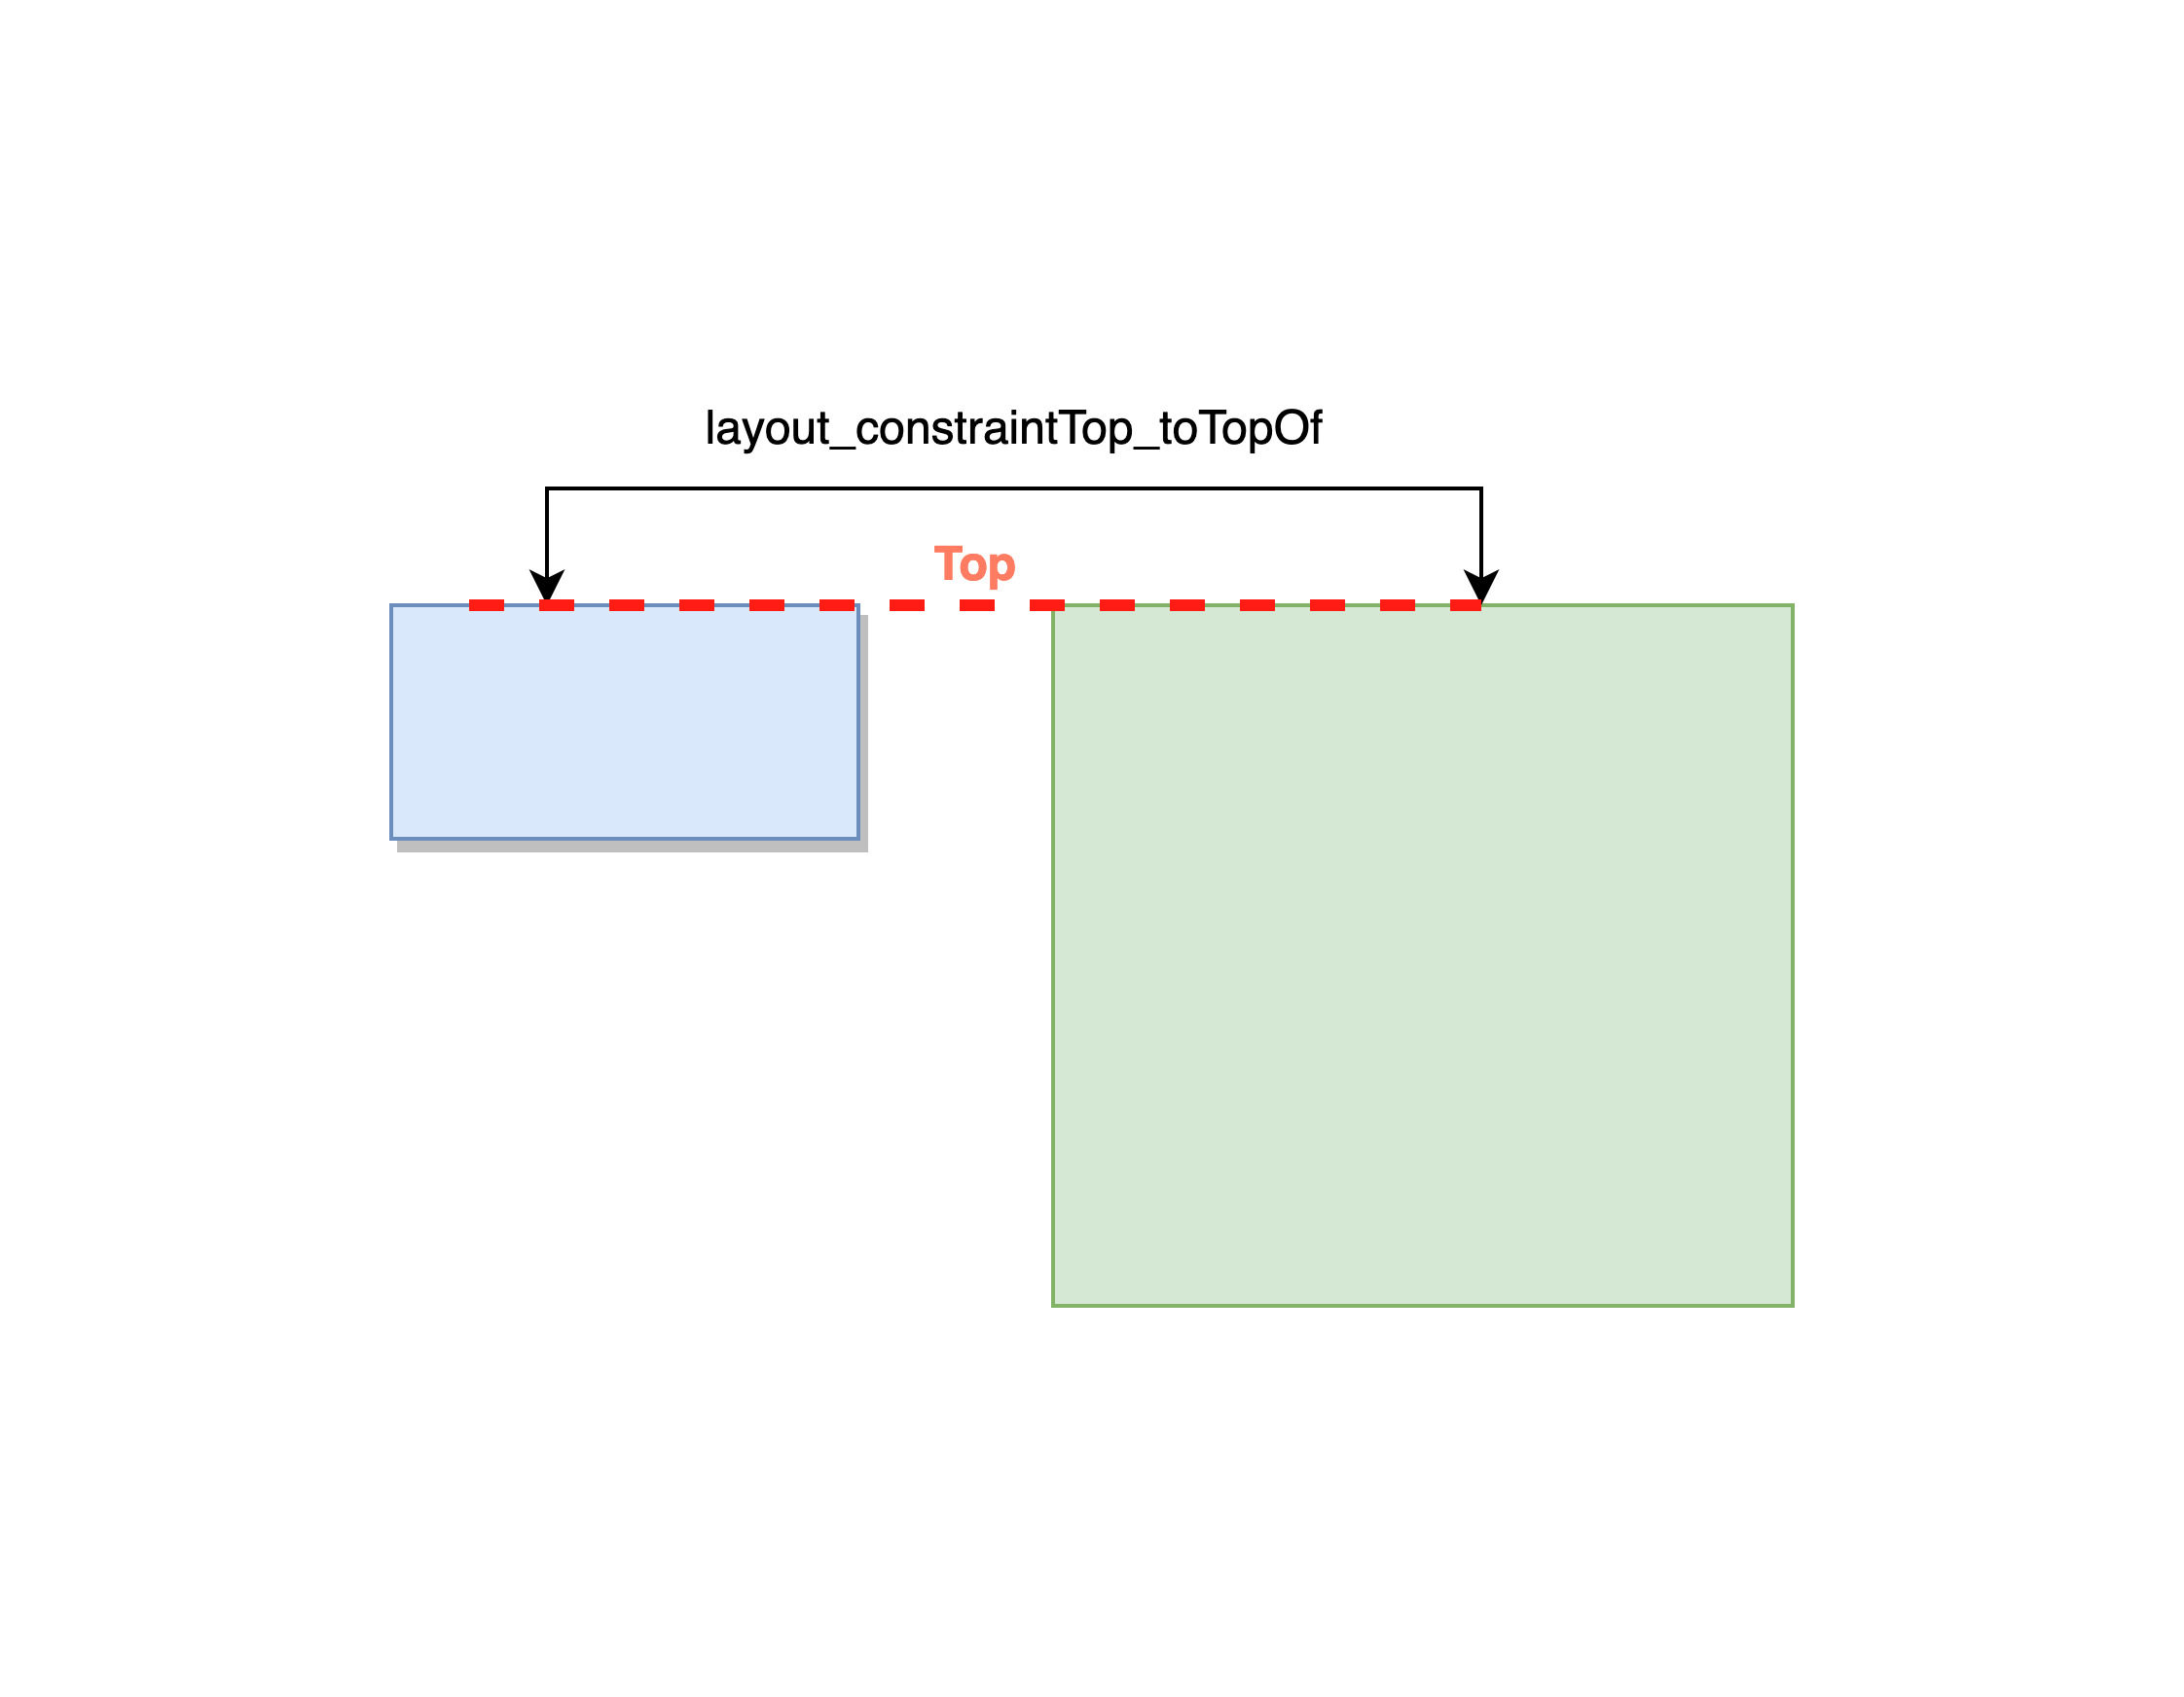
layout_constraintTop_toTopOf
This constraint tells that the top of the source view should be the same as the top of the target view. As you can see in the image below, the top layer of both green and blue views are in the same vertical position.
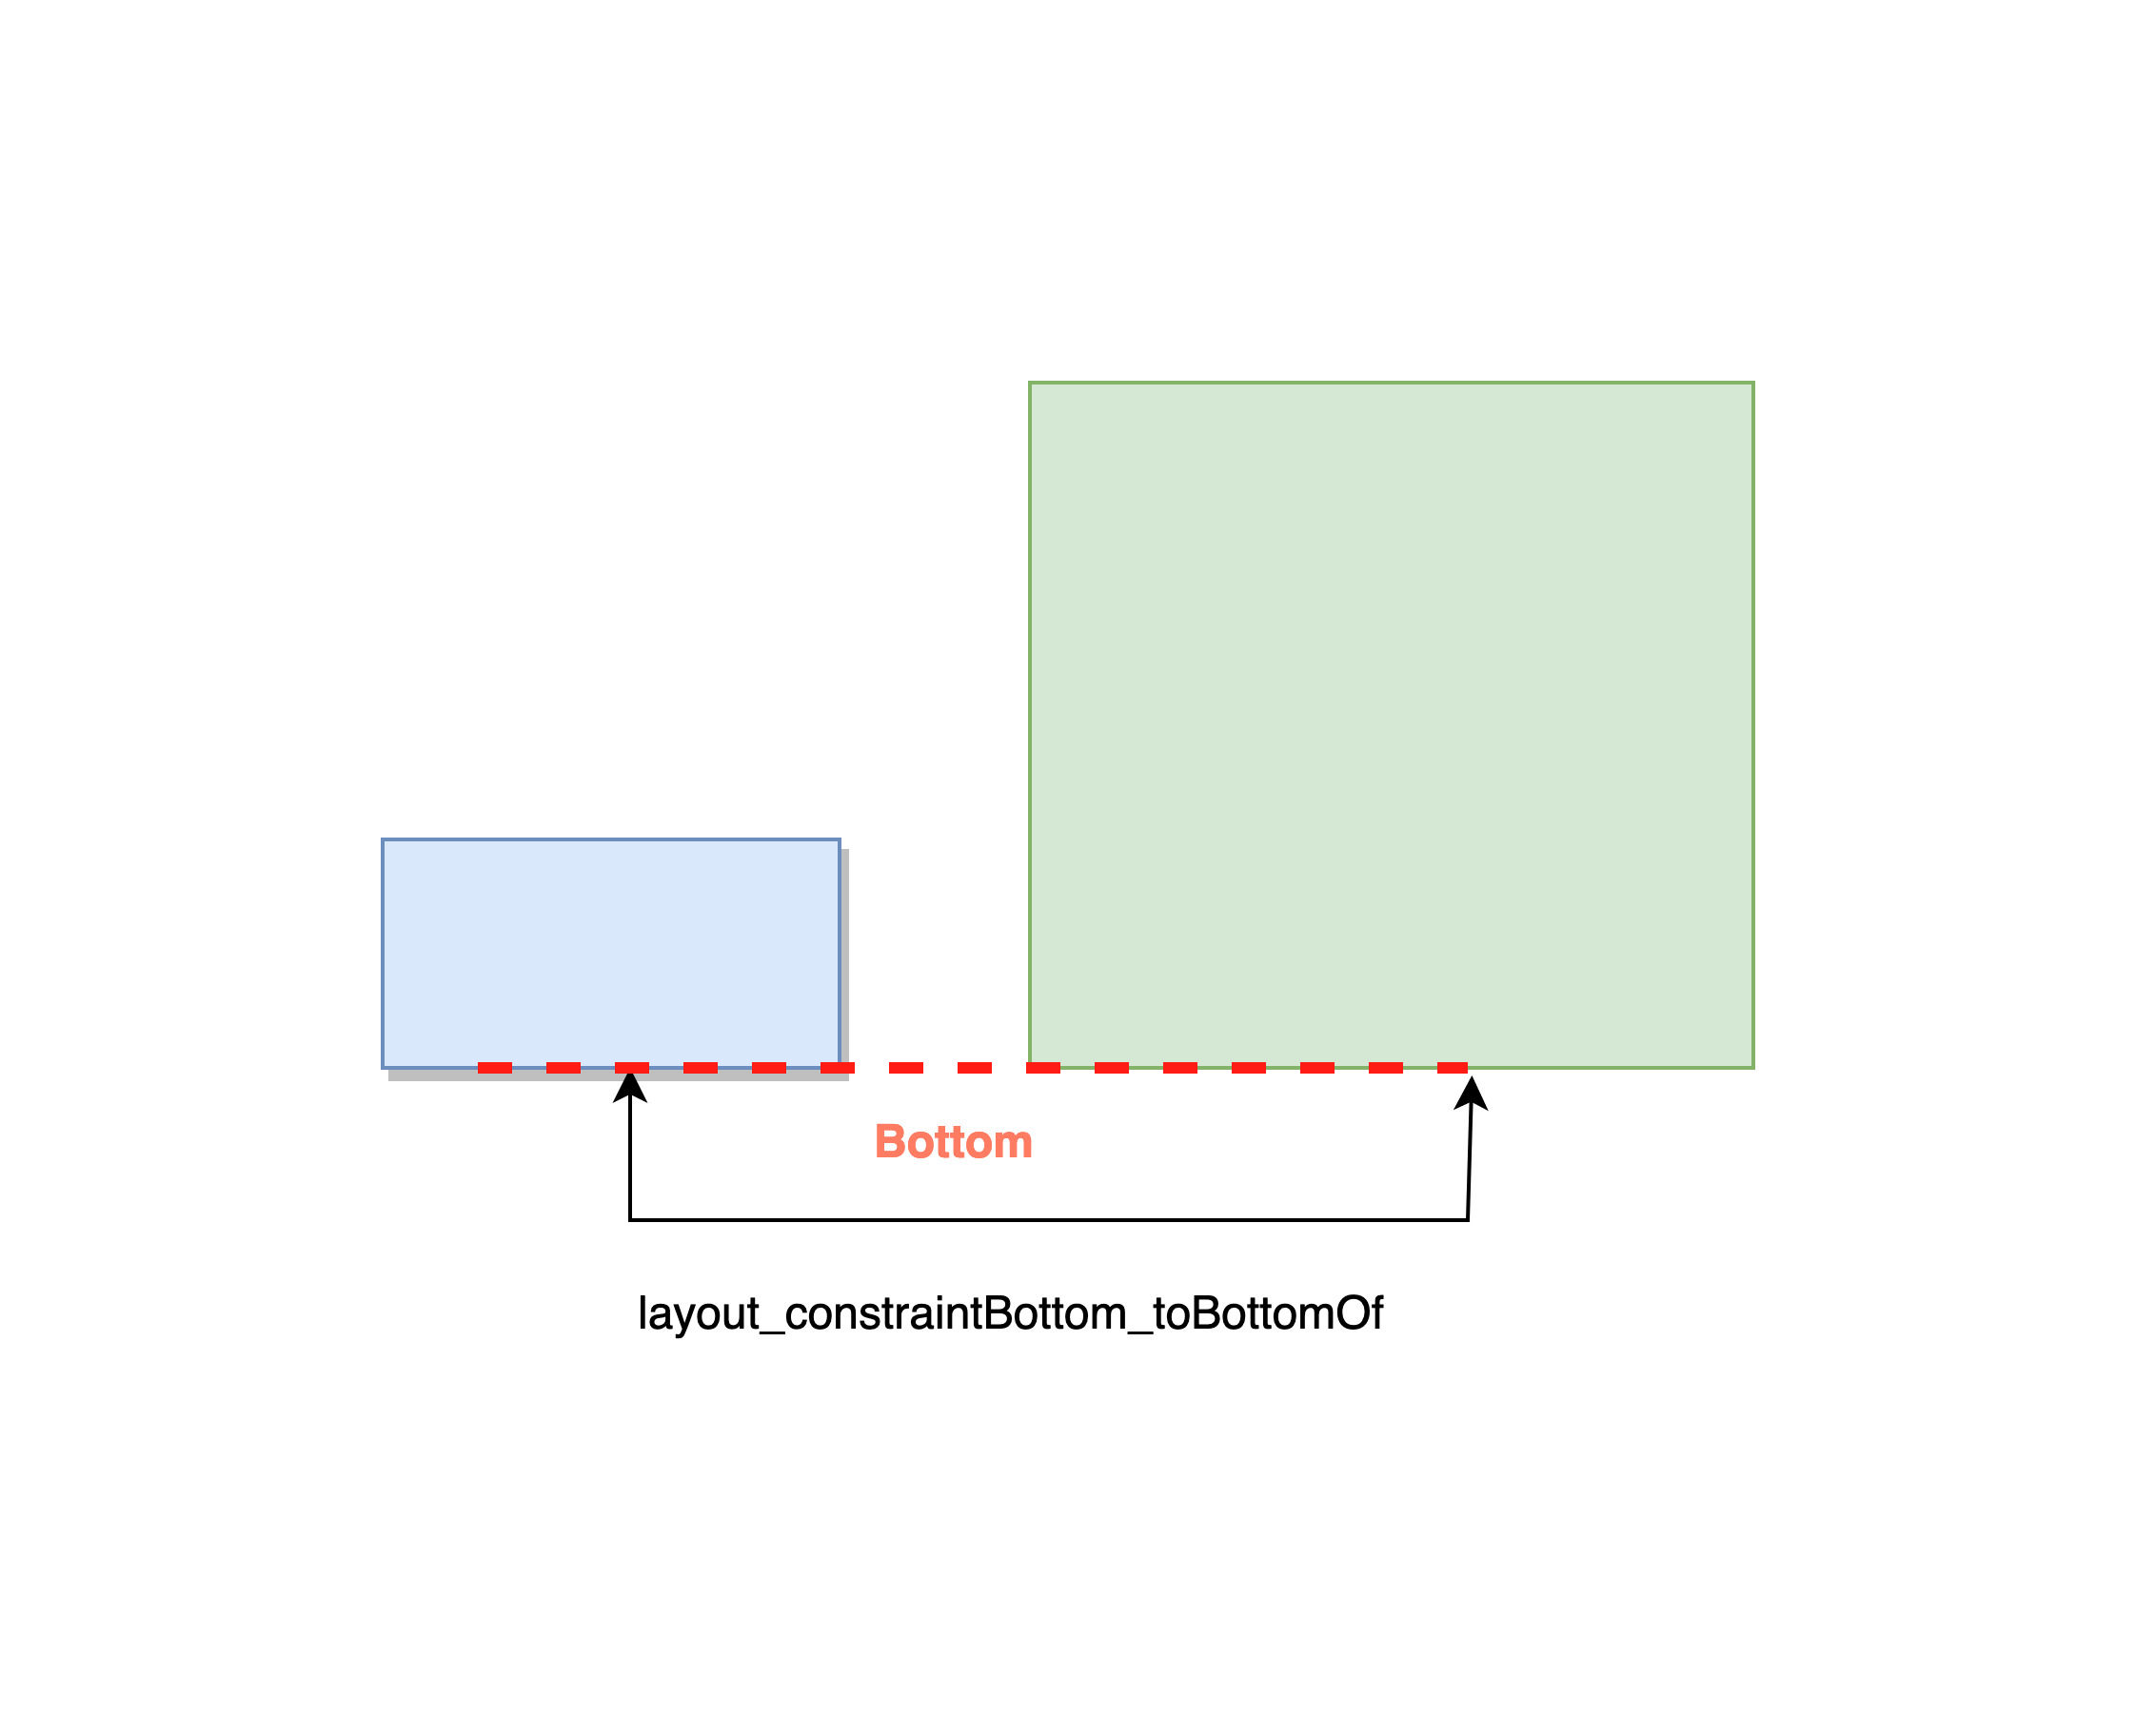
layout_constraintBottom_toBottomOf
This constraint tells that the bottom of the source view should be the same as the bottom of the target view. As you can see in the image below, the bottom layer of both green and blue views are in the same vertical position.
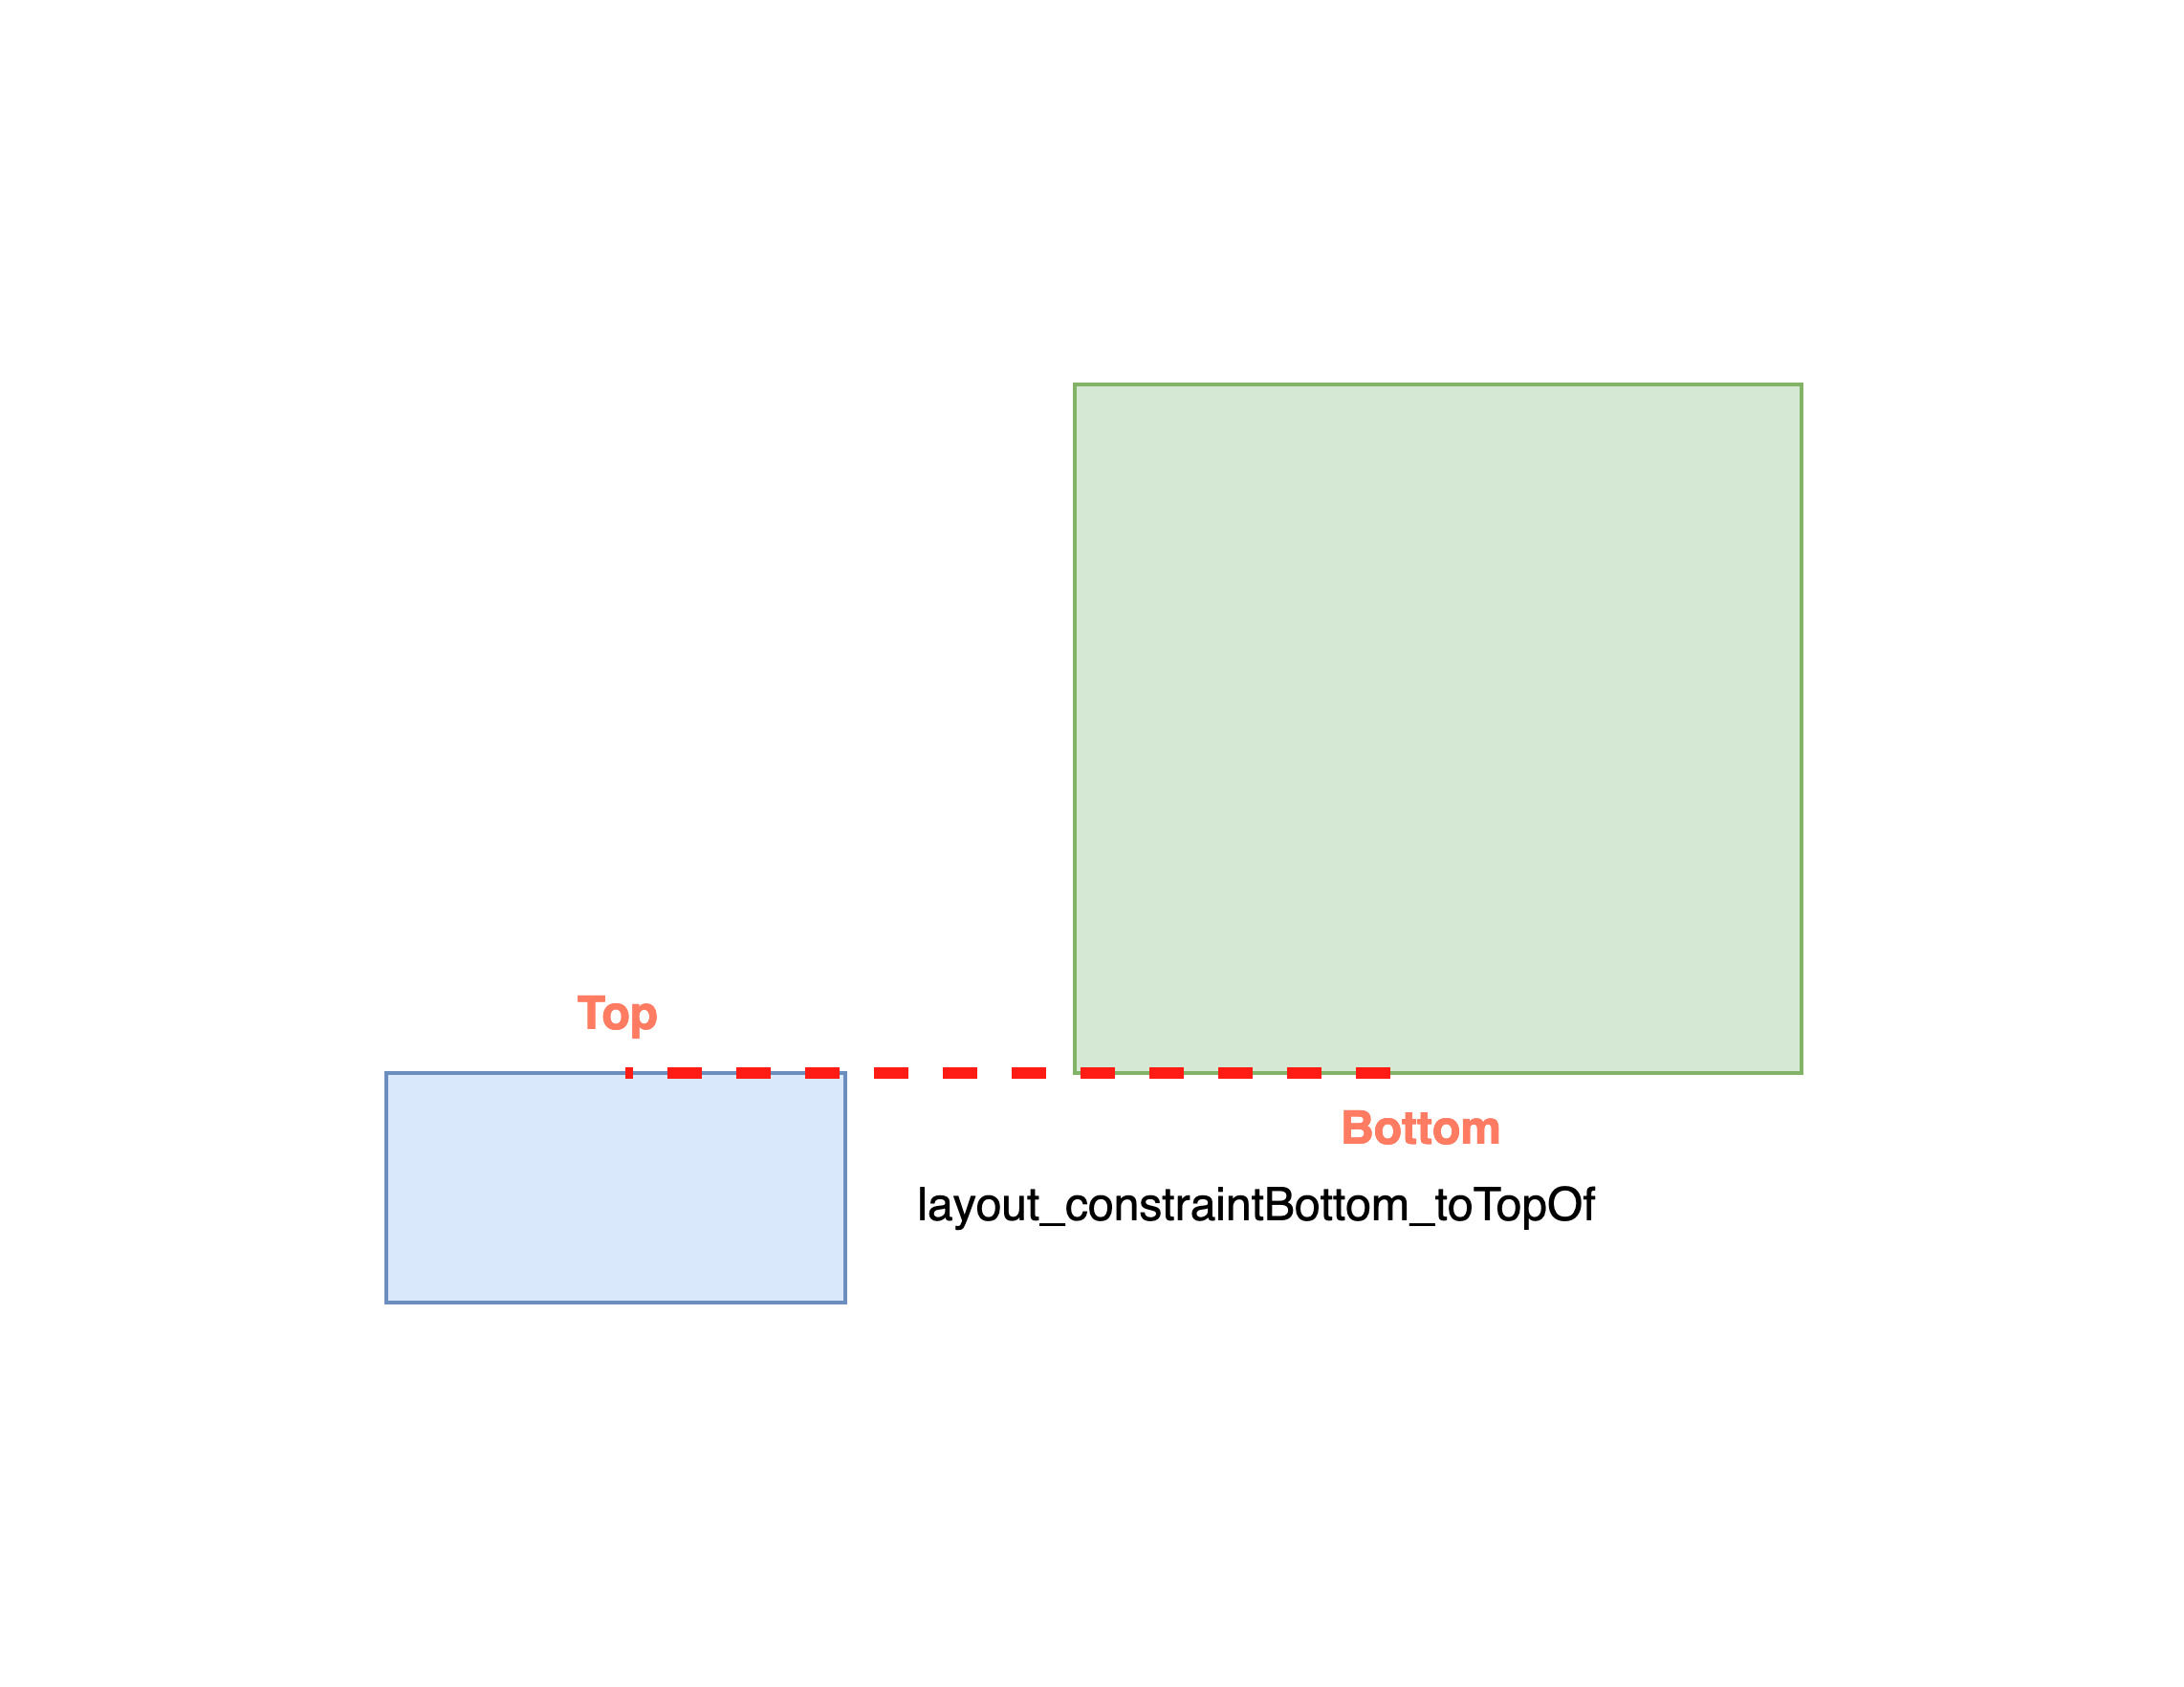
layout_constraintBottom_toTopOf
This constraint tells that the bottom of the source view should be the same as the top of the target view. As you can see in the image below, the bottom layer of green and top layer of blue views are in the same vertical position.
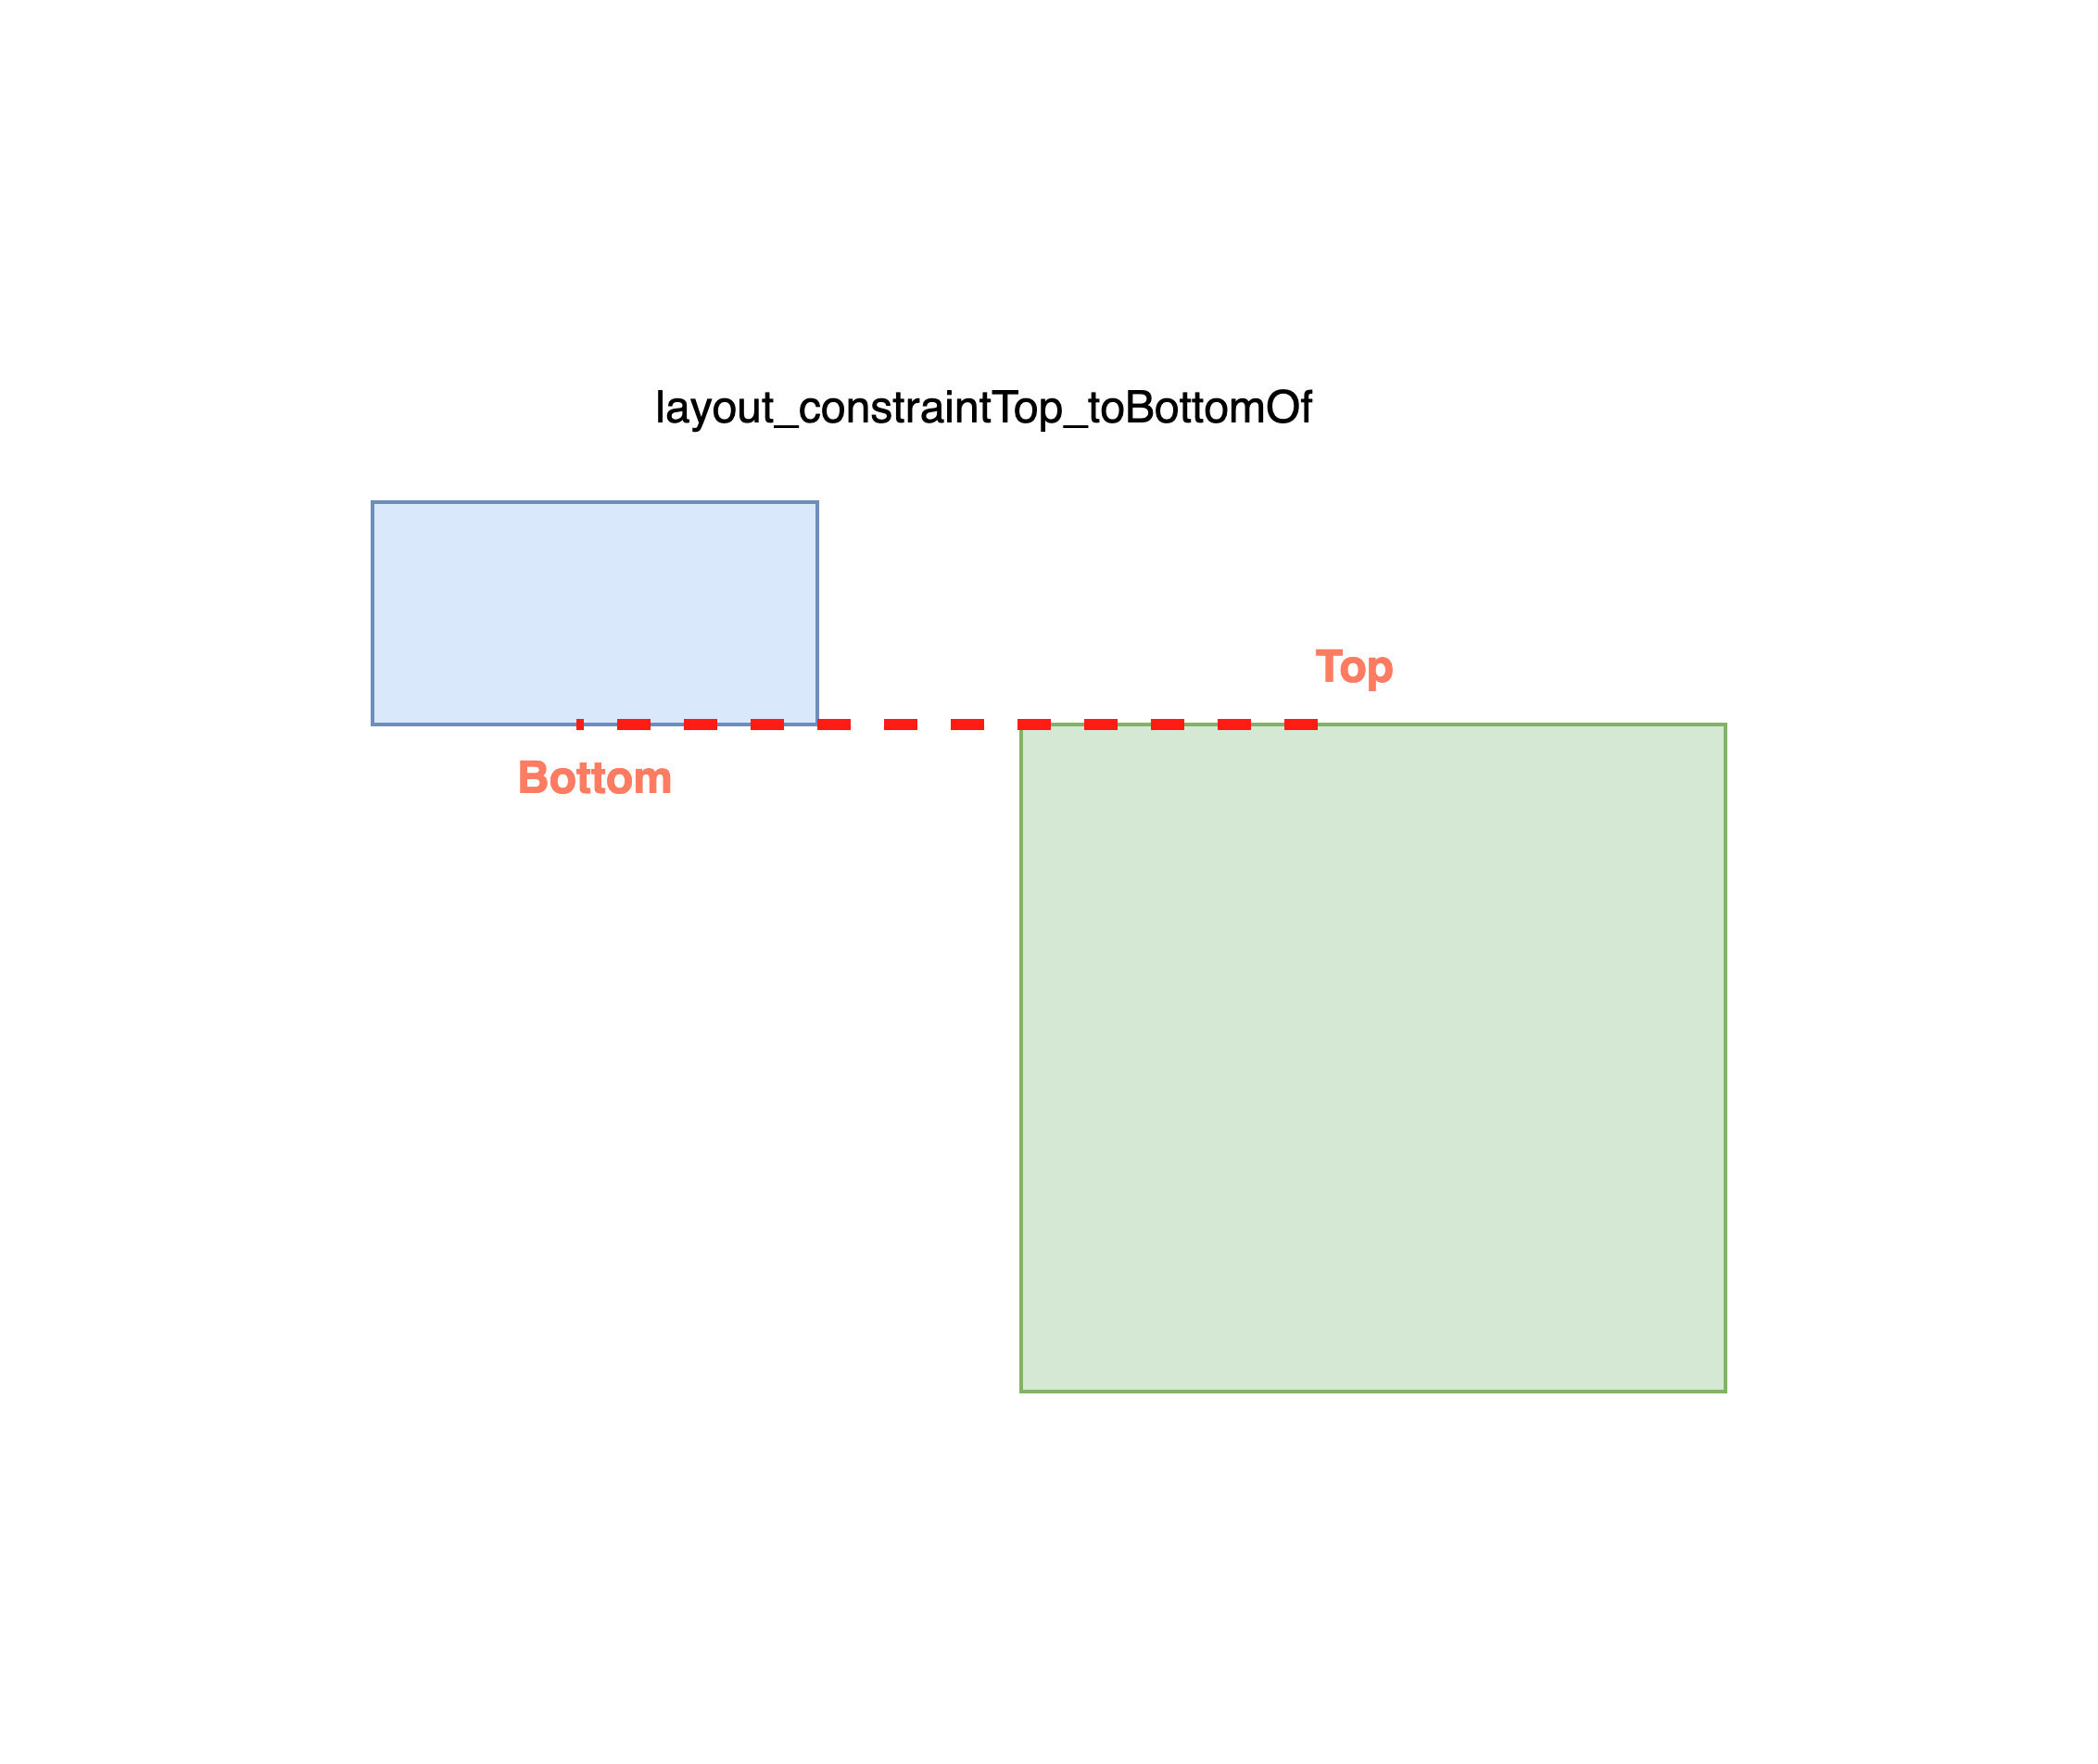
layout_constraintTop_toBottomOf
This constraint tells that the top of the source view should be the same as the bottom of the target view. As you can see in the image below, the top layer of green and bottom layer of blue views are in the vertical position.
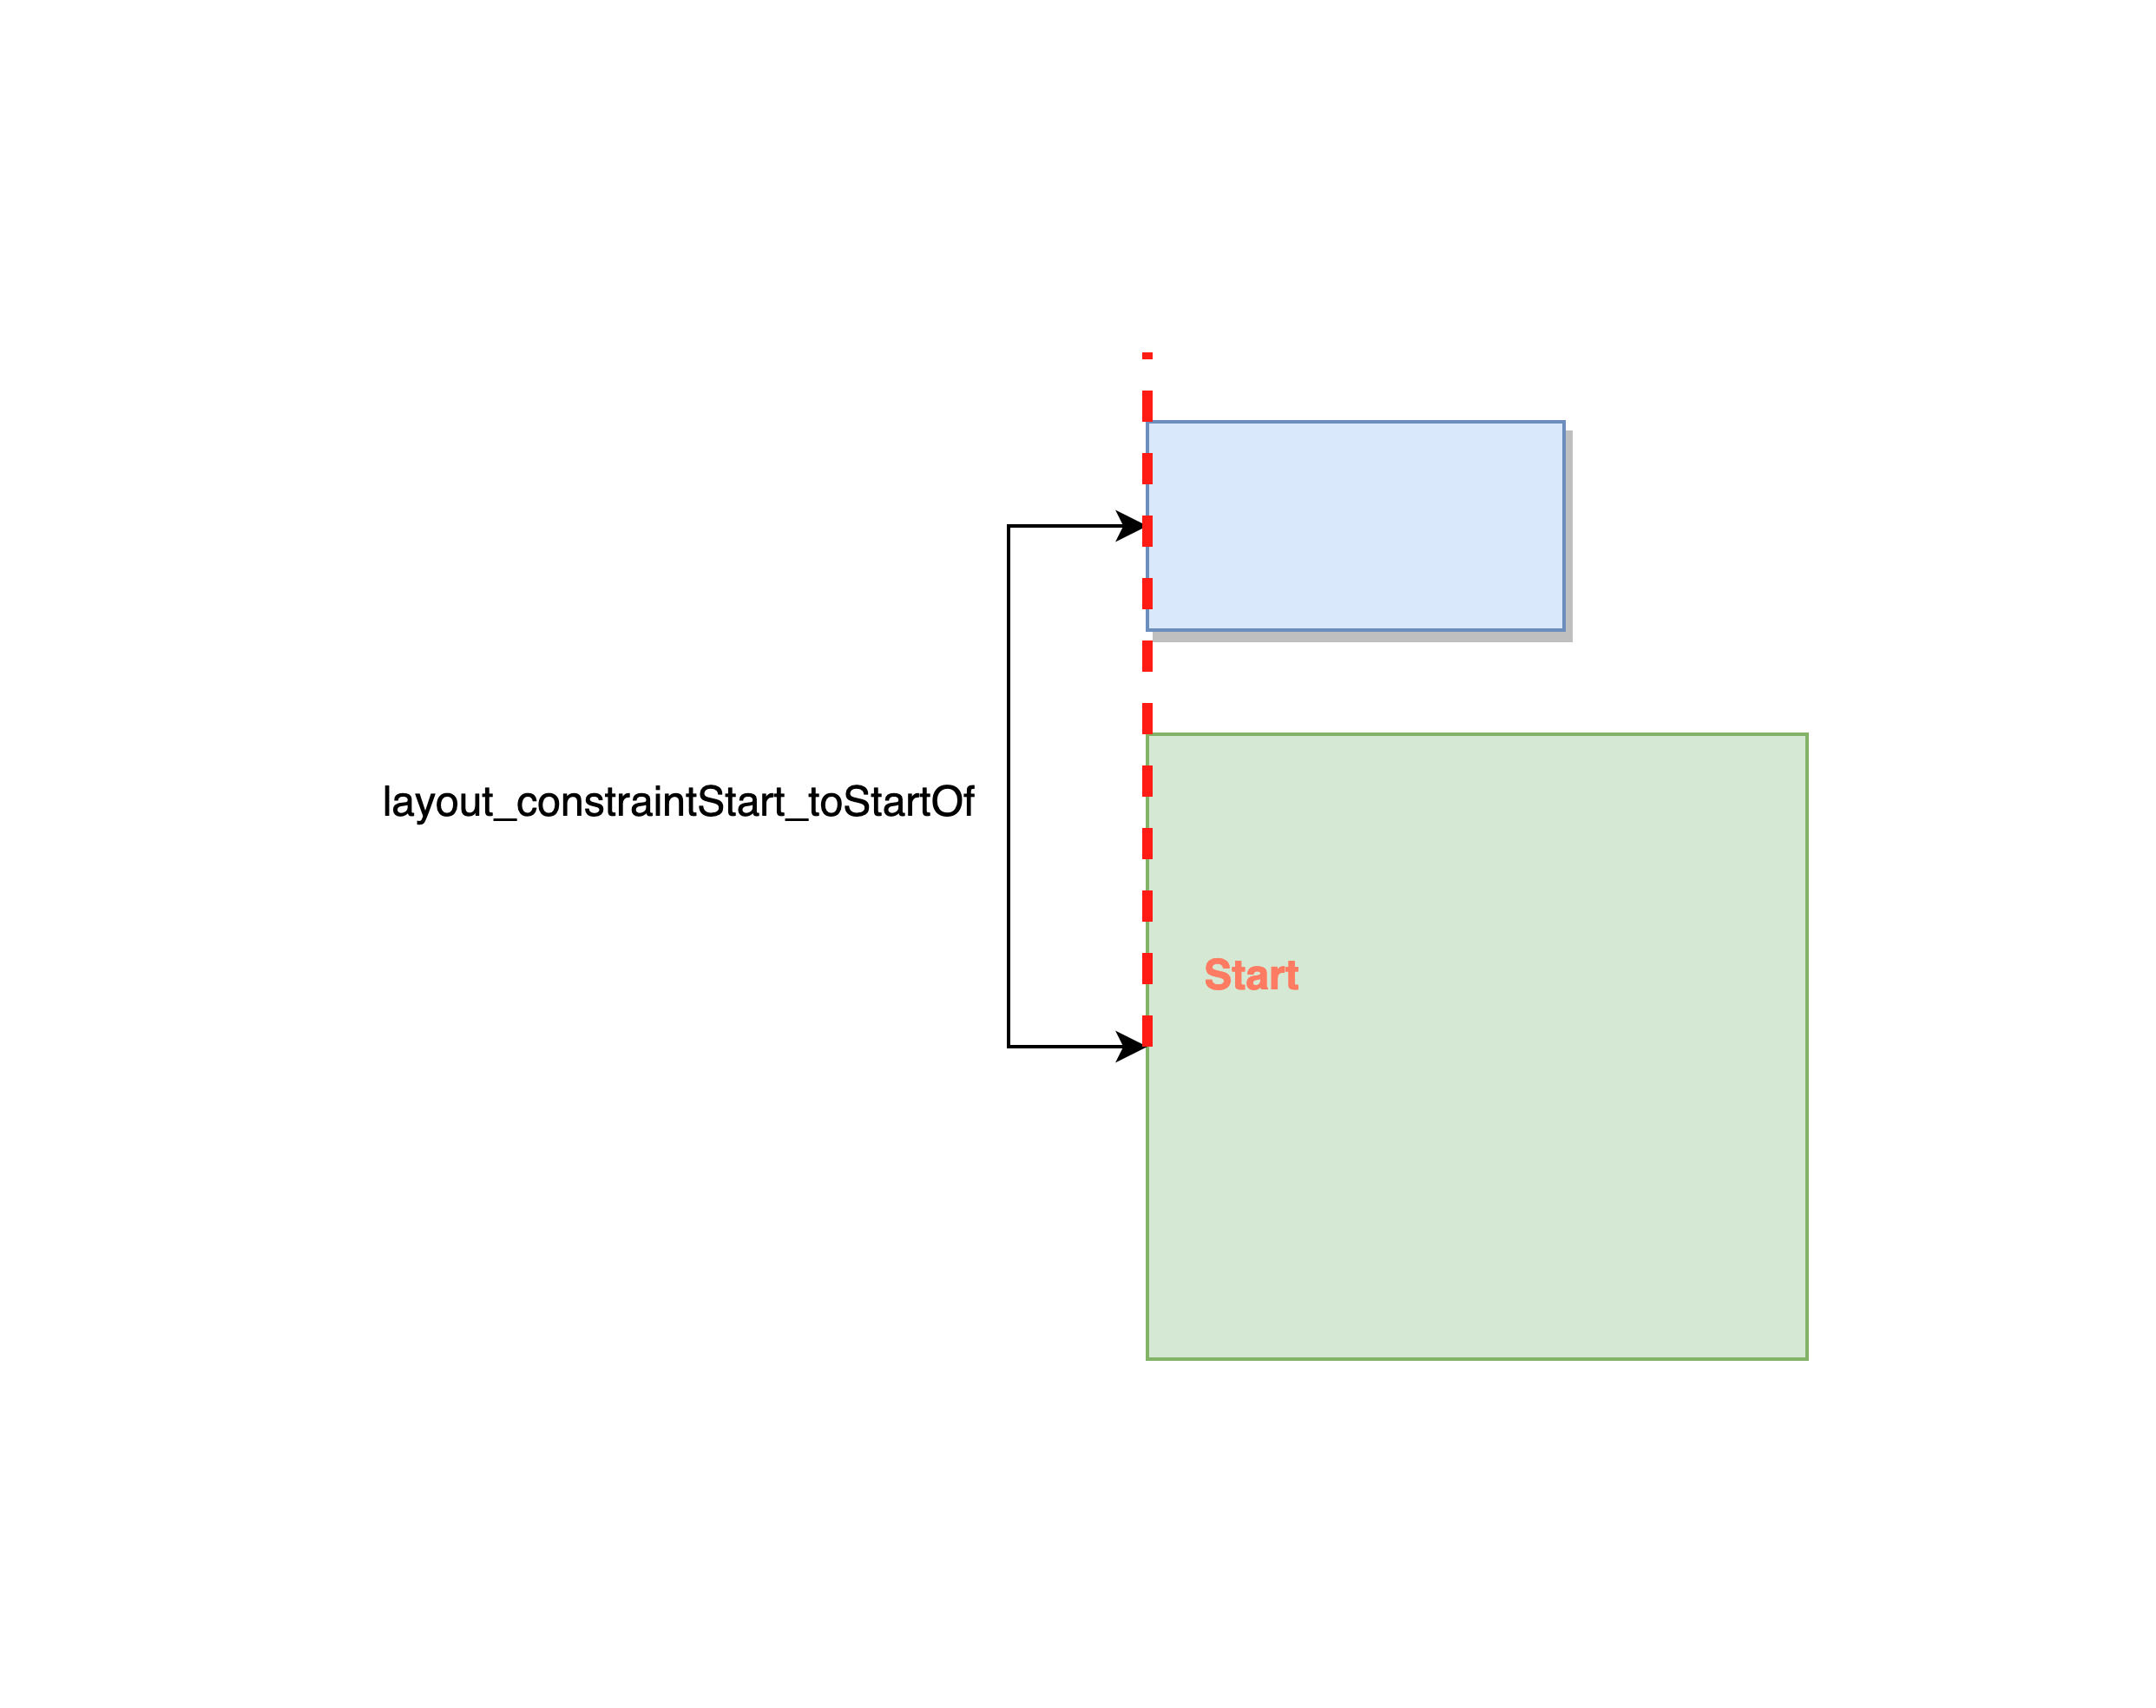
layout_constraintStart_toStartOf
This constraint tells that the start of the source view should be the same as the start of the target view. As you can see in the image below, the start layer of green and blue views are in the vertical position.
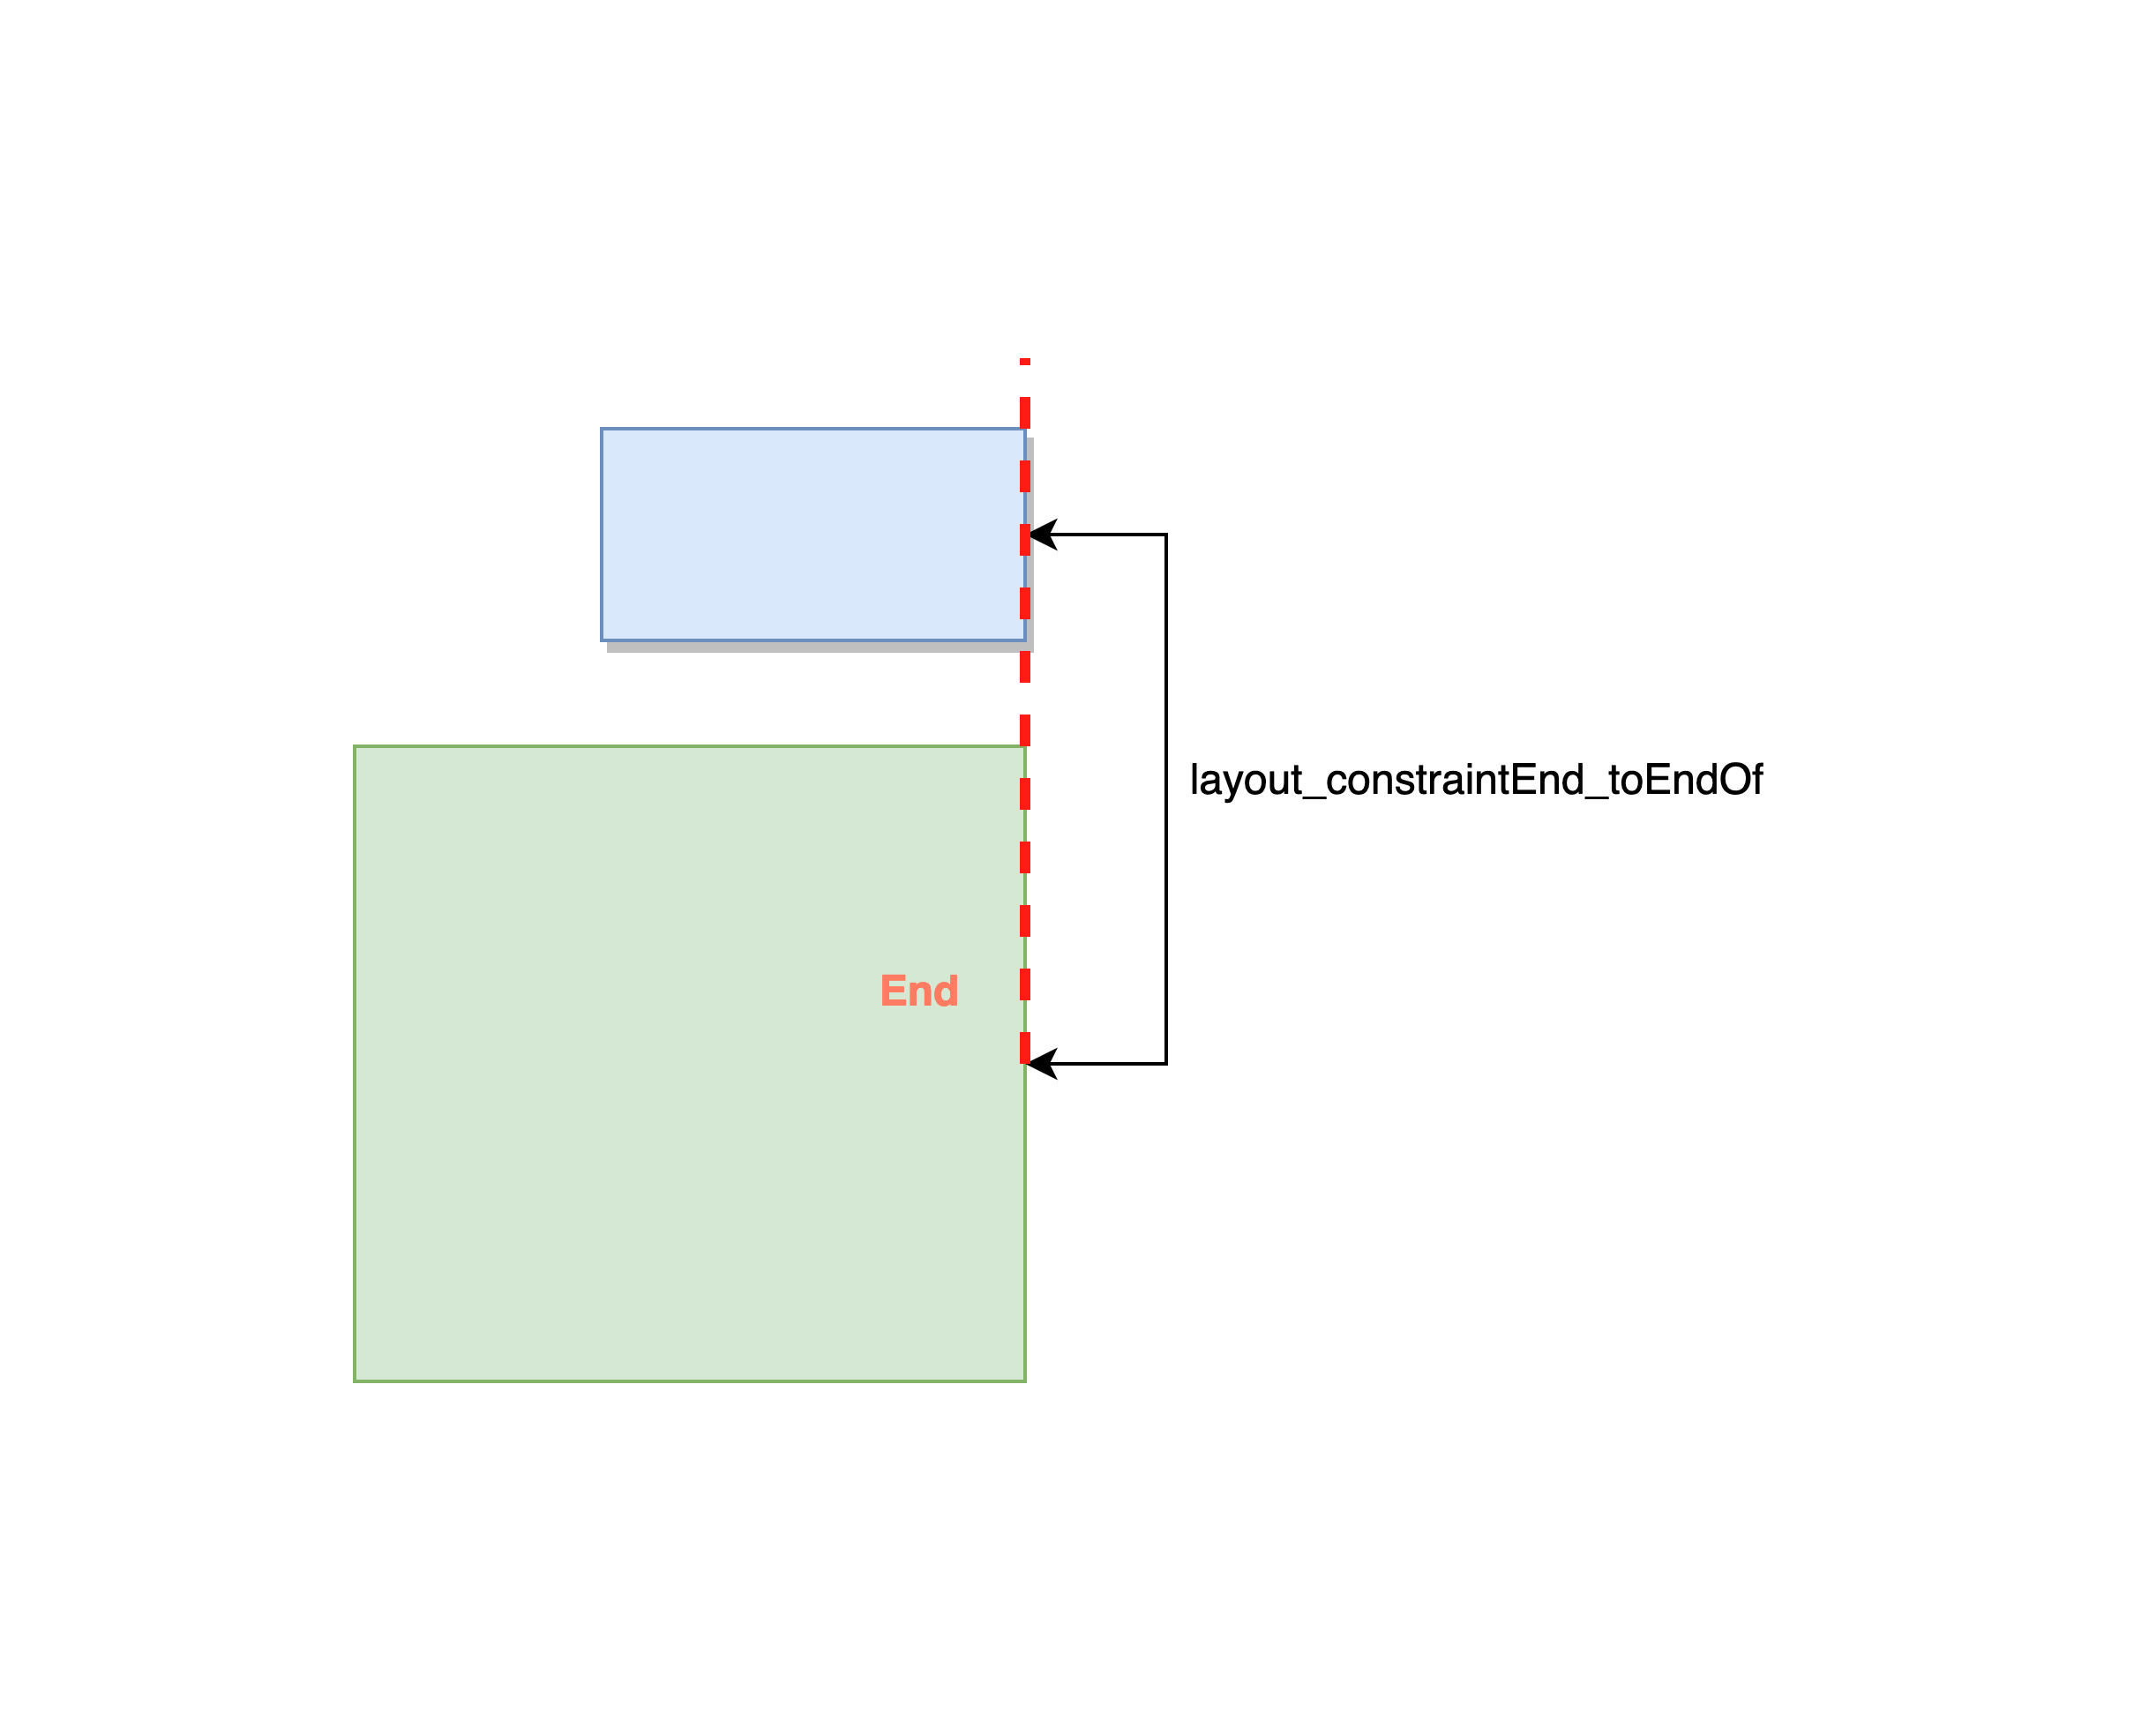
layout_constraintEnd_toEndOf
This constraint tells that the end of the source view should be the same as the end of the target view. As you can see in the image below, the end layer of green and end layer of blue views are in the vertical position.
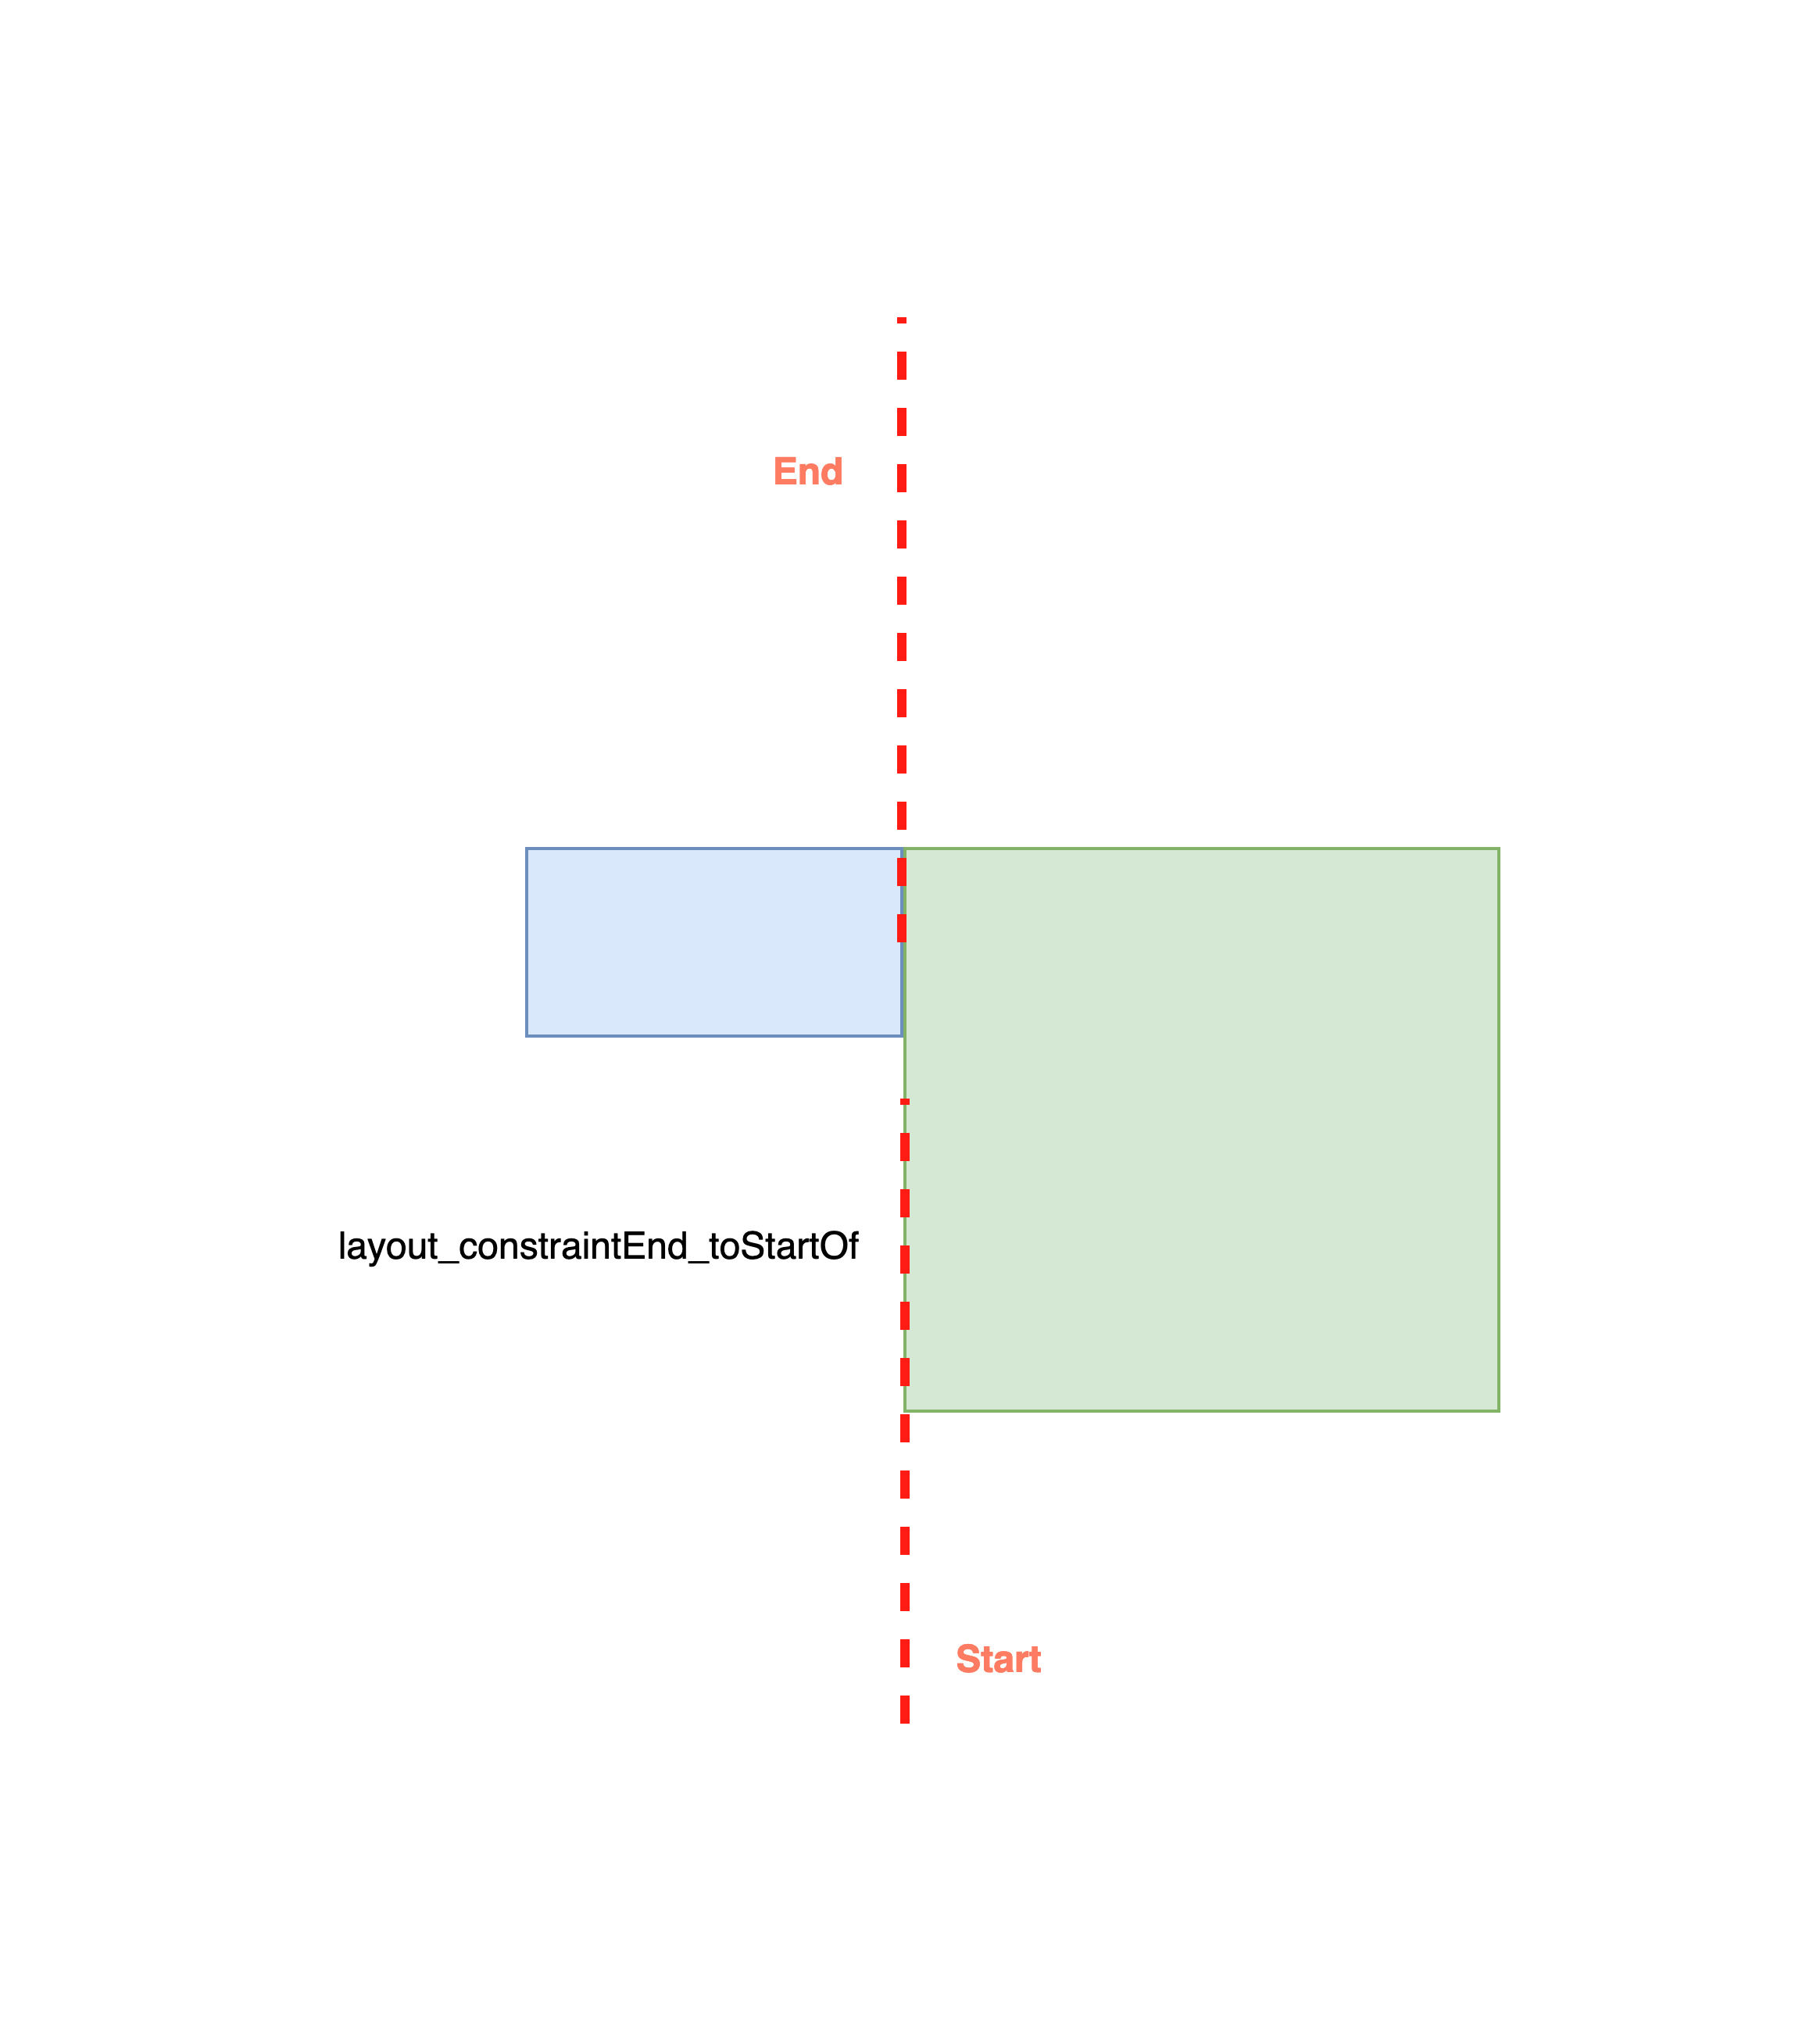
layout_constraintEnd_toStartOf
This constraint tells that the end of the source view should be aligned as the start of the target view. As you can see in the image below, the end layer of green and start layer of blue views are in the vertical position.
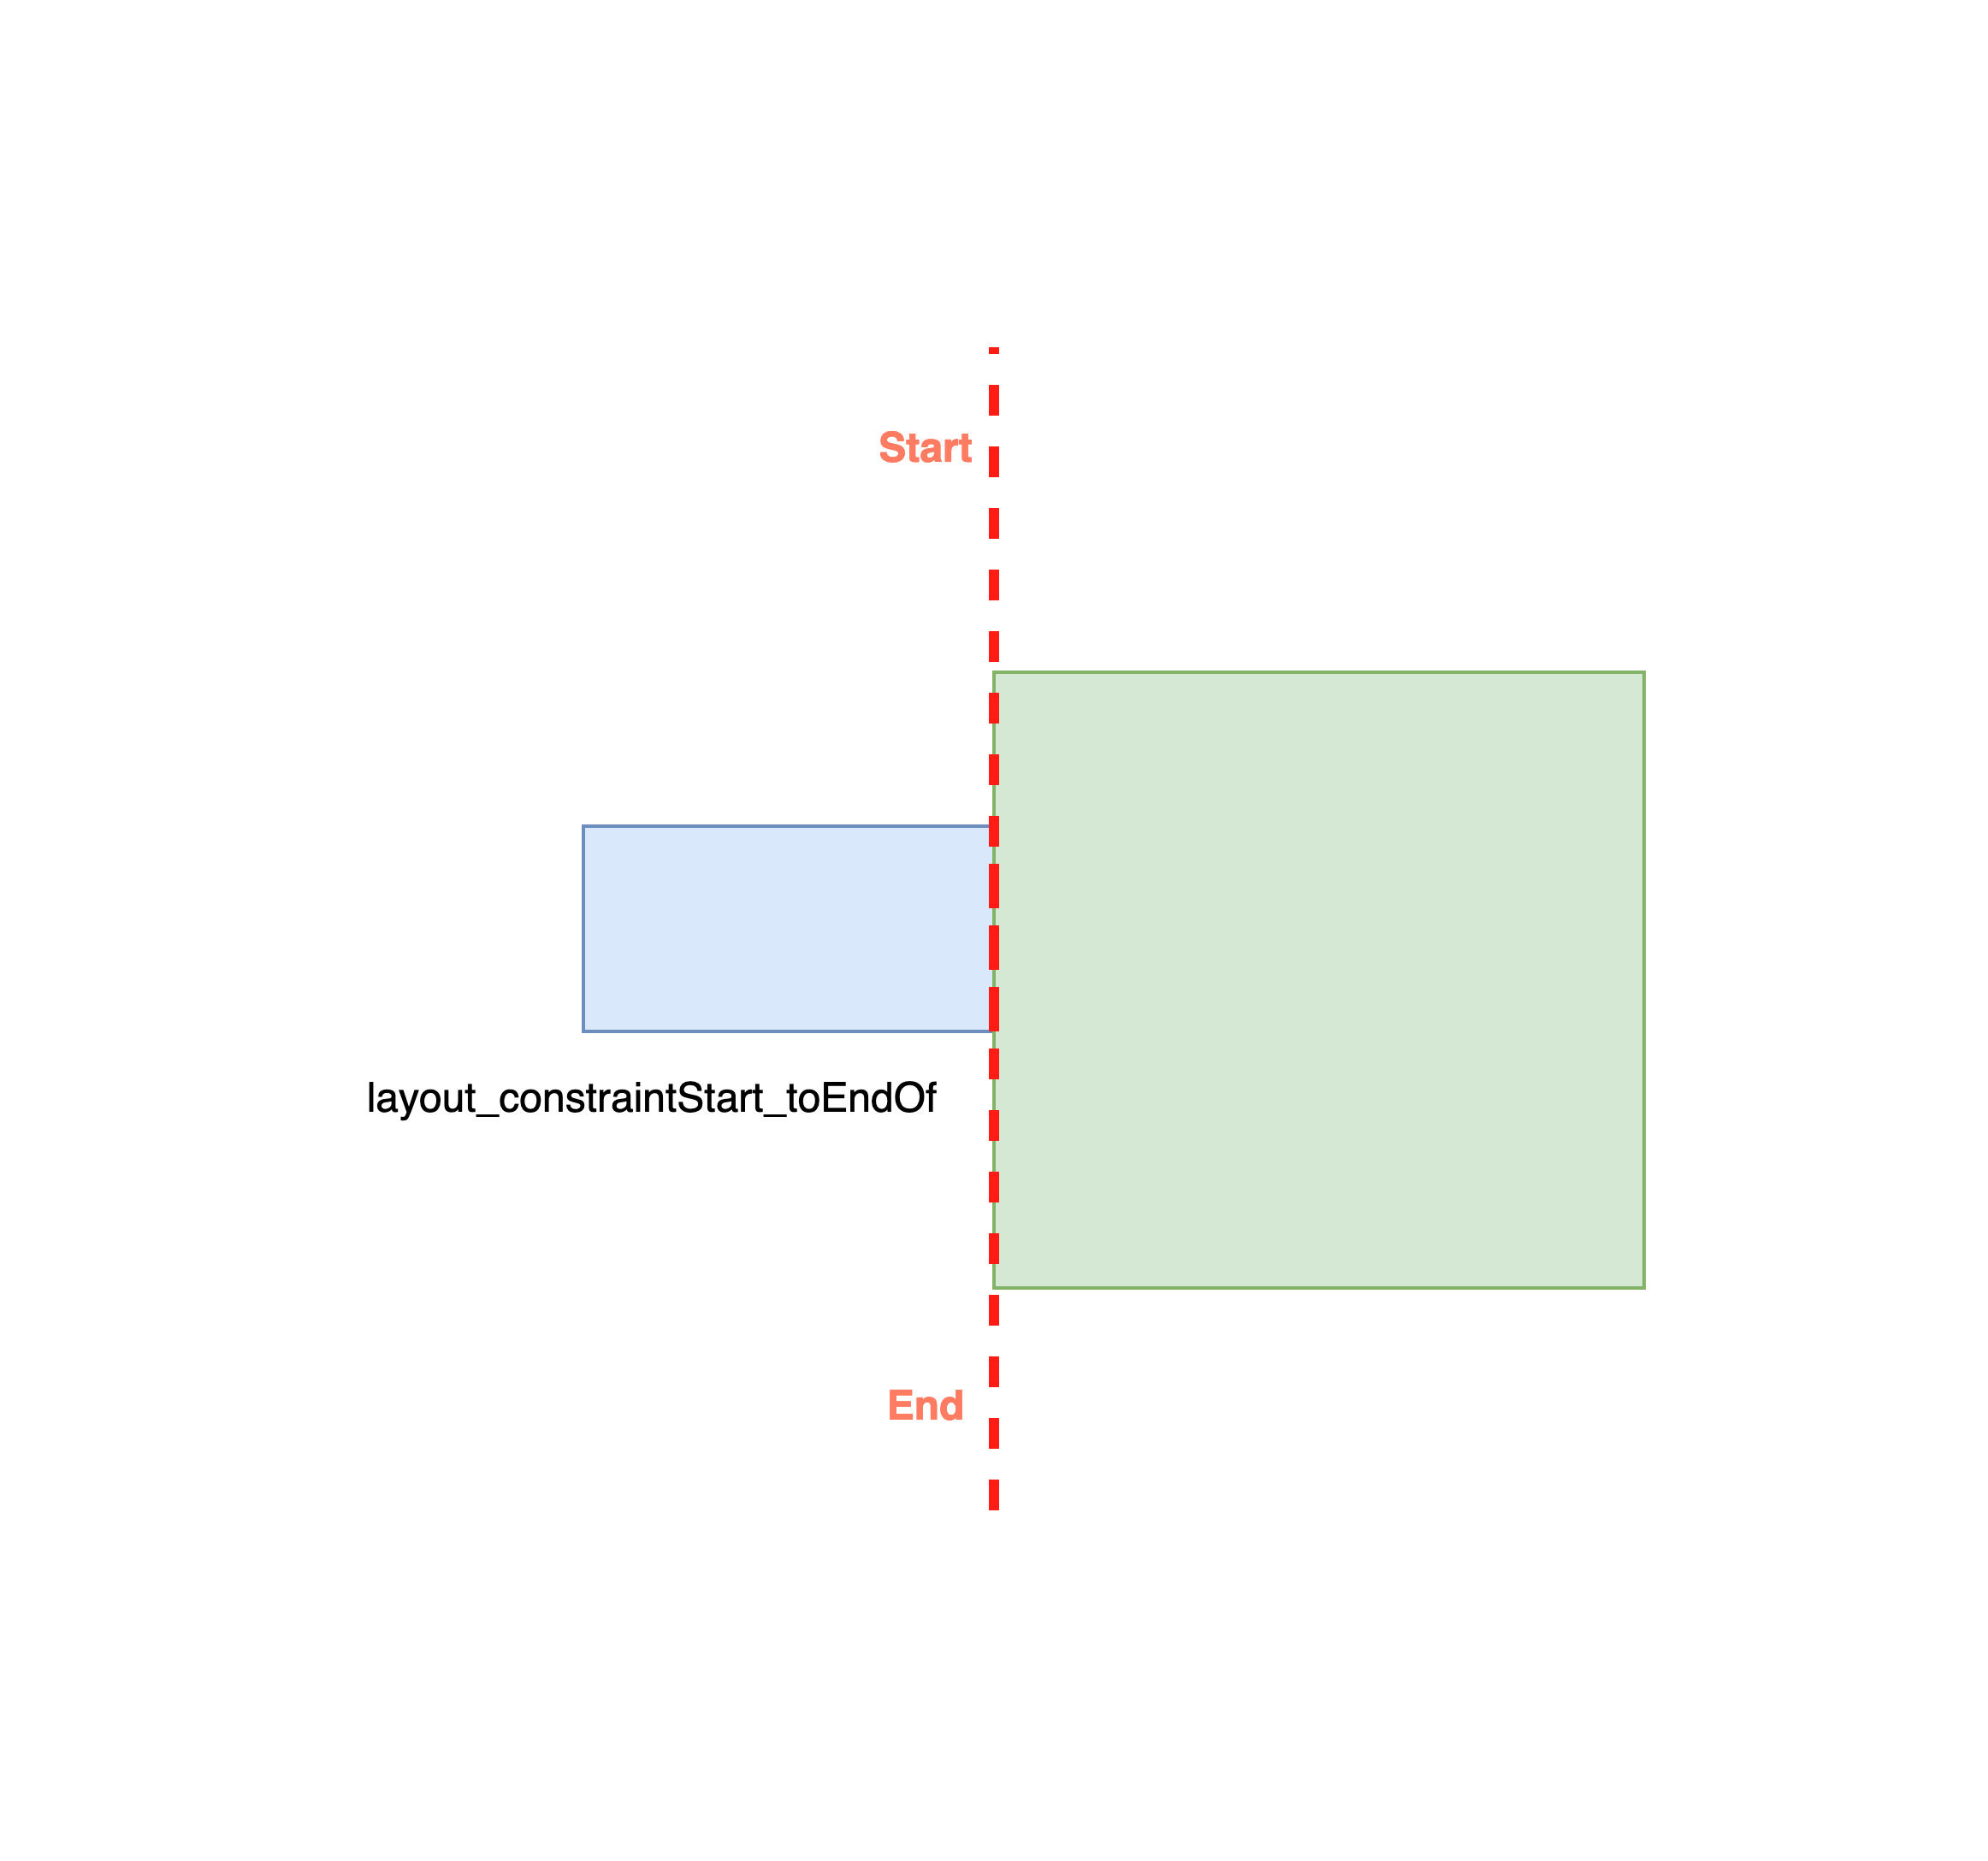
layout_constraintStart_toEndOf
This constraint tells that the start of the source view should be aligned as the end of the target view. As you can see in the image below, the start layer of green and end layer of blue views are in the vertical position.
With the help of these Constraints, you can align elements the way you want without the need of unnecessary nested layouts. One other advantage of constraints is that it will support any kind of screen size, whether it’s a phone or tablet or even watches.
Example
Here’s a small code example layout for a login screen.
<?xml version="1.0" encoding="utf-8"?>
<androidx.constraintlayout.widget.ConstraintLayout xmlns:android="http://schemas.android.com/apk/res/android"
   xmlns:app="http://schemas.android.com/apk/res-auto"
   xmlns:tools="http://schemas.android.com/tools"
   android:layout_width="match_parent"
   android:layout_height="match_parent">


   <TextView
       android:id="@+id/lblLogin"
       android:layout_width="wrap_content"
       android:layout_height="wrap_content"
       android:layout_marginTop="50dp"
       android:fontFamily="sans-serif-condensed-medium"
       android:text="Login"
       android:textColor="#000"
       android:textSize="20sp"
       app:layout_constraintTop_toTopOf="parent"
       app:layout_constraintStart_toStartOf="parent"
       app:layout_constraintEnd_toEndOf="parent" />

   <androidx.appcompat.widget.AppCompatEditText
       android:id="@+id/txtEmail"
       android:layout_width="match_parent"
       android:layout_height="wrap_content"
       android:layout_marginStart="10dp"
       android:layout_marginTop="60dp"
       android:layout_marginEnd="10dp"
       android:ems="10"
       android:hint="Write Your Email Here"
       android:inputType="textEmailAddress"
       android:minHeight="48dp"
       android:textColorHint="#000"
       app:layout_constraintTop_toBottomOf="@id/lblLogin"
       tools:layout_editor_absoluteX="89dp" />

   <androidx.appcompat.widget.AppCompatEditText
       android:id="@+id/txtPassword"
       android:layout_width="match_parent"
       android:layout_height="wrap_content"
       android:layout_marginStart="10dp"
       android:layout_marginTop="20dp"
       android:layout_marginEnd="10dp"
       android:ems="10"
       android:hint="Enter your Password"
       android:inputType="numberPassword"
       android:minHeight="48dp"
       android:textColorHint="#000"
       app:layout_constraintTop_toBottomOf="@id/txtEmail"
       android:importantForAutofill="no" />

   <TextView
       android:id="@+id/txtResetPassword"
       android:layout_width="wrap_content"
       android:layout_height="wrap_content"
       android:layout_marginTop="10dp"
       android:layout_marginEnd="5dp"
       android:fontFamily="sans-serif-black"
       android:text="Reset Password"
       android:textColor="#FF5722"
       android:textSize="14sp"
       app:layout_constraintEnd_toEndOf="@id/txtPassword"
       app:layout_constraintTop_toBottomOf="@id/txtPassword" />

   <Button
       android:id="@+id/btnLogin"
       android:layout_width="wrap_content"
       android:layout_height="wrap_content"
       android:text="Login"
       app:layout_constraintStart_toStartOf="parent"
       app:layout_constraintEnd_toEndOf="parent"
       app:layout_constraintTop_toBottomOf="@id/txtResetPassword" />


   <TextView
       android:id="@+id/btnRegister"
       android:layout_width="wrap_content"
       android:layout_height="wrap_content"
       android:layout_marginTop="10dp"
       android:fontFamily="sans-serif"
       android:text="Register"
       android:textSize="16sp"
       app:layout_constraintEnd_toEndOf="parent"
       app:layout_constraintStart_toStartOf="parent"
       app:layout_constraintTop_toBottomOf="@id/btnLogin" />


</androidx.constraintlayout.widget.ConstraintLayout>
Here’s how it looks like.
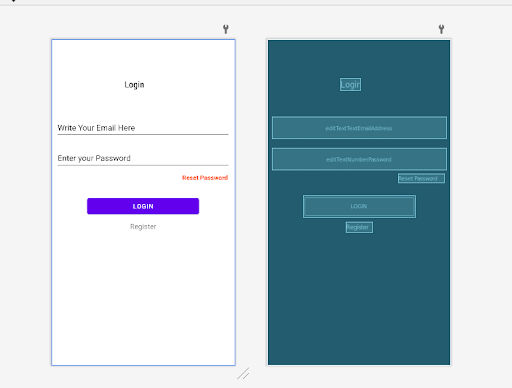
As you can see in the code, the Login text lblLogin is constrained from top, start, and end. This makes it to the top of the screen parent and aligns it in center horizontally as there are both start and end constraints.
The Email input text (txtEmail) is using width as match_parent, so it doesn’t need any start/end constraints. It’s only using layout_constraintTop_toBottomOf constraint with the lblLogin. This aligns it below the login label.
The Password input text (txtPassword) is using same approach as txtEmail. Only this is below the txtLogin.
The Reset Password (txtResetPassword) is using approach to txtLogin and txtPassword to be below the txtPassword input text. But it is also aligned at the end of the screen horizontally. For that, it is adding layout_constraintEnd_toEndOf=”parent”.
The Login button (btnLogin) is not the full size width, thus it have a wrap_content width. So, you will have to add start/end constraint as well. So this is aligned below txtResetPassword like the other views, but also adding start and end constraints to position in the center horizontally.
The Register button (btnRegister) is following the same approach of btnLogin. Only this is below the login button through constraintTop_toBottomOf constraint.
Hope this makes things clear with how constraints work and are added to make relationships with views for position and alignment in layouts.
What’s Next?
I hope beginners who just started learning constraint or using Constraint Layout will keep these basics things in mind. I would love to hear your feedback, so leave a comment below and share with others!
At the end, please Subscribe to my newsletter DroidUp to learn learn about the latest things, tips, and skills in Android development manually handcrafted and curated by Wajahat Karim.