Build a one-on-one Android chat app using Kotlin
This story was originally published with collaboration with CometChat Pro, and Alex Booker on their tutorials blog.
Once you’ve experienced the best of something, there has to be a good reason to downgrade. This is the kind of mentality users have about chat and it’s palpable. If a chat experience isn’t great, users commonly share their usernames on another platform and pick up the conversation there. You see this all the time on dating apps like Tinder or freelance platforms like Upwork.
As an indie Android developer, advanced chat features like read receipts or push notifications can be tricky and therefore time-consuming to implement which is why I look to CometChat.
CometChat is a flexible developer tool that bridges the gap between what users expect (a complete chat experience) and the technical requirements we face as Android developers. In this tutorial, we will build a chat application creatively named Chaty where users can communicate directly using the open-source CometChat Kotlin SDK:
 Chaty Demo
As you can see, when “Iron man” logs in, he appears “online” and when he joins the conversation, the message history is right there.
I encourage you to follow along but if you’re keen to read the source code, you can find it on GitHub.
To help you know what to expect, in this tutorial we will:
- Log in through CometChat user IDs
- View the list of all other users
- View user presence such as if the user is online or offline at this moment
- Send and receive chat messages to other users
- View logged in user profile details
- Log out from the application
CometChat is a hosted developer tool meaning the Kotlin SDK creates a secure connection to the CometChat platform. To follow along, you will need to create your CometChat application with a unique identifier. We will later specify this identifier in our Kotlin code when connecting to CometChat.
I won’t elaborate creating a free CometChat account in too much detail as I expect you will find it very easy.
Simply head to the dashboard where you’ll be prompted to login or create an account then create an app with any name like “ChattyTutorialApp”:
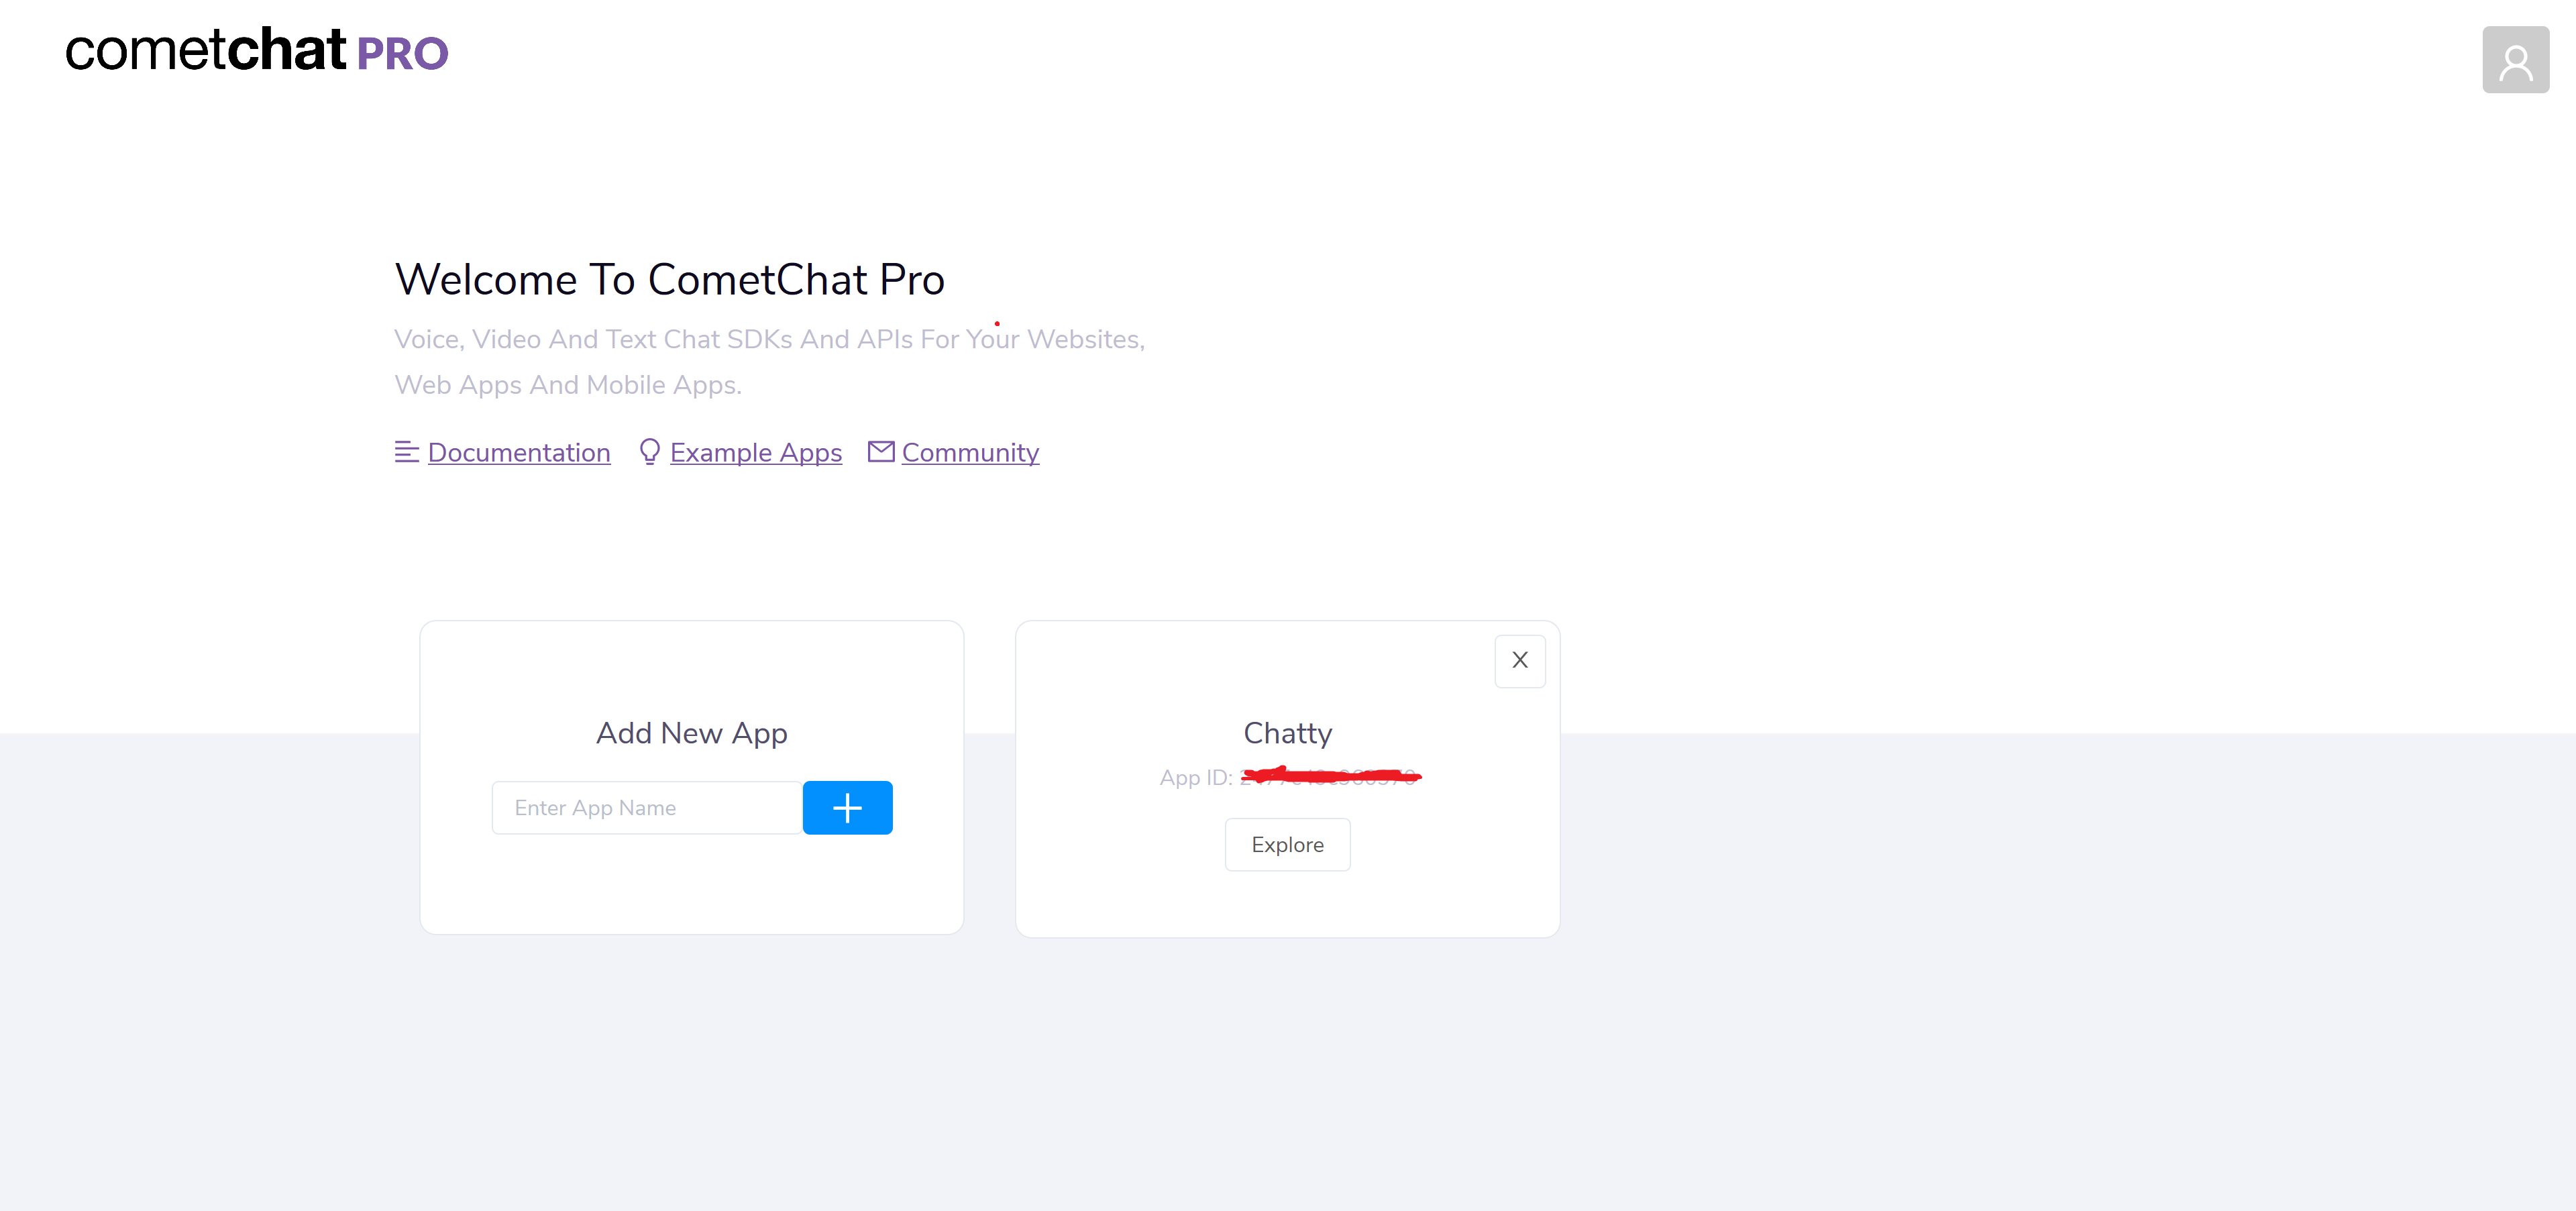
Click Explore then API Keys on the right-hand-side:
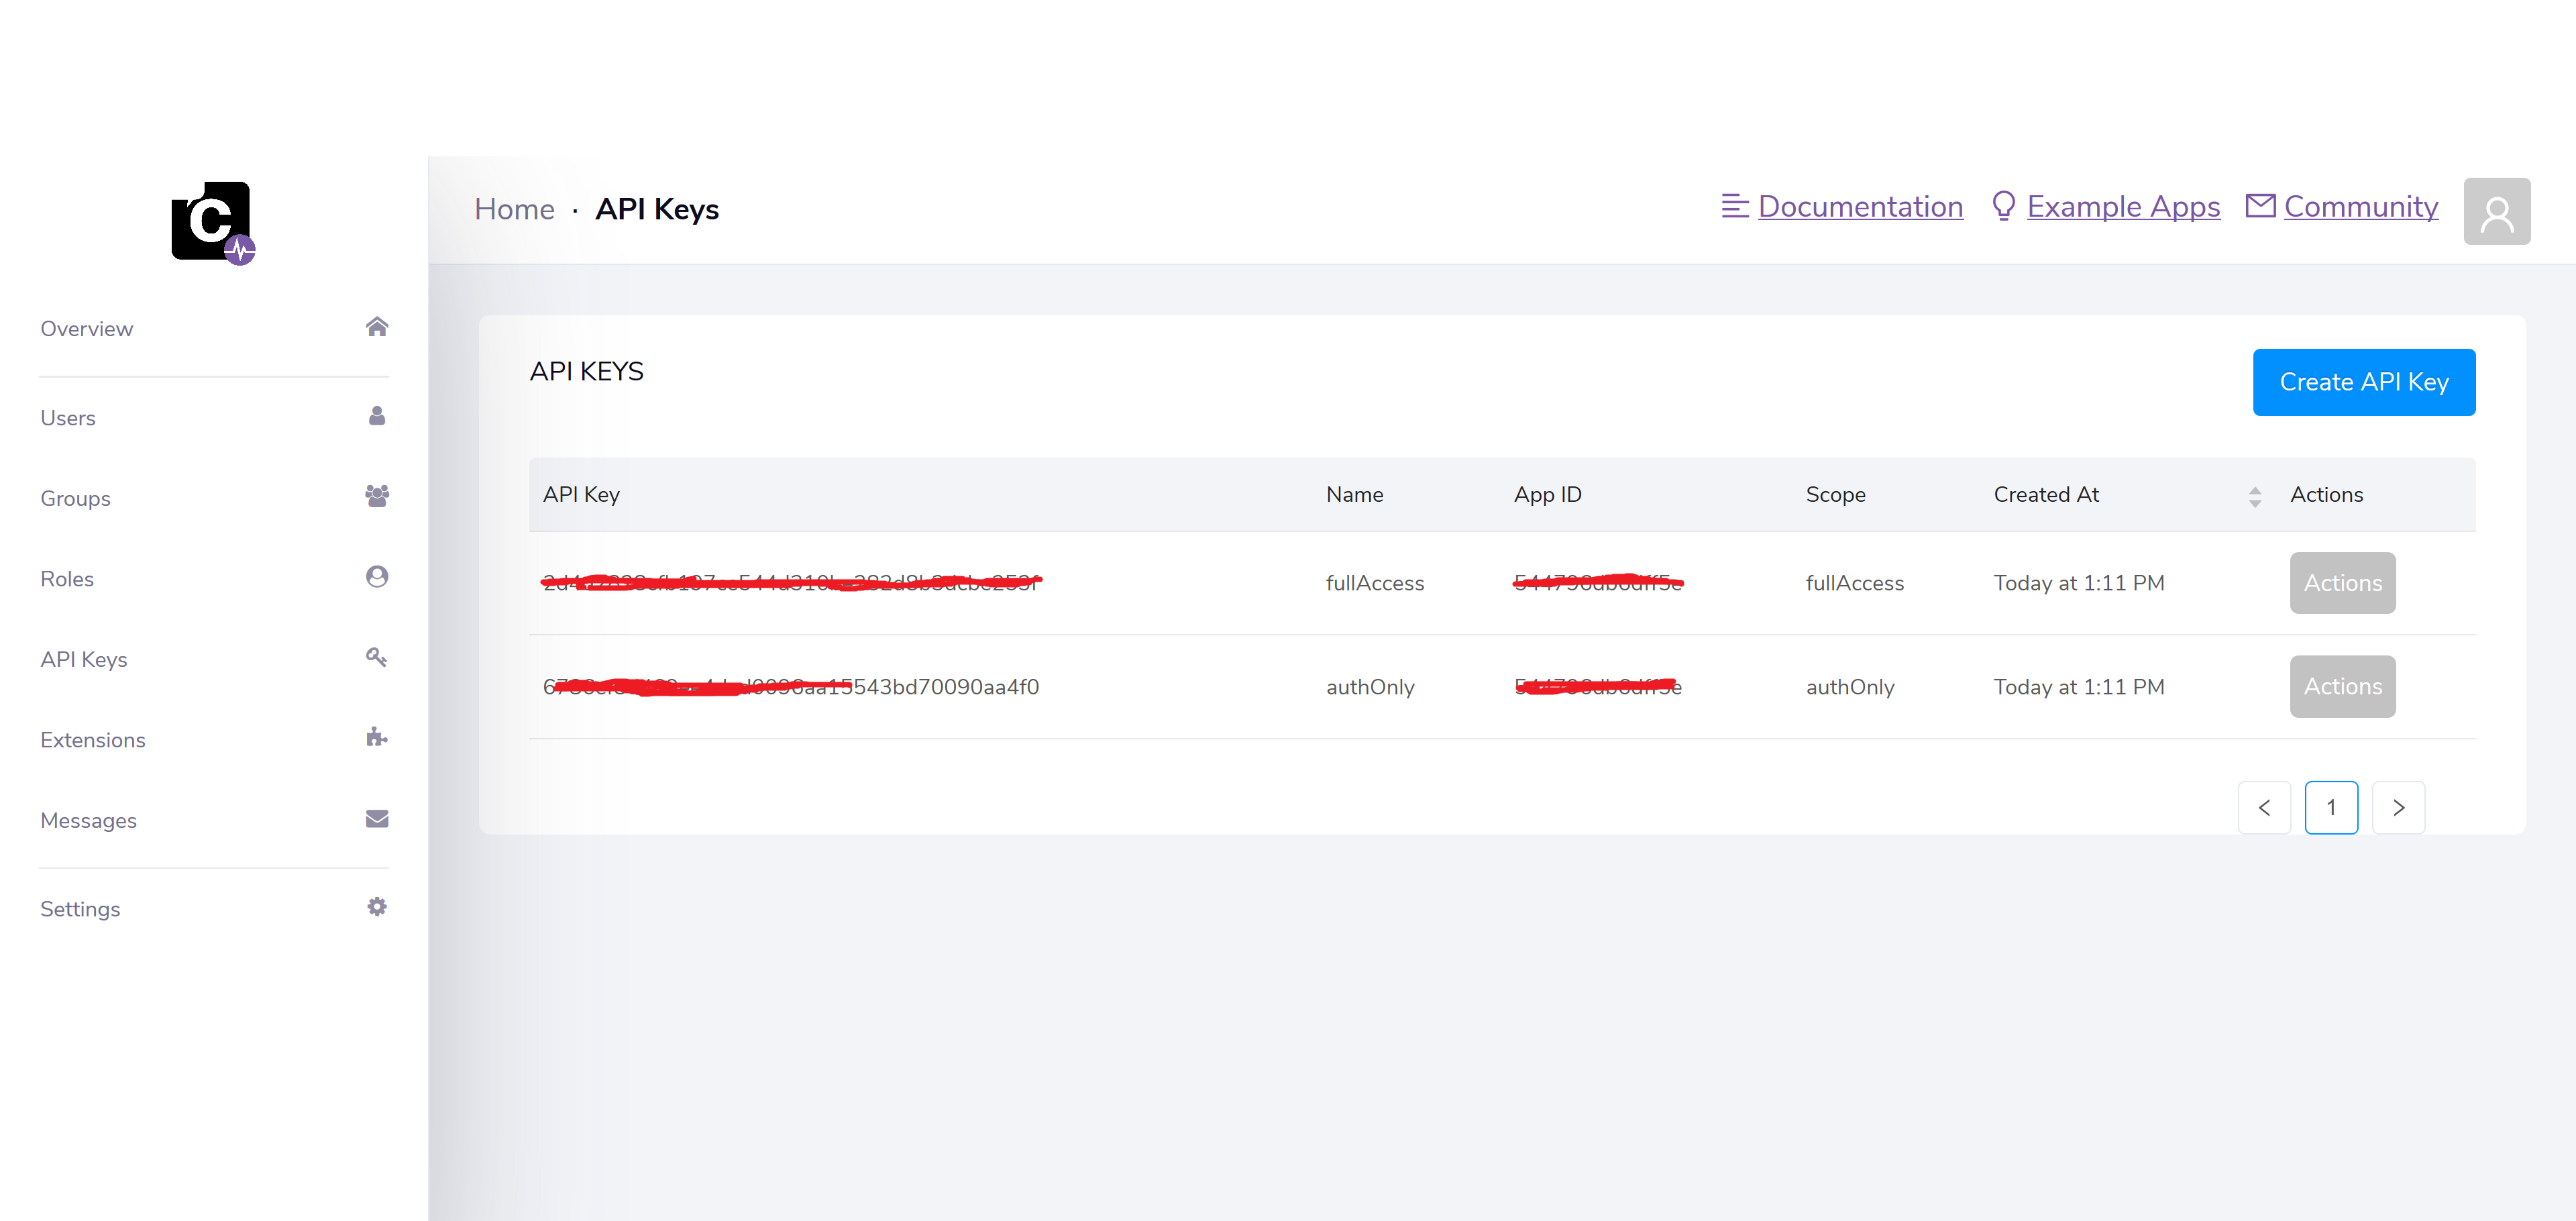
Note both the fullAccess key and App ID as we will need them in a moment.
To follow along, it would be handy if you have some experience with Android and Kotlin. Rather than touch on fundamental concepts like layouts, the RecyclerView and so, I have created a starting point for us and uploaded it to a branch called start-here
Assuming you are comfortable with Git you can run this command to download the repository:
git clone -b start-here https://github.com/wajahatkarim3/Chaty
Once downloaded, open this project in Android Studio and run this in any emulator or Android device. I am using Android Studio 3.4.2 version, but the app should run on any version from 3.2 or later.
Once your app is ready, you can see that the app has dummy data on all screens. This code includes different Activity, RecyclerViewAdapter classes, XML layout files, resources etc.
Adding CometChat dependency in Android app
To integrate CometChat SDK in your Android app, you need to add CometChat dependencies in Android project’s Gradle files. So, start by adding the maven lines from the below snippet in the project level’s root build.gradle file:
allprojects {
  repositories {
    // ....
    // Other Mavel URLs
    // ...

    maven {
      url "https://dl.bintray.com/cometchat/pro"
    }
    maven {
      url "https://github.com/jitsi/jitsi-maven-repository/raw/master/releases"
    }
   }
}
Now, add the CometChat SDK in the app level’s build.gradle file by adding the folllowing line:
dependencies {
  // Other Depenencies like AppCompat, ConstraintLayout, Glide, etc.
  implementation 'com.cometchat:pro-Android-chat-sdk:1.5.+'
}
Also, you need to add abiFilters in the defaultConfig section like the snippet below:
defaultConfig {
  // ....
  // Other Configs
  // ...

  ndk {
    abiFilters "armeabi-v7a", "x86"
  }
}
Adding CometChat App ID and API keys in the app
Now you’ve installed the necessary dependencies, you need to add the App ID and API key in the code for the CometChat SDK. You can get these from the CometChat dashboard as discussed earlier. Copy these values and put those in the strings.xml file.
<resources>
    <string name="app_name">Chaty</string>
    <string name="comet_app_id">YOUR_COMET_APP_ID</string>
    <string name="comet_api_key">YOUR_COMET_API_KEY</string>
</resources>
Your unique app ID identifies your application and your application’s settings.
Normally it would be advisable to use an authOnly key and to authorize users with a password or token before allowing them access to your chat. For this tutorial, we are using the almighty and dangerous fullAccess key. Keep this private in production.
Initializing CometChat in the app
Now you have dependencies and keys in your app, let’s initialize CometChat. You can do this when the app is started in your launcher activity or splash activity or preferably in your Application file. Open the ChattyApp.kt file from your code and put the bold lines from the snippet below in the onCreate() method.
class ChattyApp : Application() {

    override fun onCreate() {
        super.onCreate()

        CometChat.init(this, getString(R.string.comet_app_id), object : CometChat.CallbackListener<String>() {
            override fun onSuccess(p0: String?) {
                Log.d("ChattyApp", "Initialization completed successfully!")
            }

            override fun onError(exception: CometChatException?) {
                Log.e("ChattyApp", "Initialization failed with !" + exception?.localizedMessage)
            }
        });
    }
}
Log in through CometChat user IDs
CometChat does not handle authentication or authorization however, we make it seamless for you to tie CometChat to your existing users’ database or authentications service (like our friends at Auth0.
Normally you would wite some custom code to test if a user is authorised and if they are — send an ephemeral token. For education purposes we will be using the pre-issued and almighty fullAccess token:
 Chaty Login Demo
Although you will need your users’ databse with passwords (and most likely associations with other data specific to your app), there is also a concept of a CometChat user. In a nutshell, you need to create a CometChat user for each user who connects to your chat. You can do this from the dashboard or using our platform API. Altenatively, we give you some test users of superheroes with the IDs SUPERHERO1, SUPERHERO2, SUPERHERO3, SUPERHERO4, and SUPERHERO5. We’ll be using these users in this tutorial.
CometChat provides a login() method for logging in any user. Let’s use that here like the code below.
CometChat.login(userId, getString(R.string.comet_api_key), object : CometChat.CallbackListener<User>() {
    override fun onSuccess(user: User?) {

        // Hide Progress Bar
        progressLoading.visibility = View.GONE
        btnLogin.visibility = View.VISIBLE
        txtUsername.isEnabled = true

        if (user != null)
        {
            // Go to Contacts screen
            var intent = Intent(this@LoginActivity, ContactsActivity::class.java)
            startActivity(intent)
            finish()
        }
        else
        {
            Toast.makeText(this@LoginActivity, "Couldn't find the user", Toast.LENGTH_SHORT).show()
        }
    }

    override fun onError(exception: CometChatException?) {

        // Hide Progress Bar
        progressLoading.visibility = View.GONE
        btnLogin.visibility = View.VISIBLE
        txtUsername.isEnabled = true

        Toast.makeText(this@LoginActivity, exception?.localizedMessage ?: "Unknown Error Occurred!", Toast.LENGTH_SHORT).show()
    }
})
The code is pretty self-explanatory. You’re passing userId along with the fullAccess API key in the login() method. This will dispatch either onSuccess() or onError() callback methods. If the user is successfully logged in, the app is navigating to the contact screen which will show the list of all other users of the app.
View the list of all other users
Once the user is logged in, the app will show the Contacts screen with all other users registered in CometChat dashboard. At this moment, we’re using test superhero users of CometChat, so you will see the list of those superheroes. If your app needs features like friends or followers, this is the place where you can integrate it.
CometChat SDK provides a UserRequest class, through which you can configure what kind of users you need and then you can load those users with fetchNext() method.
// Load All Users from CometChat
var usersRequest = UsersRequest.UsersRequestBuilder().setLimit(10).build()
usersRequest.fetchNext(object : CometChat.CallbackListener<List<User>>() {
    override fun onSuccess(usersList: List<User>?) {
        if (usersList != null)
        {
            var loggedInUser = CometChat.getLoggedInUser()
            for (user in usersList)
            {
                // Don't add yourself (logged in user) in the list
                if (loggedInUser.uid != user.uid)
                {
                    contactsList.add(user.convertToUserModel())
                }
            }

            // Update the Recycler Adapter
            recyclerAdapter.notifyDataSetChanged()
        }
        else
        {
            Toast.makeText(this@ContactsActivity, "Couldn't load the users!", Toast.LENGTH_SHORT).show()
        }

        // Hide Progress
        progressLoading.visibility = View.GONE
        recyclerContacts.visibility = View.VISIBLE
    }

    override fun onError(exception: CometChatException?) {

        // Hide Progress
        progressLoading.visibility = View.GONE
        recyclerContacts.visibility = View.VISIBLE

        Toast.makeText(this@ContactsActivity, exception?.localizedMessage ?: "Unknown error occurred!", Toast.LENGTH_SHORT).show()
    }
})
We’re creating a UserRequest with UserRequestBuilder class, and setting a maximum limit of users to 10 with the setLimit() method. You might want to adjust this for your app.
The fetchNext() method dispatches a callback with onSuccess and onError methods. The rest is easy. The code adds the list of users from onSuccess in the RecyclerView and shows it to the user.
 Chaty Contacts List
View user presence such as if the user is online or offline at this moment
User presence is usually a very attractive feature of any chat application. Without this, any chat app and mail app doesn’t have much difference. CometChat provides this feature in a very easy and simple way using addUserListener() method like the code below.
val listenerID = "UNIQUE_LISTENER_ID"

// Add Online/Offline Listener
CometChat.addUserListener(listenerID, object : CometChat.UserListener() {
    override fun onUserOffline(offlineUser: User?) {
        super.onUserOffline(offlineUser)
        setUserStatus(false)
    }

    override fun onUserOnline(user: User?) {
        super.onUserOnline(user)
        setUserStatus(true)
    }
})
When the users’ visibility changes, either onUserOffline or onUserOnline method gets called and you can perform your actions in these callback methods. We’ve used this code in ContactsActivity and ChatActivity classes to show the other users presence.
 Chaty User Presence
Send and receive chat messages to other users
Before sending messages, you need to fetch the already existing messages for that particular conversation. You can do this through MessageRequest class like the code below.
var messagesRequest = MessagesRequest.MessagesRequestBuilder()
    .setUID(it.uid)
    .build()

messagesRequest.fetchPrevious(object : CometChat.CallbackListener<List<BaseMessage>>() {
    override fun onSuccess(msgList: List<BaseMessage>?) {
        // Add the msgList in your existing RecyclerView adapter here
    }

    override fun onError(exception: CometChatException?) {
        Toast.makeText(this@ChatActivity, exception?.localizedMessage ?: "Unknown error occurred!", Toast.LENGTH_SHORT).show()
    }
})
You can see how easy and consistent the SDK is. The UID for message request is the unique identifier for the conversation. Chaty is generating this ID by combining both user IDs in alphabetic order. So, whoever opens that chat gets the same UID and thus loads the same conversation messages.
Now to send the message to another user, you can use sendMessage() method and pass the object of TextMessage class.
val receiverID: String = "RECEIVING_USER_ID"
val messageText = "Message Text Goes Here"
val messageType = CometChatConstants.MESSAGE_TYPE_TEXT
val receiverType = CometChatConstants.RECEIVER_TYPE_USER

val textMessage = TextMessage(receiverID, messageText, messageType,receiverType)

CometChat.sendMessage(textMessage, object : CometChat.CallbackListener<TextMessage>() {
    override fun onSuccess(p0: TextMessage?) {
      // Message sent. You can show the delivery ticks here
    }

    override fun onError(p0: CometChatException?) {
      // Message sending failed
    }
})
Now, to receive the messages from another user in real-time, you need to add a listener through addMessageListener().
CometChat.addMessageListener("Conversation_ID", object : CometChat.MessageListener() {
    override fun onTextMessageReceived(message: TextMessage?) {
        // You can add this message in your RecyclerView adapter
    }
})
When your chat screen is closed or inactive, you should stop listening to the messages by removing the listener.
CometChat.removeMessageListener("Conversation_ID")
 Chaty Chat Conversation
View logged in user profile details
For the profile screen in Chatty app, you need to fetch the logged in users’ data. For that, CometChat provides us the getLoggedInUser() method.
val user = CometChat.getLoggedInUser()
if (user != null)
{
  // User is logged in.
  val name = user.name
  val id = user.uid
  val photoUrl = user.avatar
}
else
{
  // No User logged in
}
We’re using this method in ProfileActivity class to show the basic name, ID, and photo of the current logged in user along with the logout button.
 Chaty Profile
Log out from the application
Finally, we’ve reached the last section of logging out the user. Like all other methods of CometChat SDK, we have logout() method to clear the current existing session for the CometChat. We’ve used this code in the OnClickListener of the logout button in ProfileActivity class like this.
CometChat.getLoggedInUser()?.let {
    CometChat.logout(object : CometChat.CallbackListener<String>() {
        override fun onSuccess(p0: String?) {
            // Starting Login screen
            val intent = Intent(this@ProfileActivity, LoginActivity::class.java)
            intent.addFlags(Intent.FLAG_ACTIVITY_CLEAR_TOP)
            intent.addFlags(Intent.FLAG_ACTIVITY_CLEAR_TASK)
            intent.addFlags(Intent.FLAG_ACTIVITY_NEW_TASK)
            startActivity(intent)
            finish()
        }

        override fun onError(exception: CometChatException?) {
            Toast.makeText(this@ProfileActivity, exception?.message ?: "Unknown Error Occured!", Toast.LENGTH_LONG).show()
        }
    })
}
This code checks if the user is logged in or not. If yes, then it logs out the user through CometChat.logout() button and then closes all the existing open activities. Finally, it opens the login screen.
 Chaty Logout
Conclusion
In this tutorial, you built a simple chat application with an aesthetic UI. You learned how easy it is to use CometChat and how powerful features like user presence, sending messages, etc can be implemented with not so much effort in a very clean and optimized way. This allows you, as a developer, to focus on the business logic and things that matter most rather than spending time on technical difficulties and minor issues.
I hope you found this tutorial helpful. Don’t forget to check the official documentation of CometChat Pro to explore further. Find the complete source code of Chaty app and this tutorial here on GitHub.
Originally published at https://www.cometchat.com on July 29, 2019.
If you liked this article, you can read my new articles below:


🔥 Google Developer Expert (GDE) in Android . 📱 Professional Android Developer with ~10 years experience. 💻 Creator of various Open Source libraries on Android . 📝 Author of two technical books and 100+ articles on Android. 🎤 A passionate Public Speaker giving talks all over the world.

